igolgi Stream Engine
- Getting Started
- Dashboard
- Transcoding
- Job History
- Documentation
- API Keys
- Billing
- API
- API Documentation
- Creating cURL Jobs
- Go Examples
- Javascript Examples
- Ruby Examples
- Python Examples
- Stream videos with HTML-DASH and HLS
- Curl - Check Job Status
- Tutorials
- Trial vs Paid
- Using Tar
- Troubleshooting
- About Us
Getting Started
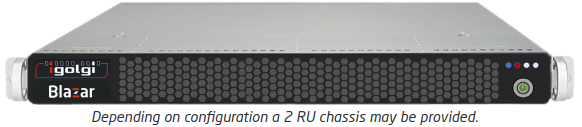
Stream Engine is a professional video compression transcoder from igolgi who has been making transcoder products for broadcast, cable and internet streaming companies for the past 15 years. Over 500 companies use igolgi products to serve their customers daily. Stream Engine is the cloud version of igolgi's iLUX file VoD transcoder which is used primarily for VoD transcoding in large cable TV systems. Stream Engine has processed millions of video titles and is extremely robust to the varieties of video and audio technologies.
Stream Engine is now the cloud version of this proven technology and igolgi is adding features to it daily to meet the fast paced demands of the industry. If there is something you would like to see please leave us a comment on the dashboard page. Our Chicago engineering team will get back to you normally in 2 business days.
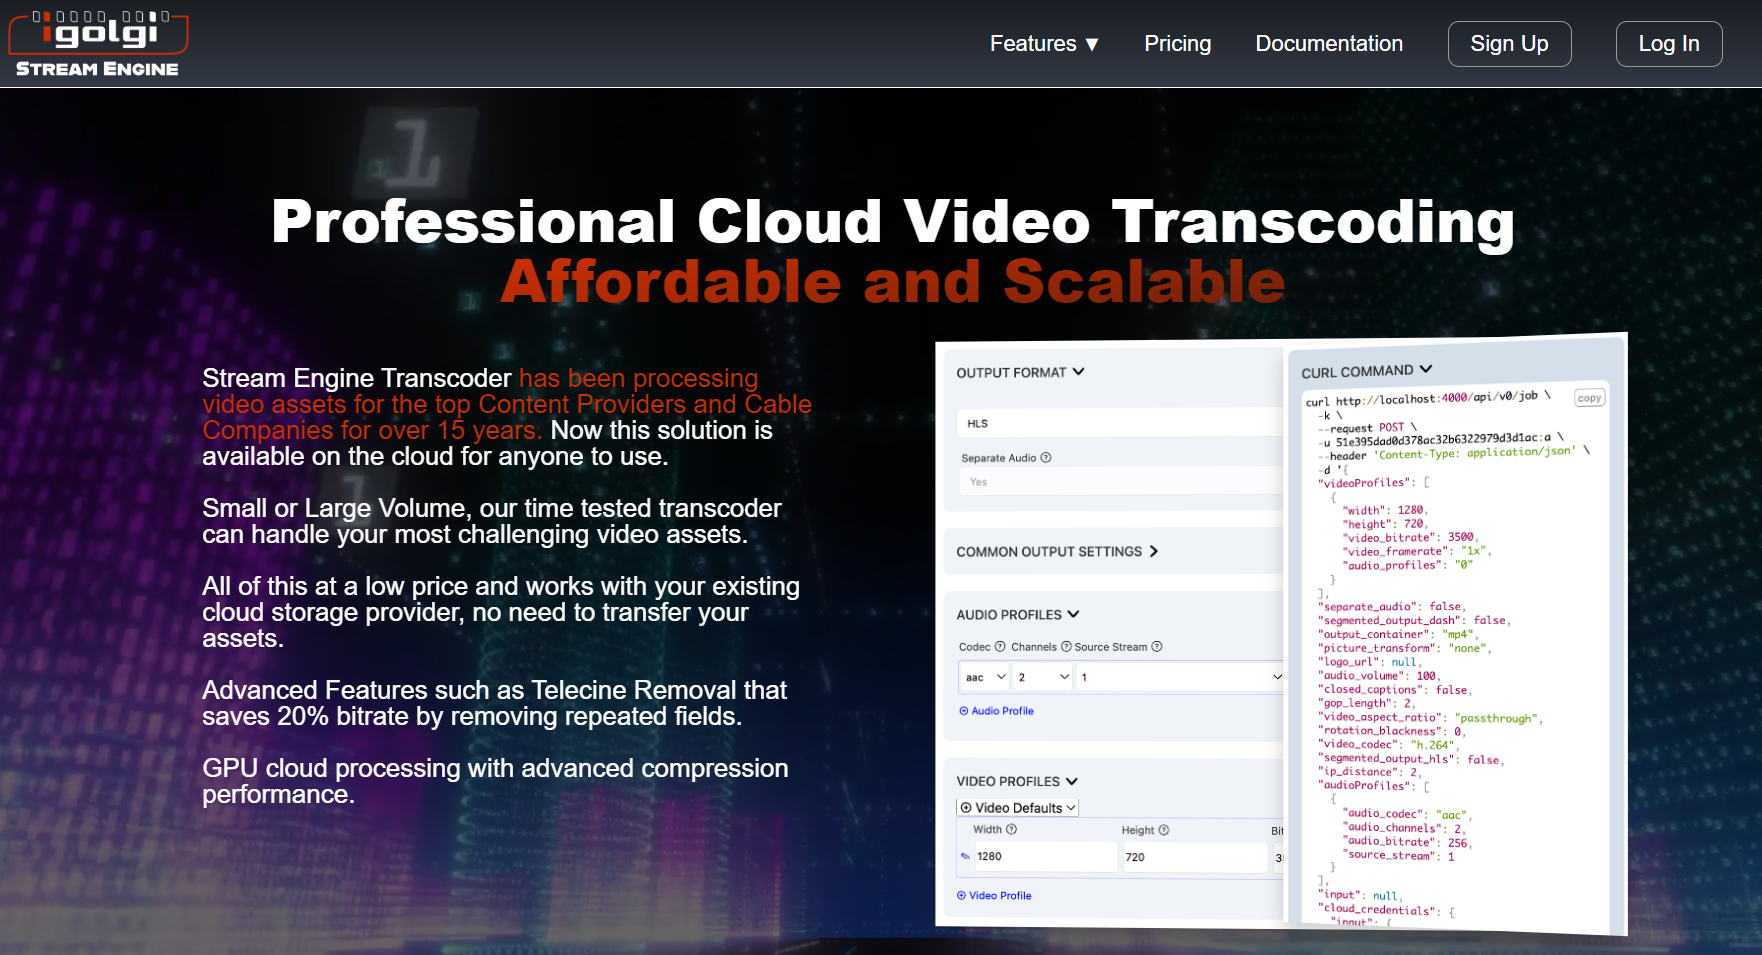
To Get Started, Click "Log In" in the upper right hand corner of the home page, or if you have not signed up yet select the "Sign Up" button
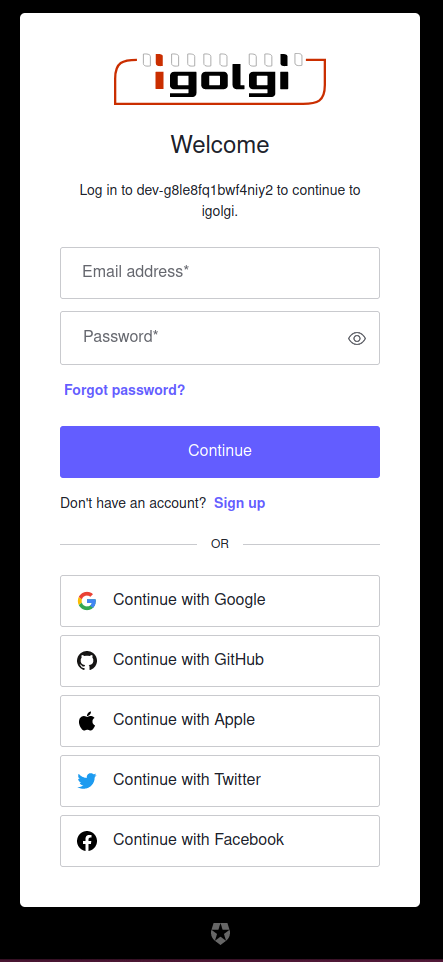
Login with your email address and password or sign up for a free account.
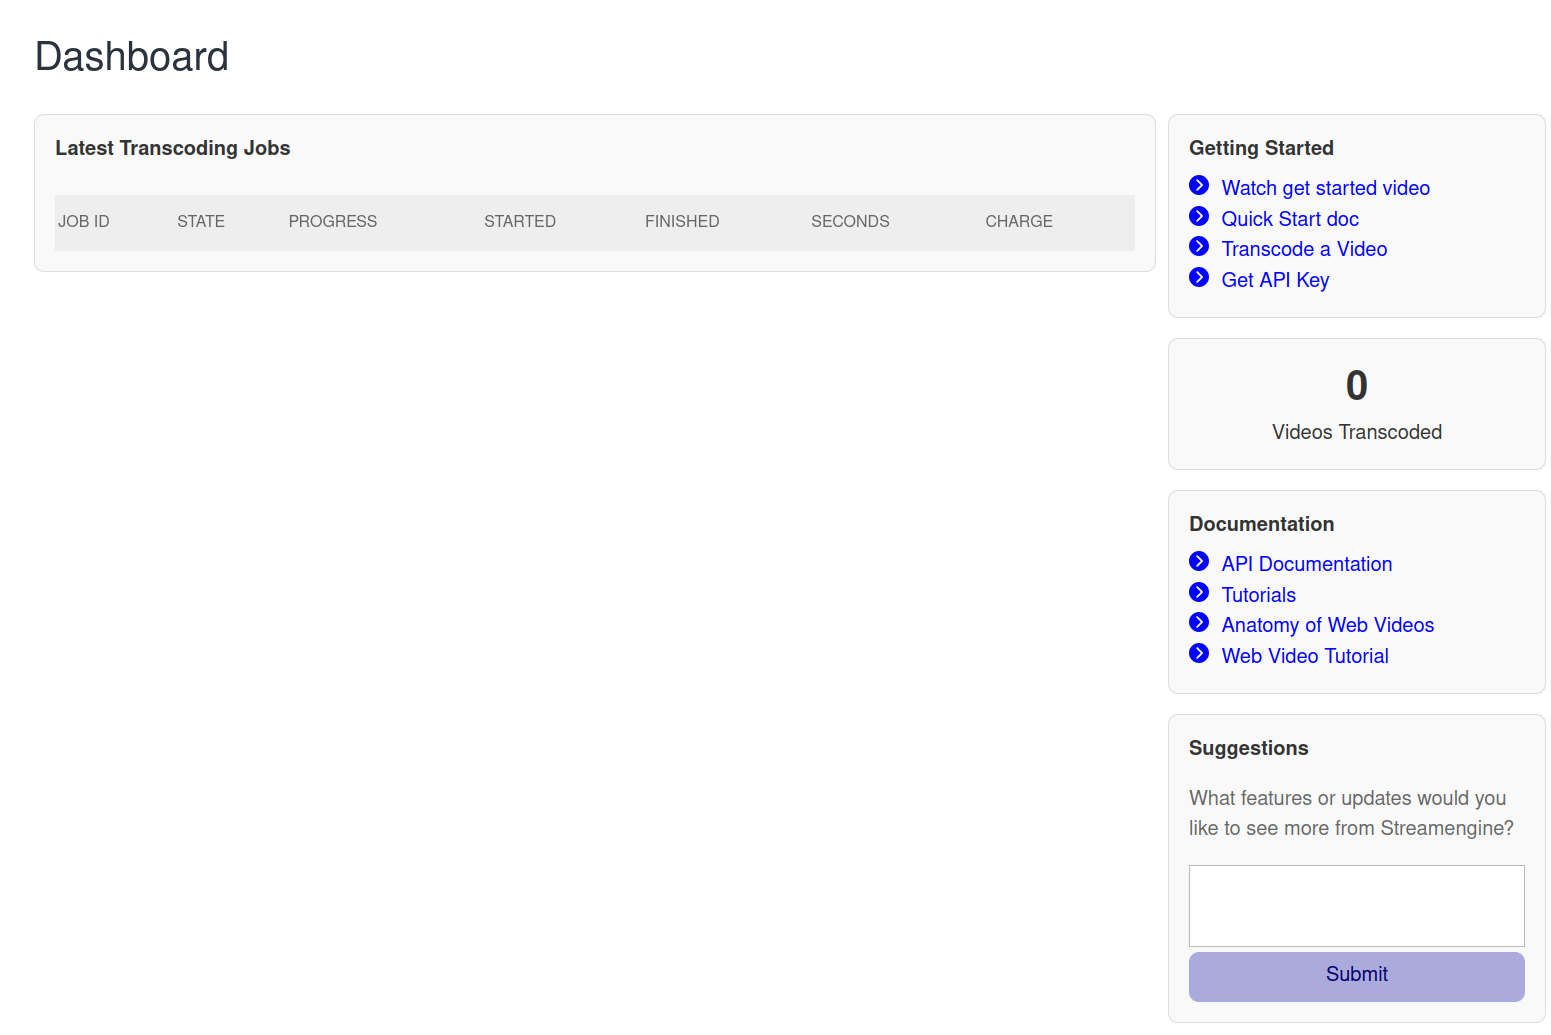
After you sign in you will be on the dashboard page (yours may look different) the dashboard gives you an overview of the system.
If you are new, click on documentation, tutorials or jump into the Transcoding page and get started with your first job. With the trial account you have 14 days of usage and can run 1 minute test files.
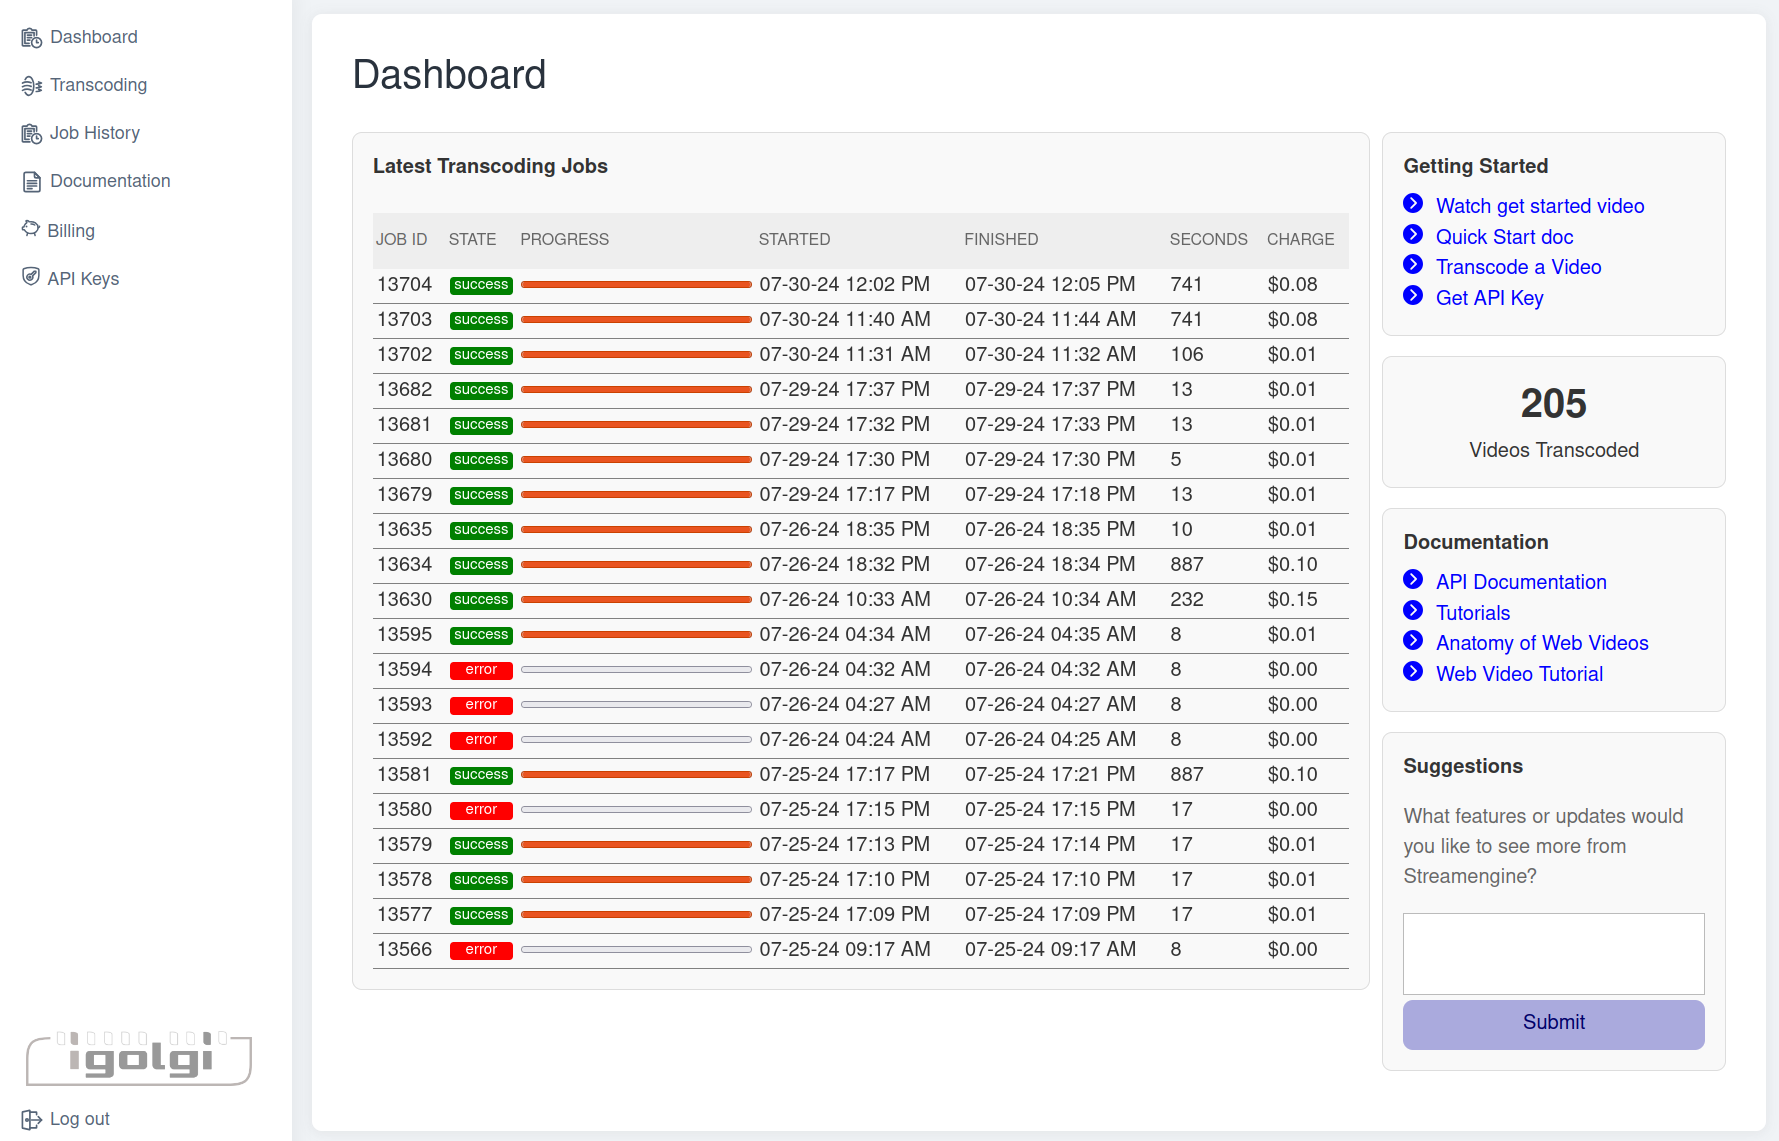
Dashboard
Dashboard is the first page you come to after you login to streamengine, it gives you a starting point to see jobs that you might have run over night depending on your subscription level.
the main sections are the pages list, in the left hand column. Days remaining in the banner if you are running in trial mode. The dashboard section shows the latest jobs that were run. If you need more information click on the job history page.
Transcoding
The Transcoding page is where all of the magic happens. Users can drag and drop files, while power users can link up cloud data storage from (aws, google and oracle clouds), use templates, curl and or API calls to batch their high volume jobs.
Please Note: This page is a dynamic page which changes based on what has been selected, your page may look different. Choosing cloud resources, separating audio from video, adding multiple audio tracks and using video ladders adds more complexity to this page. Drag and drop, using temporary storage and video files with embedded audio reduces complexity.
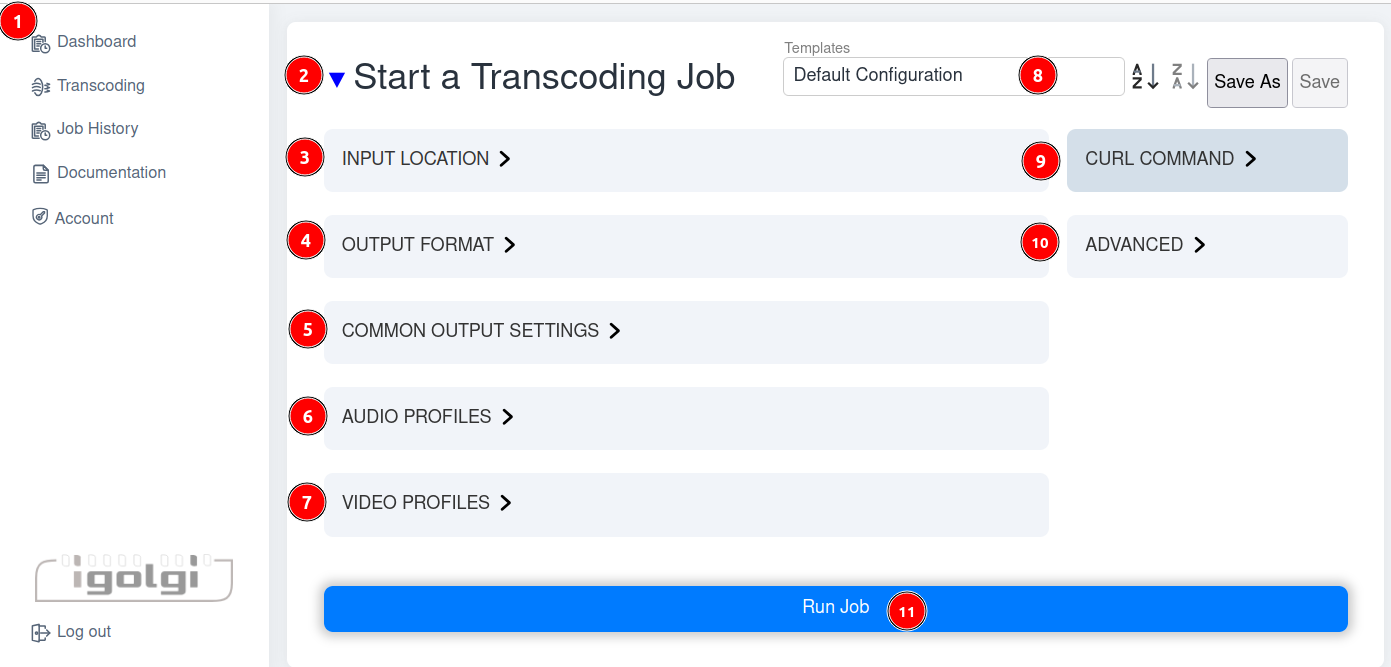
Transcoding Page Overview
1.) Access other Pages, Home page and Log out
Access any page by clicking on it in the left menu.
2.) Blue Triangle
This page can be very advanced, generally start with the blue triangle pointed down and only expose the options you want to turn on. Once you get comfortable with this you can use more options by clicking the triangle to the up position.
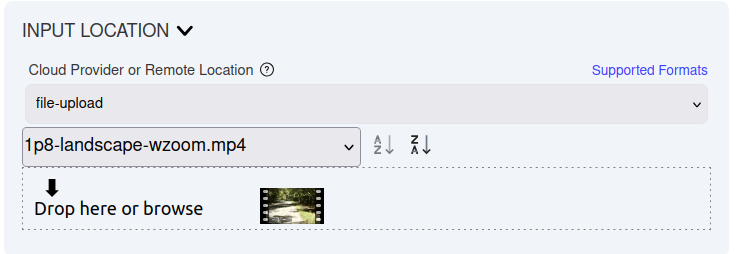
3.) INPUT LOCATION
Where is the input video file located? file-upload (default), aws, gcloud, oracle cloud, or any http or https URL. With file-upload you can drag and drop a video file from your web browser. As the file is uploading do not close the web browser that you are on. Open a second browser window if you want to do additional work while you wait for the file to upload.
To use AWS, google cloud or Oracle cloud see detailed settings in documentation below.
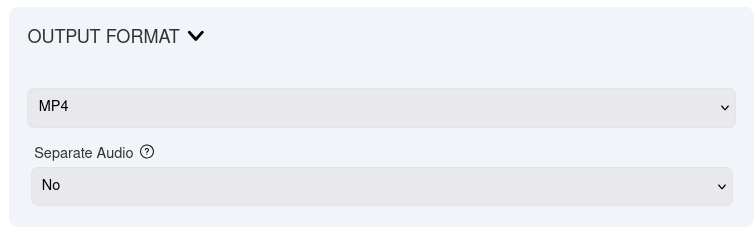
4.) OUTPUT FORMAT
Select output format MP4, TS, DASH, HLS or DASH+HLS. Separate Audio
5.) COMMON OUTPUT SETTINGS
Save converted file to Igolgi-store or a cloud provider. Set video codec, h.264 (AVC), h265 (HEVC) or mpeg2. Picture Transform none, deinterlace or detelecine/deinterlace
6.) AUDIO PROFILES
Codec AAC, AC3, MP2; Channels 2 (stereo), 6 (5.1); source stream 1 - 8; Bitrate (kbps) 32 -768; Downmix to Stereo; Dialnorm 0 - 31db and option for up to 3 multiple tracks.
7.) VIDEO PROFILES
Presets or ladders; width x heigh; bitrate; framerate .5x - 2x; and options for up to 5 videos using audio settings above.
8.) Templates A-Z Z-A Save As Save
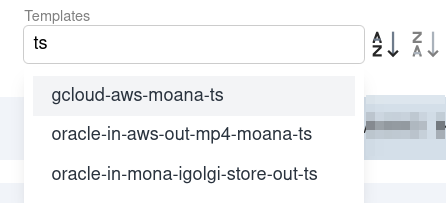
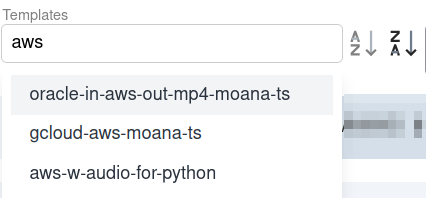
When you login for the first time the Default Configuration template should be the current template. Default Configuration is set up for easy access to drag and drop and convert to help you get started fast. If you modify the template you can select "Save As" to save it under another name. Select "Save" if you want to save it under the same name. If you have a lot of templates you can sort them A-Z or reverse sorting Z-A, this is a toggle so if selected it will stay selected. The template field is also searchable, just start typing and you will see templates that match the patterns you are typing so you might want to think about names you want to use for your templates.
| Search templates with "ts" sort A-Z |
Search templates with "aws" sort Z-A |
|
|
|
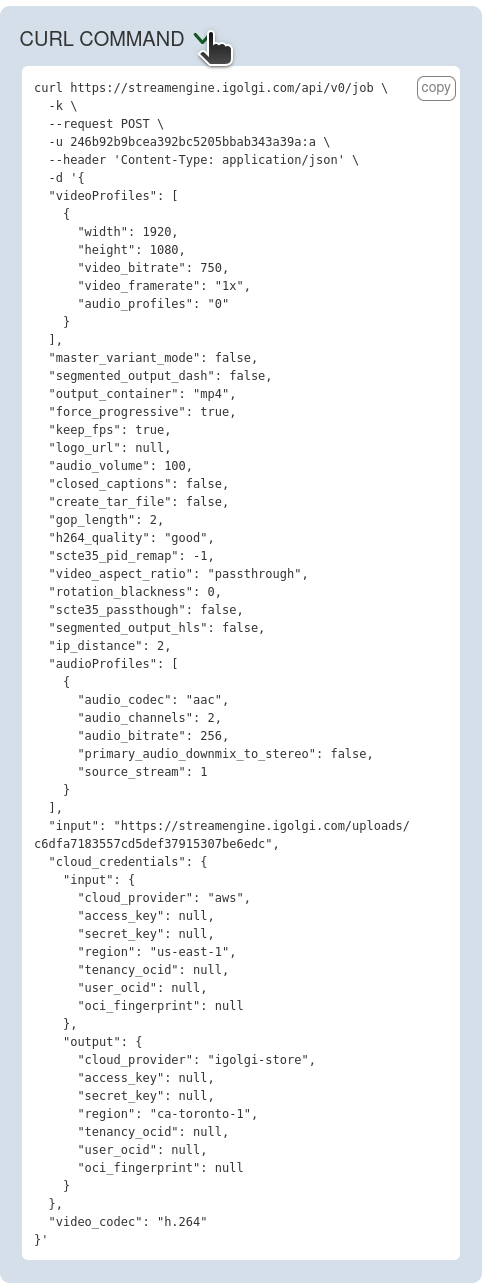
9.) CURL COMMAND
Advanced option for power users to submit the job through a command url or curl.
10.) ADVANCED
Insert logo, change audio volume, create tar or tar.gz file instead of single files, video quality good, better or best (only displays when h.264 is selected); IP frame distance; GOP Length; Aspect Ratio and Rotation Options, Passthrough, 4:3, 16:9, Invert Aspect Ratio, Rotate Counterclockwise, Rotate Clockwise, Rotate Counterclockwise & Invert Aspect Ratio, Rotate Clockwise & Invert; Rotation Side Panel Transparency; and Closed Captions
11.) Run Job
Once your job settings are set, click run job to transcode your video
Input Location
Where is the video file that you want to convert? Options: cloud: aws, oracle, google; http(s), or file-upload. Each option selected will change this section of the form.
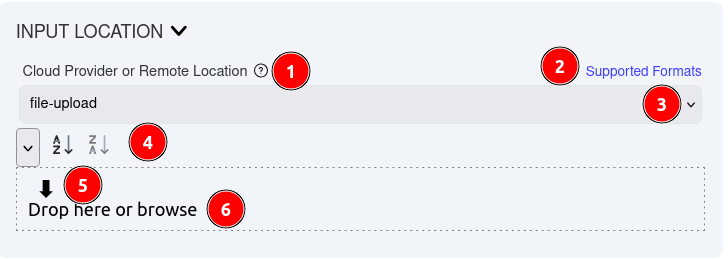
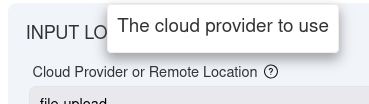
1) Clicking on the question mark in the circle will pop up a little more help, although using this manual other documentation or user forums may provide additional help.
2) Click on Supported formats to see what kinds of inputs are supported, please note this list may change. Theses formats are for input containers and are still subject to codecs we support.

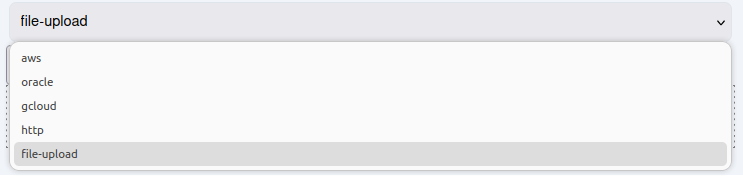
3.) Click on input location dropdown list. For new users file-upload is the default, after you use stream engine it will remember the last setting. Please note: selecting a saved template may change this field. The following options will be explained below.
4.) This drop down will show a list of temporary files that have been uploaded, if you have a few of them you can sort them based on the first character of the name in the A-Z or Z-A
5.) Click on the green arrow if you want o browse for a file to upload.
6.) You can also drag and video files into this box
Input Location - Dropdown list
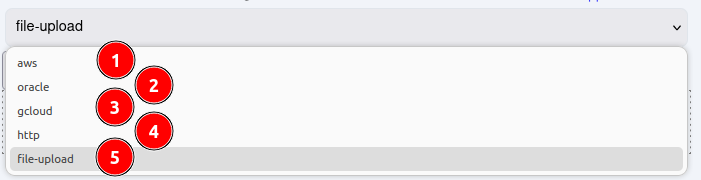
Cloud providers for video input
If you are using any cloud providers please make sure you save your templates, when you are done configuring them. All of the fields under the cloud provider are required and will need to be filled in to run properly. Wild cards are not supported at this time, if you want to batch process videos you will need to use scripts either with curl or api.
Please Note: Fields that are required will have a red box around them. Depending on settings and options you choose different fields may be required.
1.) AWS
AWS - Amazon Web Services one of the oldest and largest cloud providers. AWS offers a free tier and paid tier if you need more resources. It will require a credit card to signup. To use with StreamEngine we recommend S3 buckets* (their file system) make sure you have some sort of permissions on your files so that you stay within your budget. *AWS has many options for file storage that you can use as well.
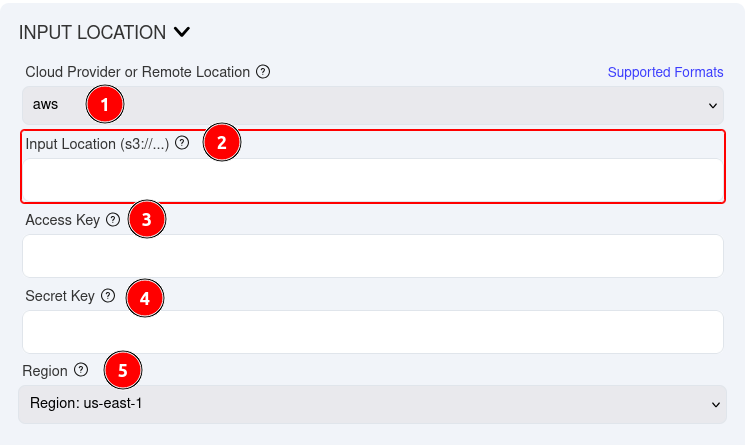
- If using Amazon Web Services select AWS in the pull down.
- Use your input file location on AWS starting with S3:// be sure to put the full name of the file with extension.
- Paste your Access Key into the Access Key field.
- Paste your Secret Key into the Secret Key field.
- Select the Region in the drop down list.
Please Note: Fields that are required will have a red box around them. Depending on settings and options you choose different fields may be required. For AWS
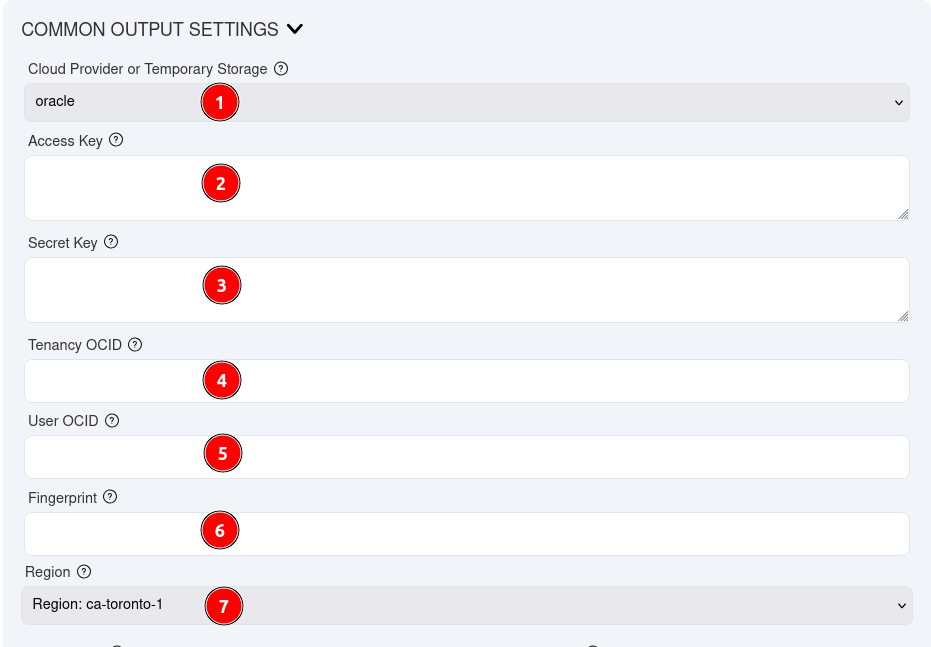
2.) Oracle Cloud
Oracle Cloud Infrastructure is provided by Oracle corporation, the makers of the leading database used by corporate America as well as other products. Oracle cloud is used by StreamEngine for temporary storage. Oracle cloud has a free tier and limited trial as well. For use with StreamEngine you will need Oracle File Storage and security to restrict access.
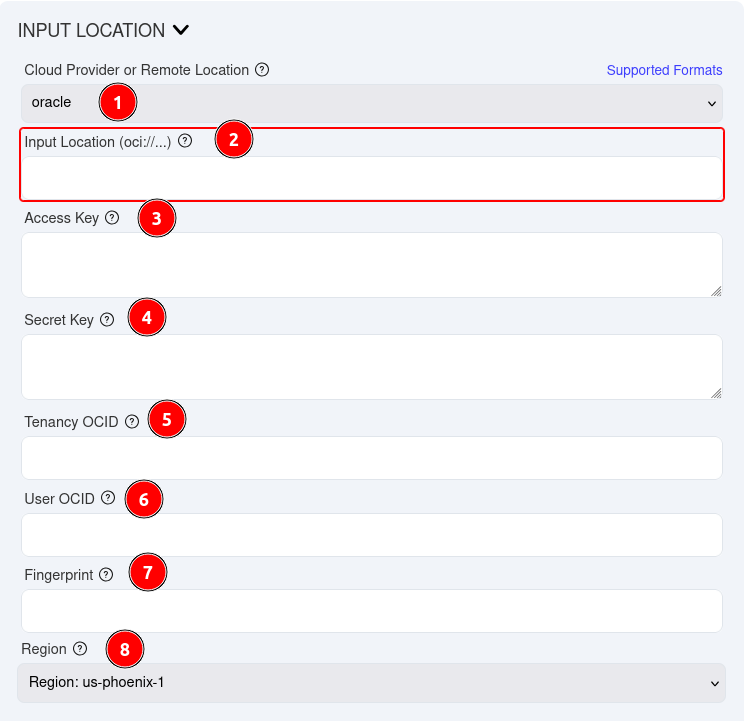
1.) If using Oracle Cloud Infrastructure (OCI) select oracle in the pull down.
2.) Use your input file location full path including file extension on oracle starting with oci://
3.) Paste your Access Key into the Access Key field.
4.) Paste your Secret Key into the Secret Key field.
5.) Paste your tenancy ocid into the Tenancy OCID field, it may start with ocid1.tenancy.oc1
6.) Paste your user ocid into the User OCID field, it may start with ocid1.user.oc1
7.) Paste your oci fingerprint into the Fingerprint field, it should have colons (:) inside of it.
8.) Select the Region in the drop down list.
Optional - Save this as a template so it remembers your settings.
3.) Google Cloud
Google Cloud is provided by Google.
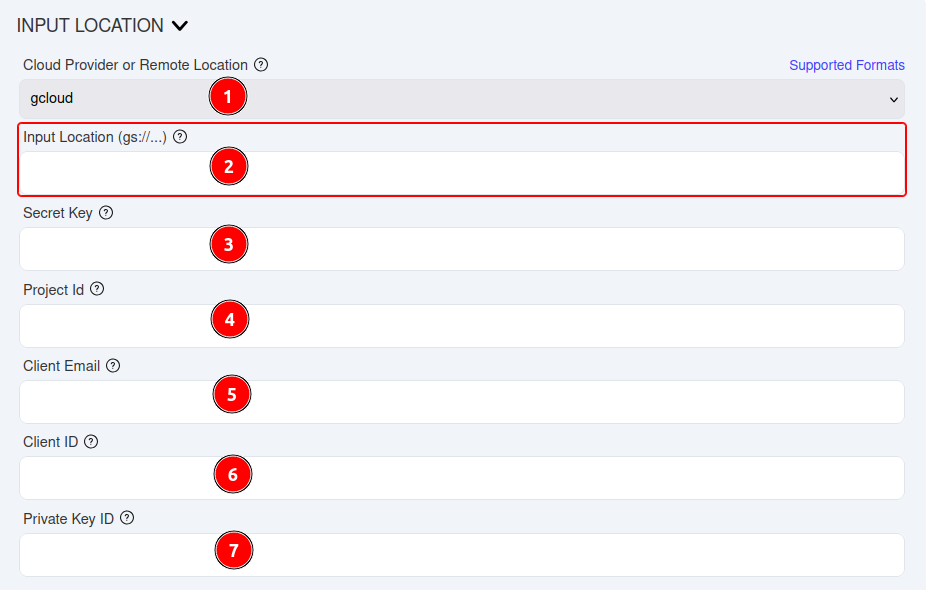
1.) If using Google Cloud (gcloud) select gcloud in the pull down.
2.) Use your input file location full path including file extension on gcloud starting with gs://
3.) Paste your secret key into the Secret Key field.
4.) Paste your project id into the Project Id field, it may start with gcloud
5.) Paste your client email into the Client Email field it may end in gserviceaccount.com
6.) Paste your client id into the Client ID field.
7.) Select the private key id in the Private Key ID field.
Optional - Save this as a template so it remembers your settings.
4.) HTTP(S)
If you want to convert a file on the web that you have permissions to use or if it is a public domain video. You can use the web video url with StreamEngine to convert the video. This does not work for YouTube and other videos without file extensions.
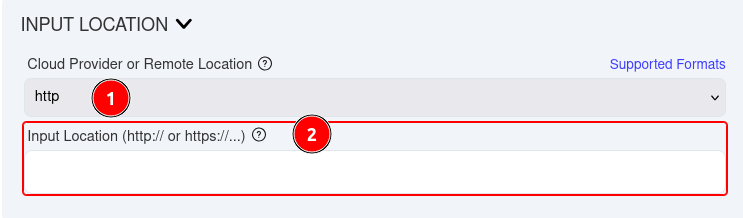
1.) Select http from the drop down list.
2.) Enter the http or https url with the full name of the file including the extension.
5.) File-Upload
The most common is file-upload. When you click on File-Upload, you'll see a form similar to the one below. The first time you will see a blank drop down list, after a few conversion you can select files that have been recently uploaded by selecting the drop down menu. If you want to convert a new file drag and drop it over the green down arrow. If you click on the green arrow you can browse for the file you want. If you are on a mobile device or tablet the green arrow is a great option and will even allow you to take a new video from your camera.
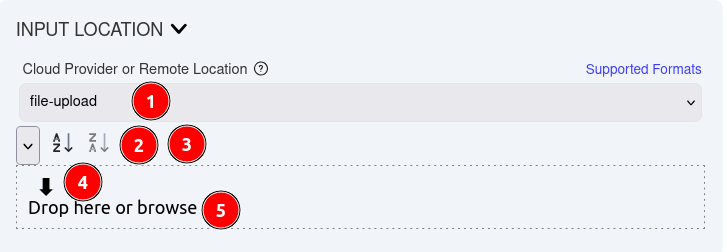
For new users, this is the default for input location and will look like the image above. Options 2 & 3 do not have any files that were loaded so they can't be picked from the drop down or sorted.
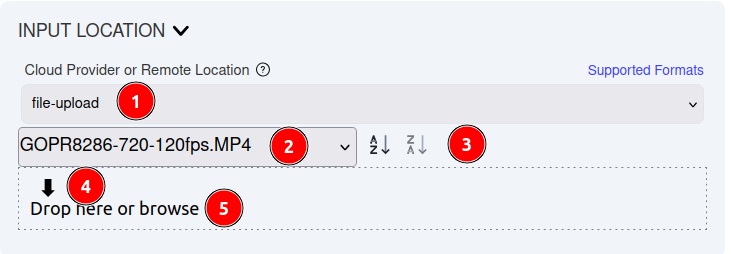
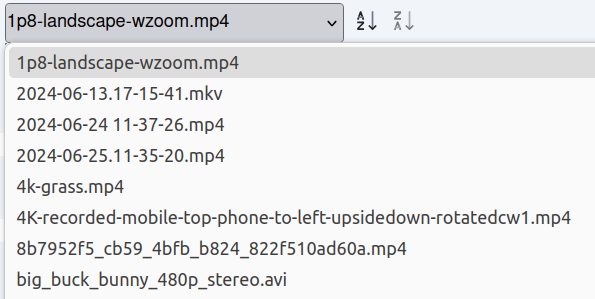
If you have been using the system for a little while it may have a history of files that are in your temporary storage location. In the example above the last file used was a GoPro file and that is the most current file. If you want to use the file in the drop down list you do not have to do any more. Or you can select an existing file or upload a new file. If you have more than one file they can be sorted A-Z or reverse sorted Z-A. These sorts are based on the first character of the file name only. Files in temporary storage are only available for a limited time.
1.) To upload a file select file-upload from the drop down list.
2.) Existing file list, these files are in your private igolgi temporary storage. If you want a file already used, you can select it. If you know the file name you can type the first letter to find it faster.
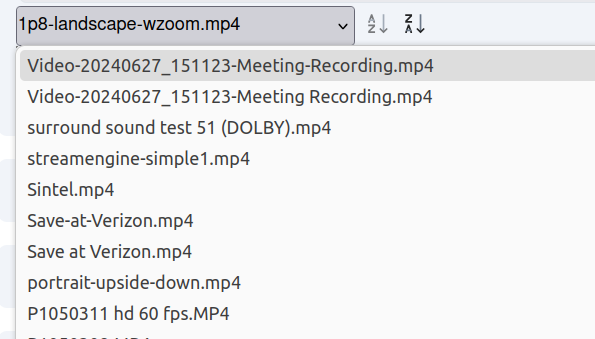
3.) Sort the files in the list. Sorting is a toggle if its clicked on it will be sorted in that order until reverse search is clicked on.
|
Sorted A-Z
|
Sorted Z-A
|
4.) Click the green arrow to browse for a video file on your local disk or mobile device.
5.) Drag and drop a file from your system into the box and release it here.
Output Format
Select the Output Format of the file containers you want to create. MP4 & TS are a video containers they can contain more than one file, usually a video file and audio file. StreamEngine allows multiple files within each video container.
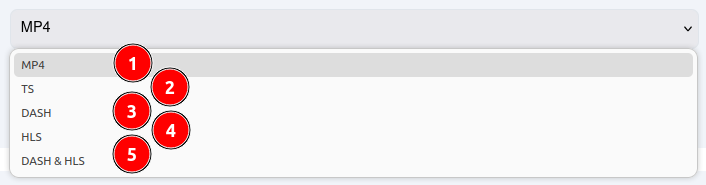
1.) MP4
MP4 (MPEG-4 Part 14) is a digital container format that stores and plays back video and audio content. It's one of the most widely used formats for streaming and playing back videos
online.
- MP4 files typically contain both video and audio streams, which are compressed using various algorithms.
- The format supports multiple tracks (e.g., video, audio, subtitles), making it a versatile container for storing and sharing multimedia content.
- MP4 is widely supported by most devices and platforms, including web browsers, mobile apps, and media players.
2.) TS
Transport Stream file, is a type of digital container format used to store and stream video and audio content. It's a packetized elementary stream (PES) that carries multiple streams of data, including video, audio, and metadata.
- TS files are commonly used in broadcast applications, such as TV streaming or cable transmission.
- They're designed for efficient transmission over networks, using packets with error correction to minimize errors during playback.
- TS files typically contain a combination of MPEG-2 encoded video and audio streams, along with other data like timestamps and synchronization information.
DASH, HLS and DASH+HLS
These options will make a bunch of little video files and corresponding audio files, you will be required to select separate audio and should use tar file format which is similar to zip. If you are on Windows you can download free open source 7-zip program. this allows a standard webserver the ability to stream the video, play it faster with less lag time and allow people playing the videos to quickly jump around or use an index into the video within seconds. Normal videos still work but they are slower to start and rewind of fastforward until the full video file gets downloaded. To learn more check out our API section on HTML+DASH+HLS.
3.) MP4+DASH
MP4-DASH (MPEG-4 Dynamic Adaptive Streaming over HTTP) is a digital container format that combines the benefits of MPEG-4 (video and audio encoding) with the adaptive streaming capabilities of DASH (Dynamic Adaptive Streaming over HTTP).
- MP4-DASH uses the same basic structure as regular MP4 files, but with additional metadata and formatting to enable adaptive streaming.
- It allows for dynamic adaptation of video quality, bit rate, and resolution in real-time, based on factors like network conditions, user device, and available bandwidth.
- This results in a more efficient and seamless viewing experience, as the stream adjusts its quality to accommodate changing network conditions.
4.) MP4+HLS
MP4+HLS (MPEG-4 + HTTP Live Streaming) is a combination of two popular digital container formats: MPEG-4 for video and audio encoding, and HLS (HTTP Live Streaming) for adaptive streaming over HTTP.
- MP4 files are used to store the encoded video and audio content, while HLS is used for segmenting and packaging the content for adaptive streaming.
- HLS enables the creation of a playlist (also known as a manifest) that contains information about each segment of the stream, allowing devices to dynamically request and play back segments based on network conditions.
- MP4+HLS files are often used in live streaming applications where real-time adaptation to changing network conditions is crucial for maintaining a seamless viewing experience.
5.) MP4+DASH+HLS
MP4+DASH+HLS (MPEG-4 + Dynamic Adaptive Streaming over HTTP + HTTP Live Streaming) is a combination of three popular digital container formats: MPEG-4 for video and audio encoding, DASH for adaptive streaming over HTTP, and HLS for efficient packaging and segmentation. This format allows for the creation of highly adaptable and efficient streaming experiences.
- MPEG-4: for video and audio encoding
- DASH: for adaptive streaming over HTTP, allowing real-time adaptation to changing network conditions
- HLS: for efficient packaging and segmentation, enabling dynamic playlist creation and smooth playback.
Separate Audio
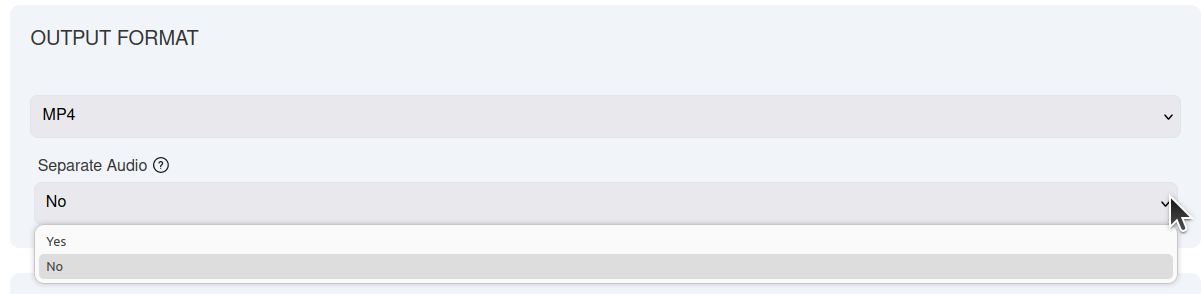
This is set to No by default so the video container will have audio embedded in it, but if you would like to separate audio track from the video and get two separate files select Yes and you will get separated video and audio files. If you have a lot of videos and audio files you may want to select tar option to bundle all of the files together. On windows you may need the free 7-zip program to export a tar file.
Select Yes to separate the video and audio files, you will not be prompted to add audio to the video profiles below.
Select No to embed audio into the video file container, you will have the option under video profiles to add the audio you want in the source stream location you want.
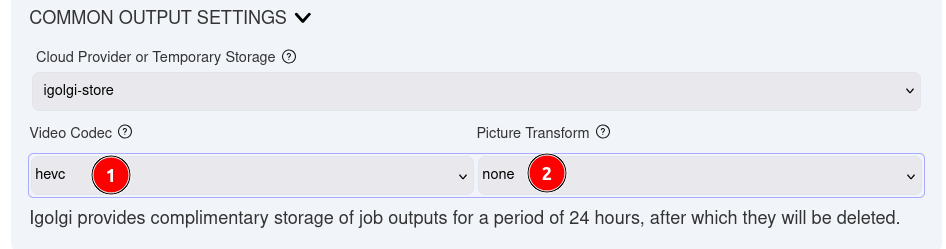
Common Output Settings
This is where you can specify how your output location, settings and if the picture needs to be transformed. By default we keep the video in the igolgi-store, which allows you to preview it in a browser (assuming you have the playback codecs) download and save the file. You can also save your converted video in the cloud using AWS, Oracle or Google Cloud. You have three different output codecs to use AHC/H.264, mpeg2 or HEVC/H.265. You also have three choices for Picture Transform, none, deinterlace and deinterlace/detelecine.

options
Temporary Storage (1.)
igolgi-store
Igolgi store is the default setting for Common Output Setting, Cloud Provider. StreamEngine will save your output files for up to 24 hours giving you time to view, download to save them.
Cloud Providers (1.)
We are not going to cover cloud settings in great detail because we covered them above. If you are using different cloud services we would recommend saving a template so you can refer back to them.

1.) If you are using the same cloud service for input and output you can copy your settings from input to output so you don't have to re-enter your credentials. If you have different clouds for input and output you will not see the copy credentials option.
AWS

In the example above aws was used for storage in file input so we can copy our settings without having to re-enter them again.
1.) Select AWS (or the same cloud service you used for file input location).
2.) Select copy credentials to copy settings from the input settings to output setting.
Oracle
The form example above is oracle cloud for file output but since oracle cloud for input was not selected you will not be able to copy oracle settings from input to output and you will need to enter them in this form.
1.) If using Oracle Cloud Infrastructure (OCI) select oracle in the pull down.
2.) Paste your Access Key into the Access Key field.
3.) Paste your Secret Key into the Secret Key field.
4.) Paste your tenancy ocid into the Tenancy OCID field, it may start with ocid1.tenancy.oc1
5.) Paste your user ocid into the User OCID field, it may start with ocid1.user.oc1
6.) Paste your oci fingerprint into the Fingerprint field, it should have colons (:) inside of it.
7.) Select the Region in the drop down list.
Optional - Save this as a template so it remembers your settings.
Google Cloud
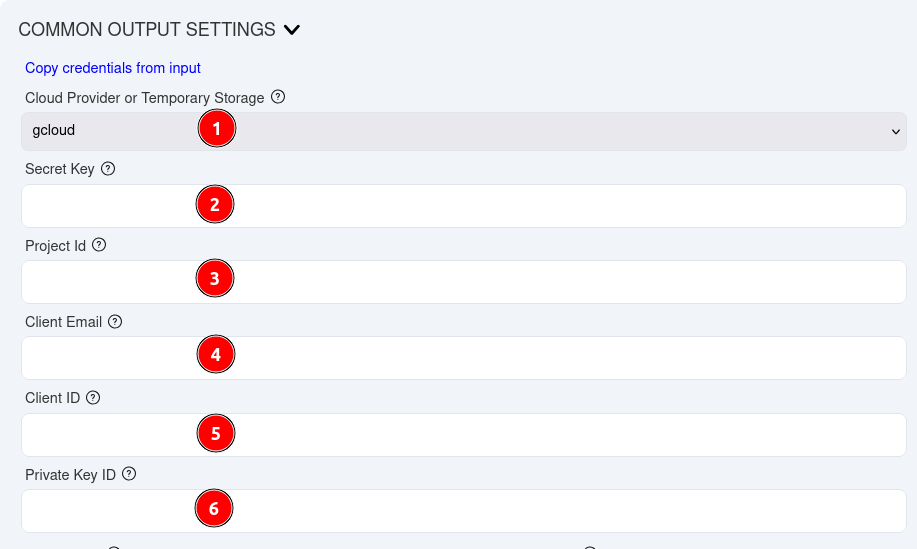
In the example above gcloud is selected for file input and you could copy credentials from the input to output, but you also have the opportunty to use different cloud accounts on the same cloud provider. This would be good copying videos from your production house to a vendors cloud account. In the case above you will need to fill out the information.
1.) If using Google Cloud (gcloud) select gcloud in the pull down.
2.) Paste your secret key into the Secret Key field.
3.) Paste your project id into the Project Id field, it may start with gcloud
4.) Paste your client email into the Client Email field it may end in gserviceaccount.com
5.) Paste your client id into the Client ID field.
6.) Select the private key id in the Private Key ID field.
Optional - Save this as a template so it remembers your settings.
Common Output Settings Continued ...
1.) Video Codecs
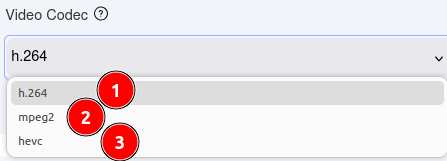
Video codecs are use to reduce the size and bandwidth of videos. Raw uncompressed or low compressed videos are great for editing but would be almost impossible to watch on cable and impossible to watch over wireless devices today. Videos need to be compressed. The lower the bandwidth the lower the cost or more people you can support on your hardware. Lower compressed videos are great for editing but not streaming. Of the three codecs we currently support, hevc / h.265 has the highest compression and lowest bandwidth, h.264 / AVC is good all around widely supported and good compression and low bandwidth.
1.) h.264
H.264 also known as AVC is the default, it is an industry standard video codec for streaming and web based video. It has a good compression ratio to show high motion, high fidelity audio at low bandwidths.
2.) mpeg2
Is an older standard from the broadcasting industries and is best for live events. It has a very low latency for linear video but not recommended for nonlinear video applications, indexing and quick search. For mpeg2 we only support HD jobs, resolution less or equal than 1920x1080. Framerates supported for this codec are:
- 23.976 fps
- 24 fps
- 25 fps
- 29.97 fps
- 30 fps
- 50 fps
- 59.94 fps
- 60 fps
3.) hevc
Is a newer codec also known as h.265, it may need to be licensed. It is available on most players, mobile devices and browsers. It currently allows the best video compression rates. It does take longer to compress and is slightly rate higher to transcode.
2.) Picture Transform
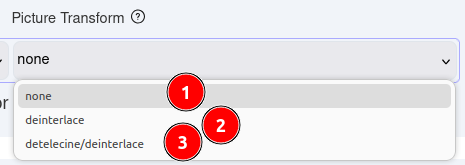
Picture Transform options are used to convert interlaced or telecined video into progressive video.
Interlaced video is a technique used in video displays where each frame is divided into two fields: one containing all the odd-numbered lines and the other containing the even-numbered lines. These fields are displayed in rapid succession, with the odd lines shown first, then the even lines, creating the perception of a complete image. This approach effectively doubles the frame rate, making motion appear smoother and reducing flicker, while using the same bandwidth as a non-interlaced signal.
This method was originally developed for analog television to optimize broadcast bandwidth while maintaining image quality. However, in modern digital displays, interlaced video is often converted to progressive scan (where each frame is shown in its entirety) to improve clarity and reduce artifacts, especially for fast-moving content.
1.) none
None is the default setting. None will not modify the the input video format. Therefore, if the input video is progressive the output will be progressive, or if the input is interlaced the output will be interlaced, etc.
2.) deinterlace
This setting will convert interlaced input video into progressive video. The streamengine algorithm for deinterlacing is an advanced motion compensated, multi-frame solution that minimizes distortions that can occur when deinterlacing. If content is not interlaced streamengine will not perform any conversions.
3.) detelecine/deinterlace
This setting will convert telecine content back to progressive and remove repeated fields. The streamengine algorithm analyzes the input video first to detect the telecine pattern and find the repeated fields. In a second pass the algorithm removes those fields.
In the case that the input video does not have telecine, the algorithm will deinterlace the content.
The input telecine cadence (3:2, 5:4, etc) will be automatically detected (even in the case there are mixed cadences).
The output framerate will be reduced back to the original progressive frame rate. A typical example is a 29.97 fps input video with 3:2 telecine will be reduced to 24 fps progressive.
The benefits of detelecine your video is that the video sequence will have fewer artifacts, and also will require 20% or fewer bits to encode since repeated fields are removed.
See an example of the streamengine detelecine algorithm here https://streamengine.igolgi.com/#detelecine
If content is not interlaced or telecined streamengine will not perform any conversions.
Audio Profiles
The first pull down selection is setting the codec for the audio. AAC is the default.

Choose a Codec
1.) AAC
AAC or advanced audio coding is the standard for streaming video replacing mp3 format. For more information see you can visit Wikipedia Advanced Audio Coding (AAC).
2.) AC3 & Dialnorm
AC3 & Dialnorm is the standard codec for Dolby Audio. If you select AC3 you will need to set a Dialnorm as well. Dialnorm stands for dialog normalization is a decibel range for changing dialog audio signal between 0 and -31 dB. If you are not an audio engineer with a target dB range, you can play around with setting starting with 0 dB for no change or visit Dolby.com. Please note that you need to have a license to rebroadcast Dolby content. More information is also available on Wikipedia Dolby Digital AC-3 or Wikipedia dialnorm.
3.) MP2
MP2 is a codec used with mpeg and ts video formats which is used by the television and broadcasting industries.

Channels and Downmix to Stereo
1.) 2 channels
Two channels are the default for stereo, left and right channel.
2.) 6 channels
Six channels are for surround sound or 5.1 audio (Front: right, center, left; Rear: right, left; and a subwoofer). This will not
3.) Downmix to Stereo
If your input video is 5.1 audio, you can convert it to 2 channel stereo by selecting 2 channels and setting Downmix to Stereo to Yes.
Note: If your input is 2 channel audio it will not automatically convert your audio to 5.1 channel audio if you set it to 6 channels. You must remix the audio in an audio or video editor first. If you have 5.1 audio and set to 2 channels without setting downmix to stereo to Yes, it will put the right channel on the center channel instead.
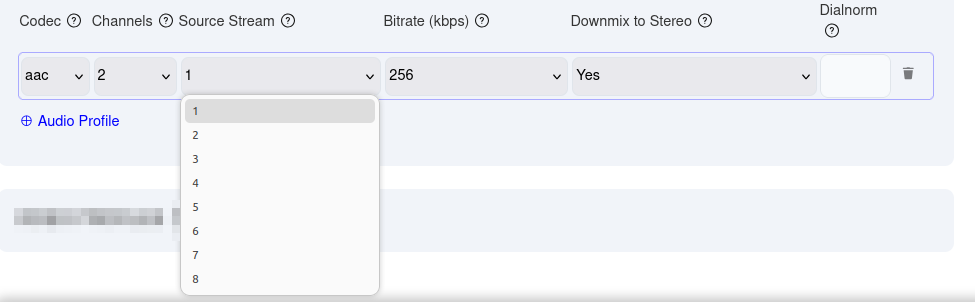
Source Stream
Most videos only have one source of audio so 1 is the default. However, professional videos can have to 8 separate audio tracks that can be at different formats or different languages. StreamEngine allows professionals the ability to setup different audio profiles - 8
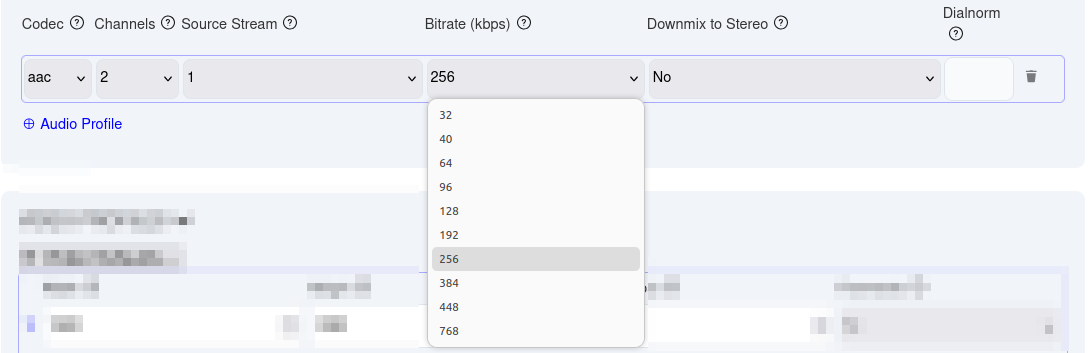
Bitrate kbps
Bitrates vary from 32 kbps - 768 kbps, depending on audio codec selected this list may be different as some codecs do not have the fidelity of AAC. MP2 and AE3 have a bitrate range between 64 kbps - 448 kbps.
Add or delete profiles

1.) Click the blue Audio Profile link to add a new audio profile, you can add up to 3 profiles.
2.) Click the garbage can to delete a profile.
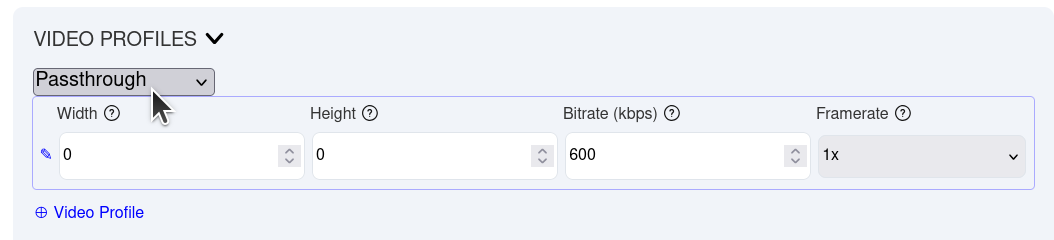
Video Profiles
Depending on options selected above the video profile selection options may vary.
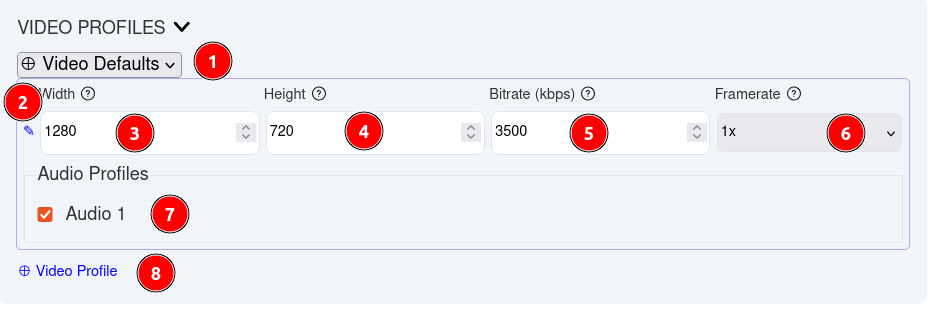
1.) Video Defaults
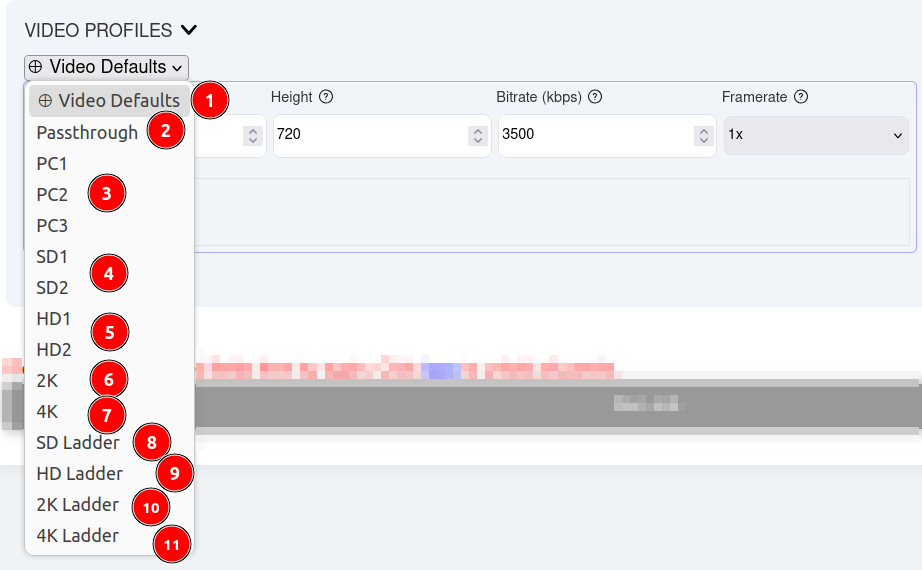
This setting allows you to select presets with defined resolutions. You can settings if you need to, and if you want to reset them just choose a different option then choose the one you want.
1.) Video Defaults is the default, you can manually configure your video using the form
2.) Passthrough keeps the incoming video resolution allowing you to add additional features, this is great for changing bandwidth, converting video codec, dash, hls, dash+hls, adding a logo or changing other advanced settings.
3.) PC1 small size, PC2 medium or PC3 or larger size videos for small display screens.
4.) SD1 or SD2 Standard Definition presets, Prior to High Def or HD TV SD was the standard.
5.) HD1 or HD2 High Definition preset, 720 and 1080
6.) 2K standard setting for 1440
7.) 4K standard setting for 4K output 2160
Ladders are presets that allow multiple video outputs. you can always modify these settings and delete profiles you do not need.
8.) SD Ladder - has 3 Standard Definition settings.
9.) HD Ladder - has 5 High Definition settings
10.) 2K Ladder - has 5 settings 2 PC, SD, HD, & 2K
11.) 4K Ladder - has 5 settings 2 PC, SD, HD & 4K
2.) Blue Pencil icon
Click this icon to see a list of common preset sizes you can choose from. Eight (8) sizes from small screens to 4K. Selecting a larger resolution might require a higher bandwidth to be selected in the Bitrate field, if you need to increase the bitrate you will get a message prompting you to set at least a minimum bitrate speed.
3.) Width
Horizontal resolution of the video. If the video is being played back in landscape this number is generally larger than height. If the video is being played back in portrait this number is generally smaller than height.
4.) Height
Vertical resolution of the video. If the video is being played back in landscape this number is generally smaller than height. If the video is being played back in portrait this number is generally larger than height.
5.) Bitrate in kbps
Bitrate is the video, is the total bandwidth of the video. In general a higher number will be a higher quality video, but it will use a higher bandwidth than a lower bitrate video. Higher resolution and action videos usually need a higher bandwidth than lower resolution and less action videos. Note: audio bitrate is in addition to video bitrate settings.
6.) Framerate
This setting will not adjust the speed of how a video plays it only changes the frame rate.
- 1/2x will reduce frames by 50% i.e. 60fps video will be 30 fps
- 1x is no change to frames
- 2x will only change 1080i videos to 1080p 29.97 fps
7.) Audio Profiles
Each video can have up to 3 audio profiles added to it. These can be set in the audio profile setting above. Specify what audio you want to use with the video configured above. The first audio track is the default.
8.) Add Video Profile
Click on this to add another video profile. You can have up to five (5) videos per submission. You can also delete profiles by clicking on the garbage can icon at the end of the line although you must have at least one video profile.

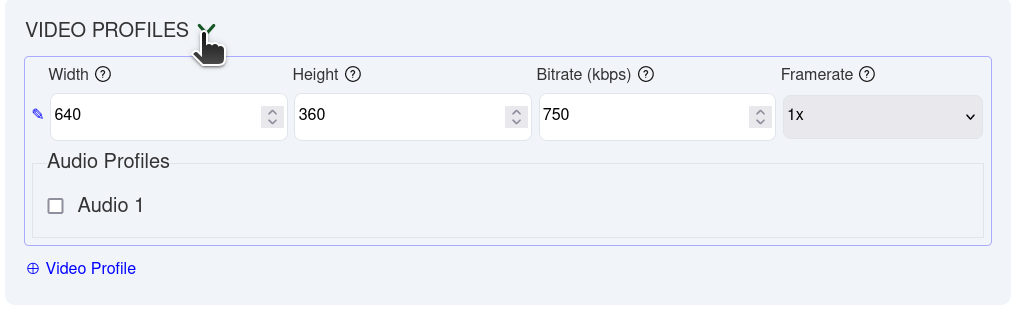
If you selected to separate your audio from the video container you will see a simpler video profile (above) that will only ask settings about the video.
If you selected to embed the audio profile into each video container then you will have to specify which audio profile to add to which video (above).
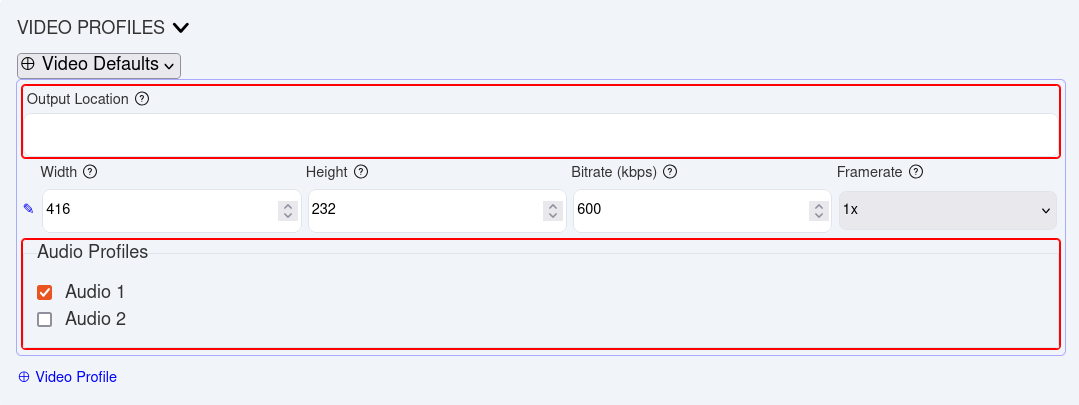
If you selected to embed the audio into the video container and use a cloud provider to save your output you will be prompted to give the output location of the video (above). i.e. on aws s3://igolgi-se-out/filename if you selected tar as an advanced output option you will nee
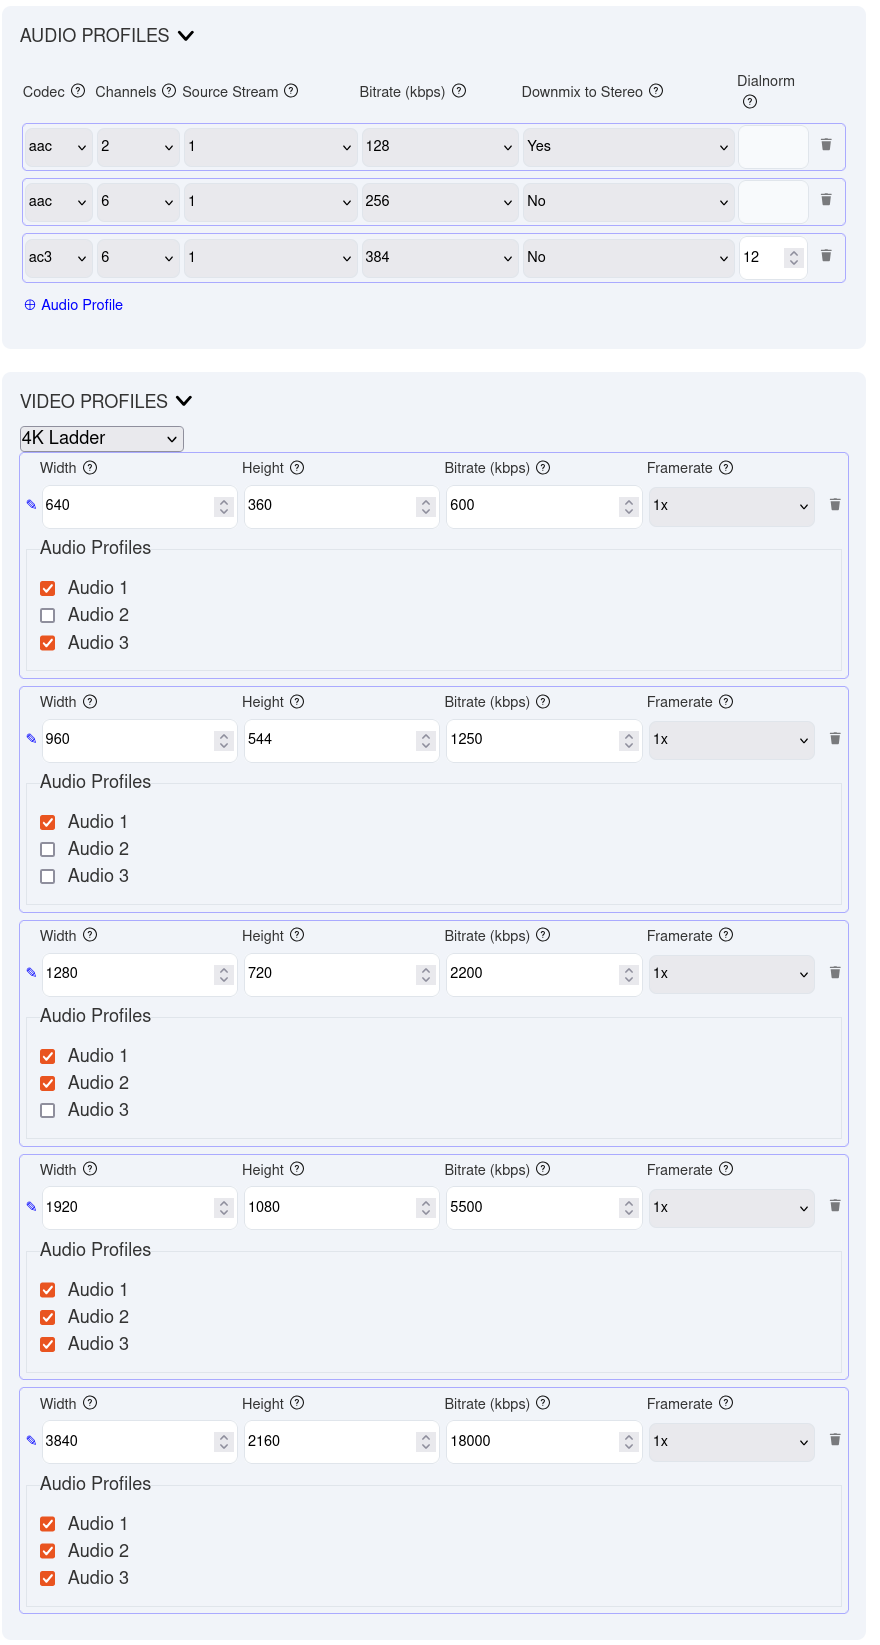
Each video profile has a corresponding audio profile (above in the audio profiles section).
Complex Audio and Video Settings
When you are using multiple audio profiles and generating multiple videos in the UI it might be best to choose the create .tar file option which should zip all of these files together for one download file. On windows you may need to use free 7-zip to extract the videos.
Video Ladders Table
|
pulldown name |
horizontal |
vertical |
h264 bitrate |
hevc bitrate |
fps |
|
PC1 |
416 |
234 |
600 |
400 |
1x |
|
PC2 |
640 |
360 |
800 |
500 |
1x |
|
PC3 |
640 |
480 |
1000 |
750 |
1x |
|
SD1 |
720 |
480 |
2000 |
1500 |
1x |
|
SD2 |
960 |
540 |
2200 |
1700 |
1x |
|
HD1 |
1280 |
720 |
3500 |
2500 |
1x |
|
HD2 |
1920 |
1080 |
5500 |
4000 |
1x |
|
2K |
2560 |
1440 |
NA |
8500 |
1x |
|
4K |
3840 |
2160 |
NA |
18000 |
1x |
|
|
|
|
|
|
|
|
SD ladder |
416 |
234 |
600 |
400 |
1x |
|
|
640 |
360 |
800 |
500 |
1x |
|
|
720 |
480 |
2000 |
1500 |
1x |
|
|
|
|
|
|
|
|
HD Ladder |
416 |
234 |
600 |
400 |
1x |
|
|
640 |
360 |
800 |
500 |
1x |
|
|
720 |
480 |
2000 |
1500 |
1x |
|
|
960 |
540 |
2200 |
1700 |
1x |
|
|
1280 |
720 |
3500 |
2500 |
1x |
|
|
1920 |
1080 |
5500 |
4000 |
1x |
|
|
|
|
|
|
|
|
2K Ladder |
416 |
234 |
600 |
400 |
1x |
|
|
640 |
360 |
800 |
500 |
1x |
|
|
720 |
480 |
2000 |
1500 |
1x |
|
|
960 |
540 |
2200 |
1700 |
1x |
|
|
1280 |
720 |
3500 |
2500 |
1x |
|
|
1920 |
1080 |
5500 |
4000 |
1x |
|
|
2560 |
1440 |
NA |
8500 |
1x |
|
|
|
|
|
|
|
|
4K ladder |
416 |
234 |
600 |
400 |
1x |
|
|
640 |
360 |
800 |
500 |
1x |
|
|
720 |
480 |
2000 |
1500 |
1x |
|
|
960 |
540 |
2200 |
1700 |
1x |
|
|
1280 |
720 |
3500 |
2500 |
1x |
|
|
1920 |
1080 |
5500 |
4000 |
1x |
|
|
2560 |
1440 |
NA |
8500 |
1x |
|
|
3840 |
2160 |
NA |
18000 |
1x |
Curl Command
For advanced users we include a curl command option, click on curl command to expand it and click on copy to copy the curl command to a clip board. Curl can be used in Windows command shell, windows PowerShell or Linux. Once you configure what you want in the StreamEngine Transcoding page and copy the curl, you can paste it an run it in curl. With a little scripting skills you can automate curl calls to convert your videos, but it helps to build a few templates on the ui and download them to modify on your windows, mac or linux pc. We do have some curl examples in the API section of this document.
Advanced Settings
Click the Advanced drop down
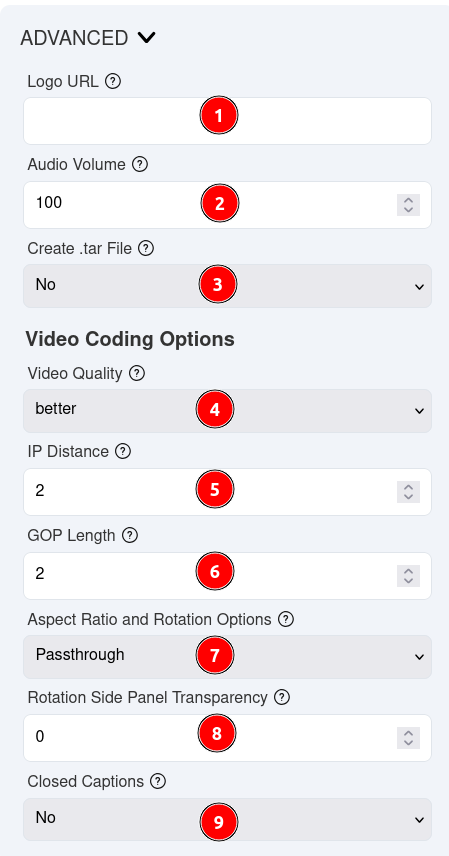
1.) Logo URL
If you are a professional user and not a trial user you can add your own logo to your videos. File must be .jpg or .png format, logo will be scaled and put in lower right hand corner. url needs to be publicly available image, i.e. http://localhost/logo.jpg will not work.
2.) Audio Volume
Decrease volume to 0 or increase volume to 200, default is 100.
3.) Create .tar file
default is no, depending on the number of videos or using external you are creating you might want to bundle your job into one file. If you are using cloud storage specify the file output name. i.e. on aws s3://output-directory/videofilename and .tar or .tar.gz should be appended to your videofilename.
Video Coding Options
4.) Video Quality (Only available if h.264 video codec is selected)
Good, Better, Best. This allows you to adjust the video quality these changes have subtle differences on most video files. If you are looking for lower bandwidth choose good if you need the best quality at highest bandwidth choose best.
5.) IP Distance
Distance between i/P frames 2 is two seconds, faster action videos could be lower and slower action could be longer.
6.) GOP Length
GOP Group of Pictures default is 2 To learn more about setting GOP lengths click here.
7.) Aspect Ratio
Common resolutions and aspect ratios, 8K is currently not supported.
| Resolution | Common Name | Aspect Ratio | Pixel Size |
| SD | 480p | 4:3 | 640x480 |
| HD | 720p | 16:9 | 1280x720 |
| FHD | 1080p | 16:9 | 1920x1080 |
| QHD | 1440p or 2K | 16:9 | 2560x1440 |
| UHD | 2160p or 4K | 16:9 | 3840x2160 |
| FUHD | 4320p or 8K | 16:9 | 7680x4320 |
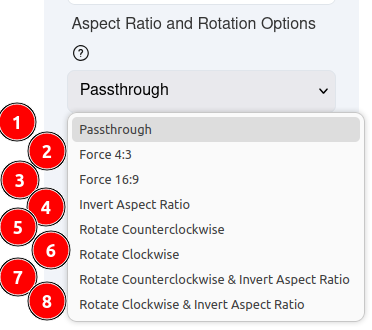
1.) Passthrough
Passthrough is the default it keeps aspect ratio and video orientation the same as the input video.
Changes to aspect ratios should have Video Profile, video settings set to Passthrough (see below)
2.) Force 4:3
Force the aspect ratio to 4:3 which is the SD stand definition standard on older TV and CRTs as well as older computer monitors and some smaller displays. 640x480 is 4:3 while HD and higher is generally 16:9 or 1920x1080. If a video was recorded in 16:9 it may look distorted when resized to 4:3. If you are processing a lot of videos do a test first.
3.) Force 16:9
Force the aspect ratio to 16:9 which is HD 720p or 1280x720 and higher resolution on newer TV and monitors. If a video was recorded in 4:3 it may look distorted when resized to 16:9. If you are processing a lot of videos do a test first.
4.) Invert Aspect Ratio
This will switch the aspect ratio from 16:9 to 4:3 or visa versa.
The settings below are usually for video recorded with mobile devices. Either in portrait or landscape modes. These settings may be changed in the future.
5.) Rotate Counterclockwise
Rotate the video 90 degrees counterclockwise. Holding a phone in portrait mode converting it to landscape mode. This may make the video upside down, if so use clockwise instead.
6.) Rotate Clockwise
Rotate the video 90 degrees clockwise. Holding a phone in portrait mode converting it to landscape mode. This may make the video upside down, if so use counterclockwise instead.
7.) Rotate Counterclockwise & invert Aspect Ratio
Rotate the video 90 degrees counterclockwise and change the aspect ratio.
8.) Rotate Clockwise & Invert Aspect Ratio
Rotate the video 90 degrees clockwise and change the aspect ratio.
8.) Rotation Side Panel Transparency
When converting a portrait video to landscape side panels can be added to show.
9.) Closed captions
No (default) yes if video has closed captions.
Run Job
Once all of your settings are set click the blue "Run Job" button, if there are any mistakes, a red message will appear above the button and the parts of the form that need to be filled will have a red box around them. You might want to click the blue triangle at the top of the page to open all dialog boxes if you can't find the missing fields.

After you submit your job, you can disconnect, log out if you want and the project will continue to run unless it has an error. After you submit a job you might see a brief message below in the lower left hand corner near the igolgi logo. this lets you know that your job is being transcoded.

The first step is transferring your job from the server to the worker which will do the encoding, at this step about 25% of the bar will be used.

At this step the worker is transcoding your job, depending on jobs in the queue and size of your video this could be short or take a while.

Once the transcoding is done your job will be transferred to igolgi-store (temporary storage) or a cloud resource if you used one.

Sometimes your job might seem to hang at 99% this usually with large dash, hls or dash+hls where their are lots of little files that need to be packaged together in a tar file.
Once your job has completed you might see that your job has completed. It is possible in rare occasions when using tar files you may get a completed before the job has been fully uploaded. In these cases look to make sure your job has finished and has a finishing time on the job history page. If the job does not have a time stamp it is still copying the tar file to the output location.

Job History
Overview
The job history page will keep track of all of the jobs you have run and the state of the jobs. Its hard to estimate how long a job will take to run, sometimes they are fast and other times they are slow. It depends on the size of the video and what needs to be done as well as other jobs in the queue. Once you submit a job you don't have to stick around, you can disconnect or log off from StreamEngine
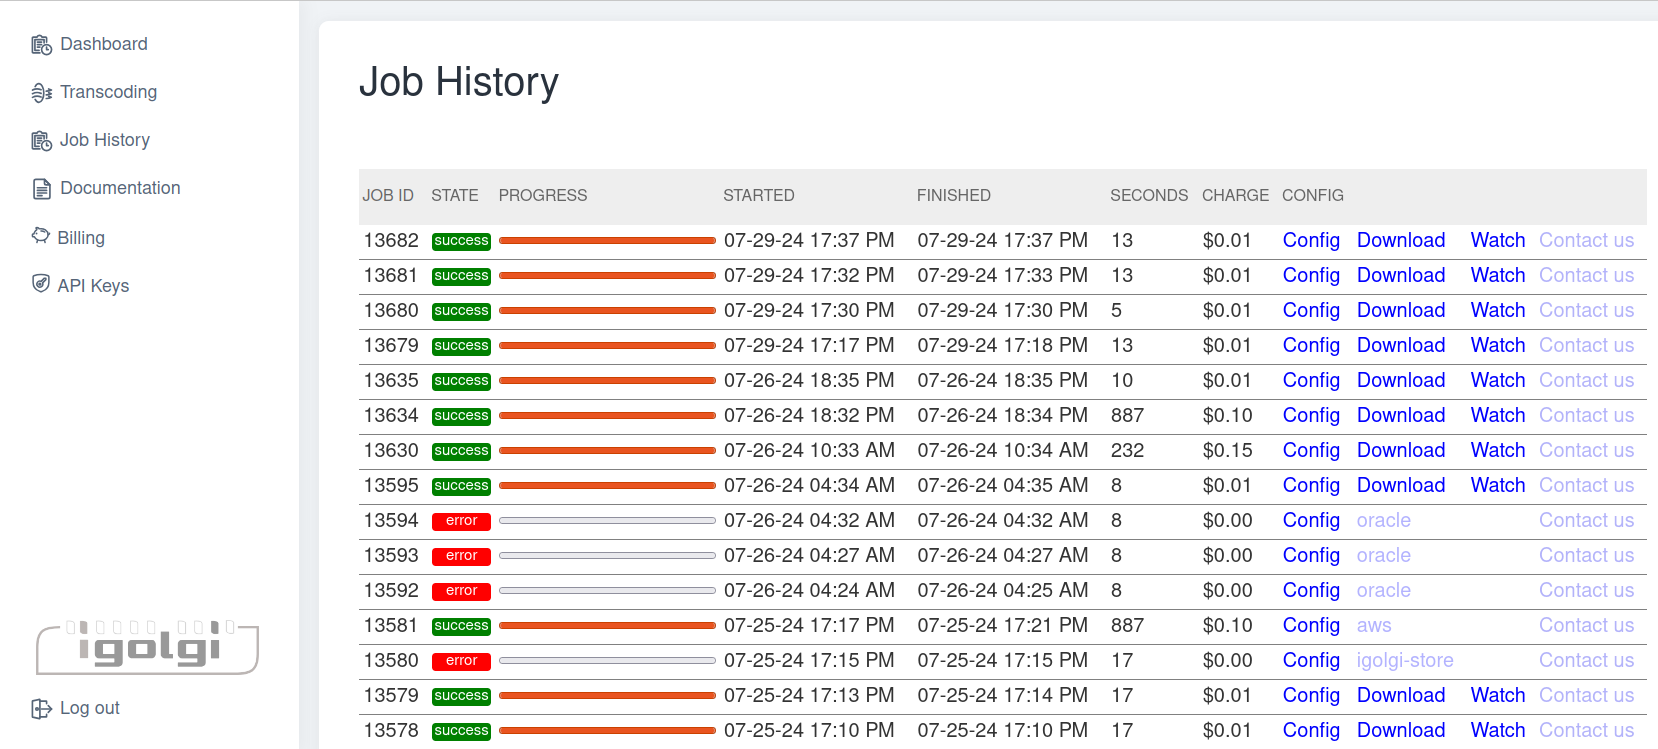
Job Id
This is the front end job id of the job that was run. If you submit a job with our UI or CURL this is the only Job_Id you need. If you are a developer using our API there are two Job_Id's one for front end and one for back end and both can be different, you will use the front end Job_ID to access the back end Job_ID.
State
This shows the current state of the job, it may be orange - ongoing, green -success, red - error or gray - abort
Progress
Progress jumps in large segments, initially it copies your video to the server at about 25%, then finds a back end server and moves it to the proper back end server this is about 1/2 done and is being transcoded, then it is about 95% done it copies the finished file to the location specified.
Started
This is the time stamp when you hit the run job button on the transcoding page.
Finished
This is the time stamp when the job has been copied to the location you specify in on the transcoding page.
Seconds
This is the playing time of the video that was encoded in seconds. A 90 minute video is 5400 seconds. We bill on seconds depending on options you choose. You will not be billed if your job does not run for some reason.
Charge
This shows how much it costs to process the video. The prices shown may not be the same prices you get charged. Pricing is subject to change at any time.
Config
The config section shows all of the options below:
- Config - click will open the configuration settings you used for this project
- Abort - click will allow you to abort the job, this option will disappear after the job has been run, you will not be charged for jobs that do not run to completion.
- Download - click to download the video and save it locally. Igolgi keeps video stored in igolgi-store for 24 hours so if you like make sure you download and save it.
- igolgi-store (temporary storage for 24 hours.) , aws, oracle, gcloud shows the location of your video. Videos stored in your cloud are not removed. If you are using a cloud service and you mouse over the cloud link aws, gcloud or oracle, you will see the path to where the video was stored.
- Watch - click to watch the video, some videos may not play depending on the codecs that your browser knows about. Some codecs may be licensed and may not play in every browser.
- Contact Us - click to send us an email. your email client needs to be configured to send us mail or you can send email to support@igolgi.com
Errors
If you get an error message you can hover over it to see what it might be and

Abort Jobs that get stuck
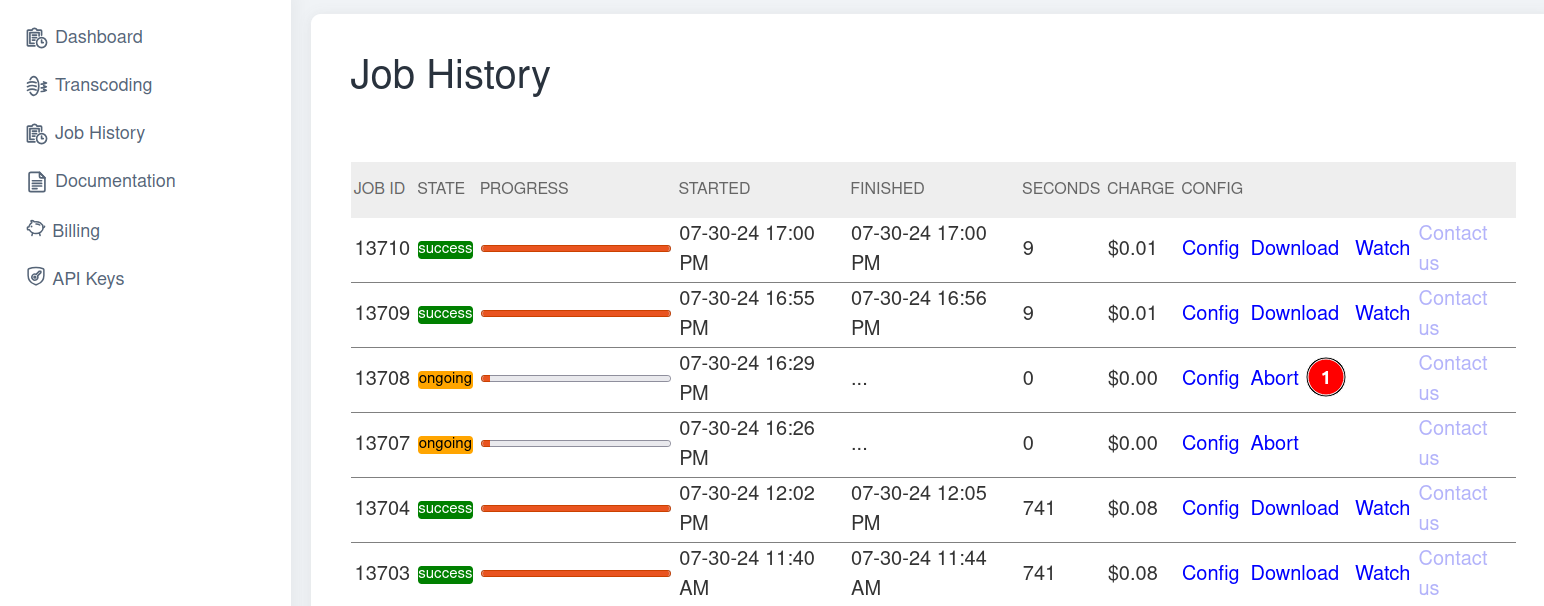
1.) Click Abort to kill jobs that seem stuck.
If a job is taking too long to finish give it some time but if you are sure its stuck you can click on abort. Sometimes if a job is hanging for a long period of time you can click on the Contact Us then scroll to the bottom of the page and look at the status of the job.
Contacting Support

If you need support or have a question click on Contact us. An email message should popup if email has been configured on your pc. If you don't have email setup on your computer you can access support by emailing support@igolgi.com send us your job id number and what the issue was.
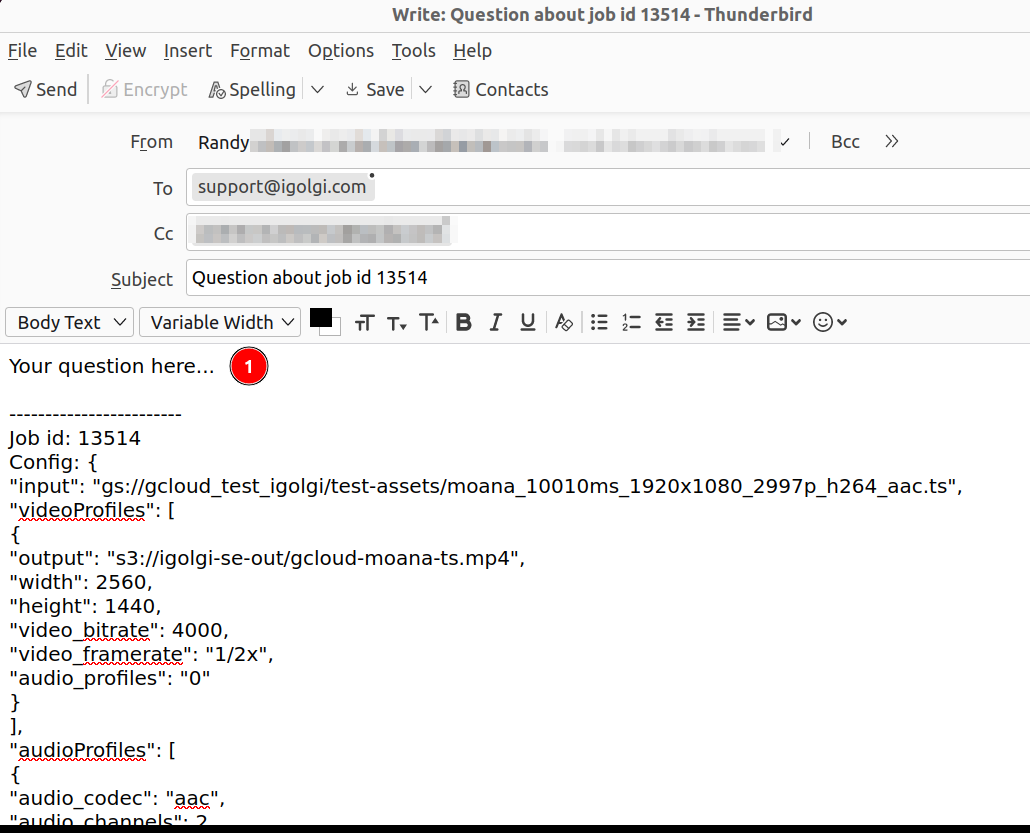
1.) If an email message pops up please ask your question here
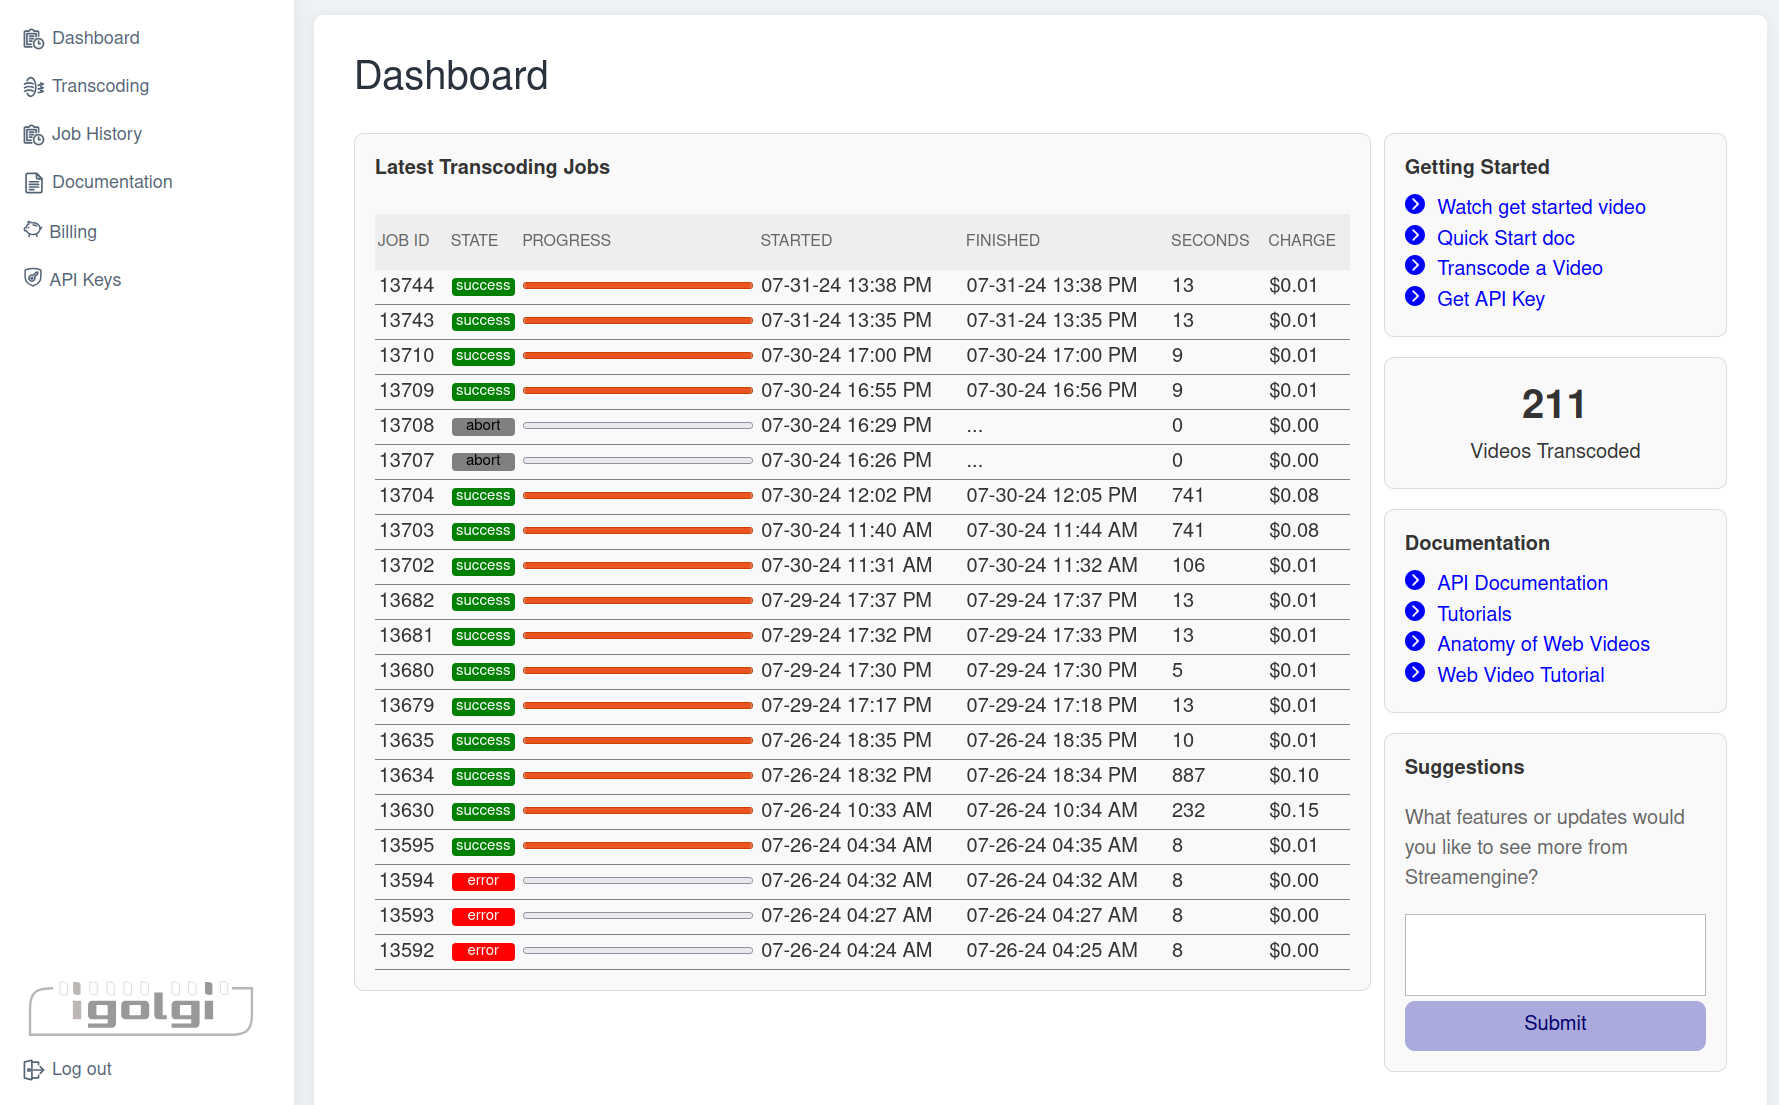
Job History on Dashboard Page
A subset of the job history can also be seen on the dashboard page.
Export to CSV
You can download a copy of your job history in csv format by clicking on the CSV field at the bottom of the page.
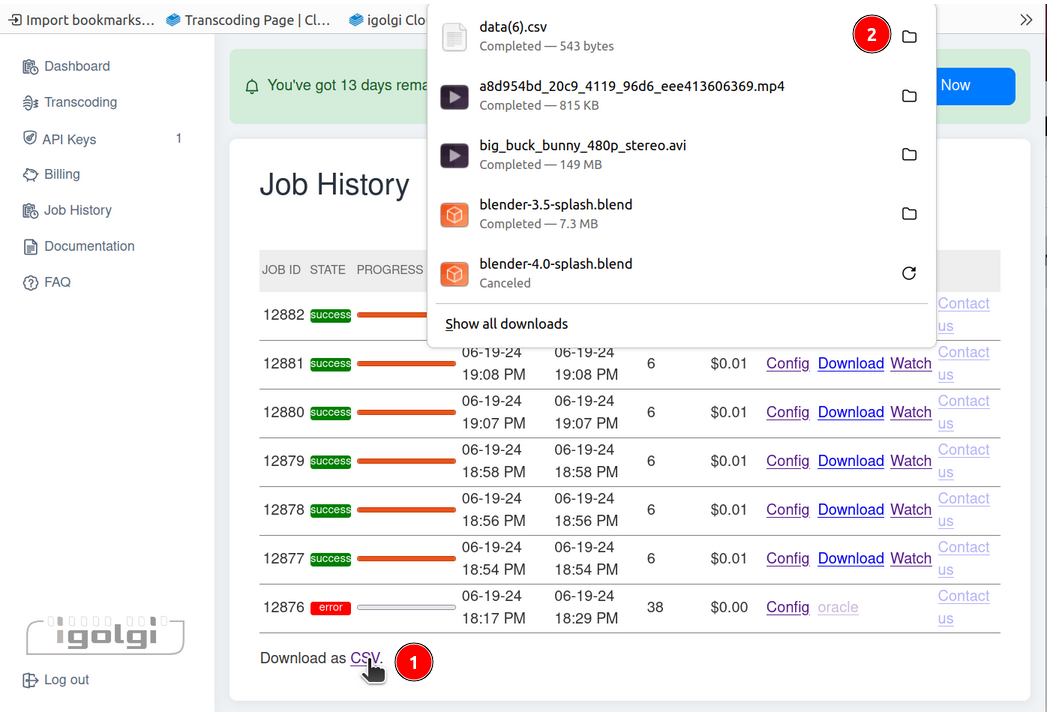
1.) Click Download as CSV
1.5.) (Not Shown) Click the browser download button to see files downloaded.
2.) Click on the data.csv file to open it up.
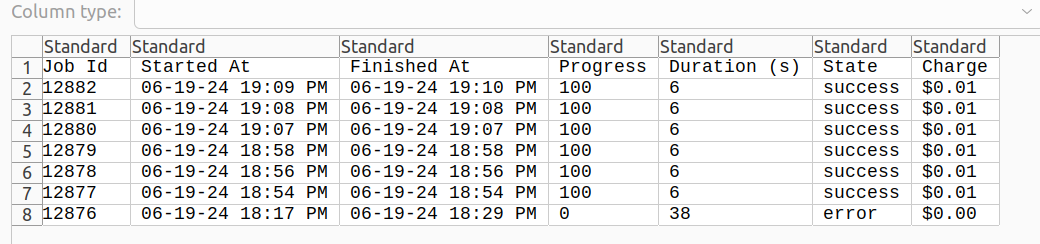
The csv report should look similar to this:
Documentation
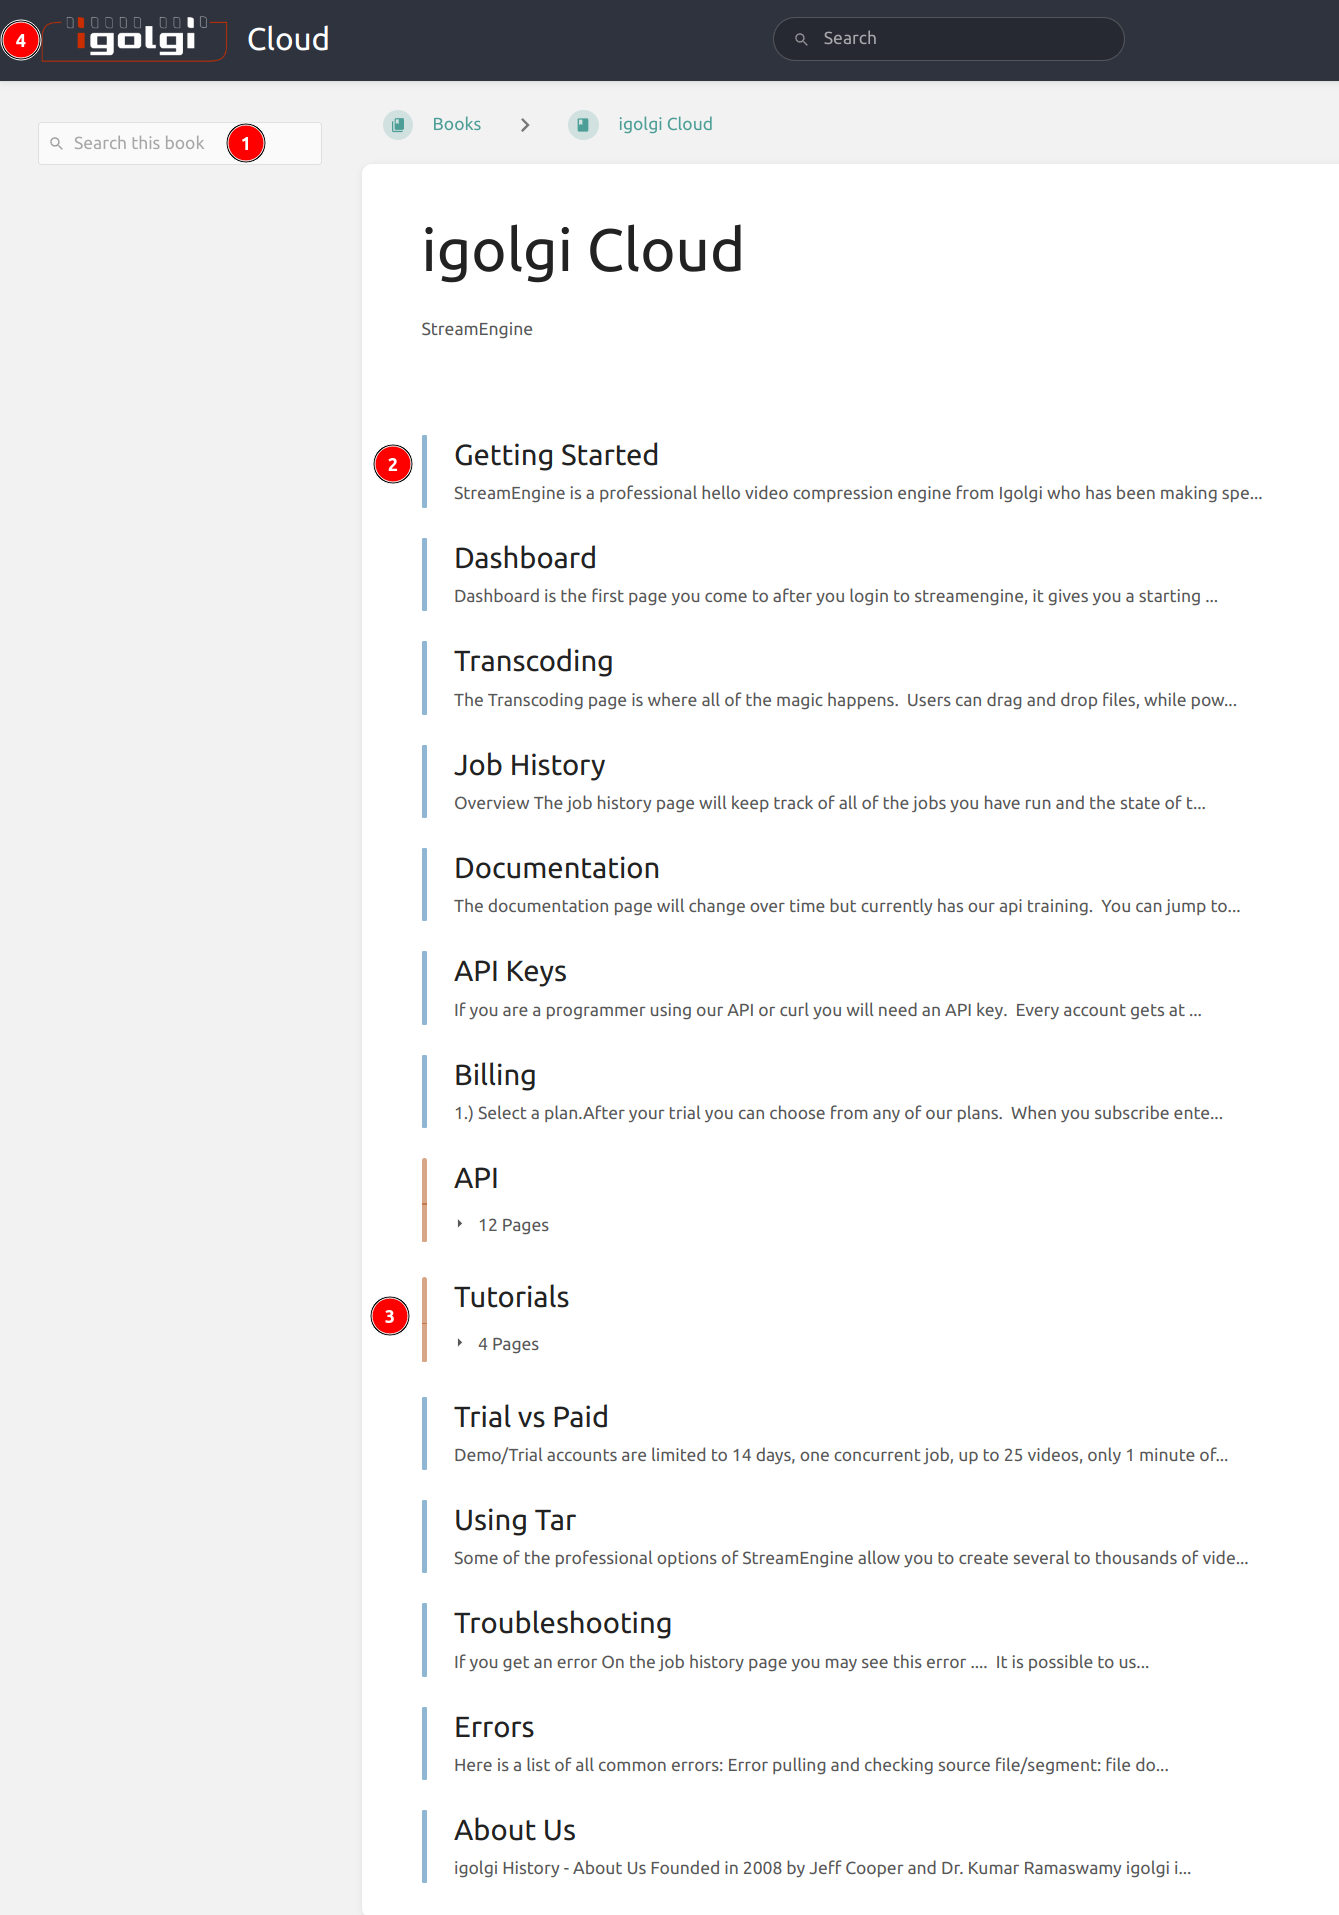
The documentation page will change over time but currently has our api training. You can jump to any spot by clicking on any of the clickable links below the contents. This is a live document it can change, new things can be added, new videos, new tutorials so you might want to check it frequently.
1.) Quick Search our documentation to find what you are looking for.
2.) Click the section you are interested in
3.) Clicking on a these sections expand to show more pages, in this case Tutorials has 4 pages.
4.) Click on the igolgi logo to go back to StreamEngine
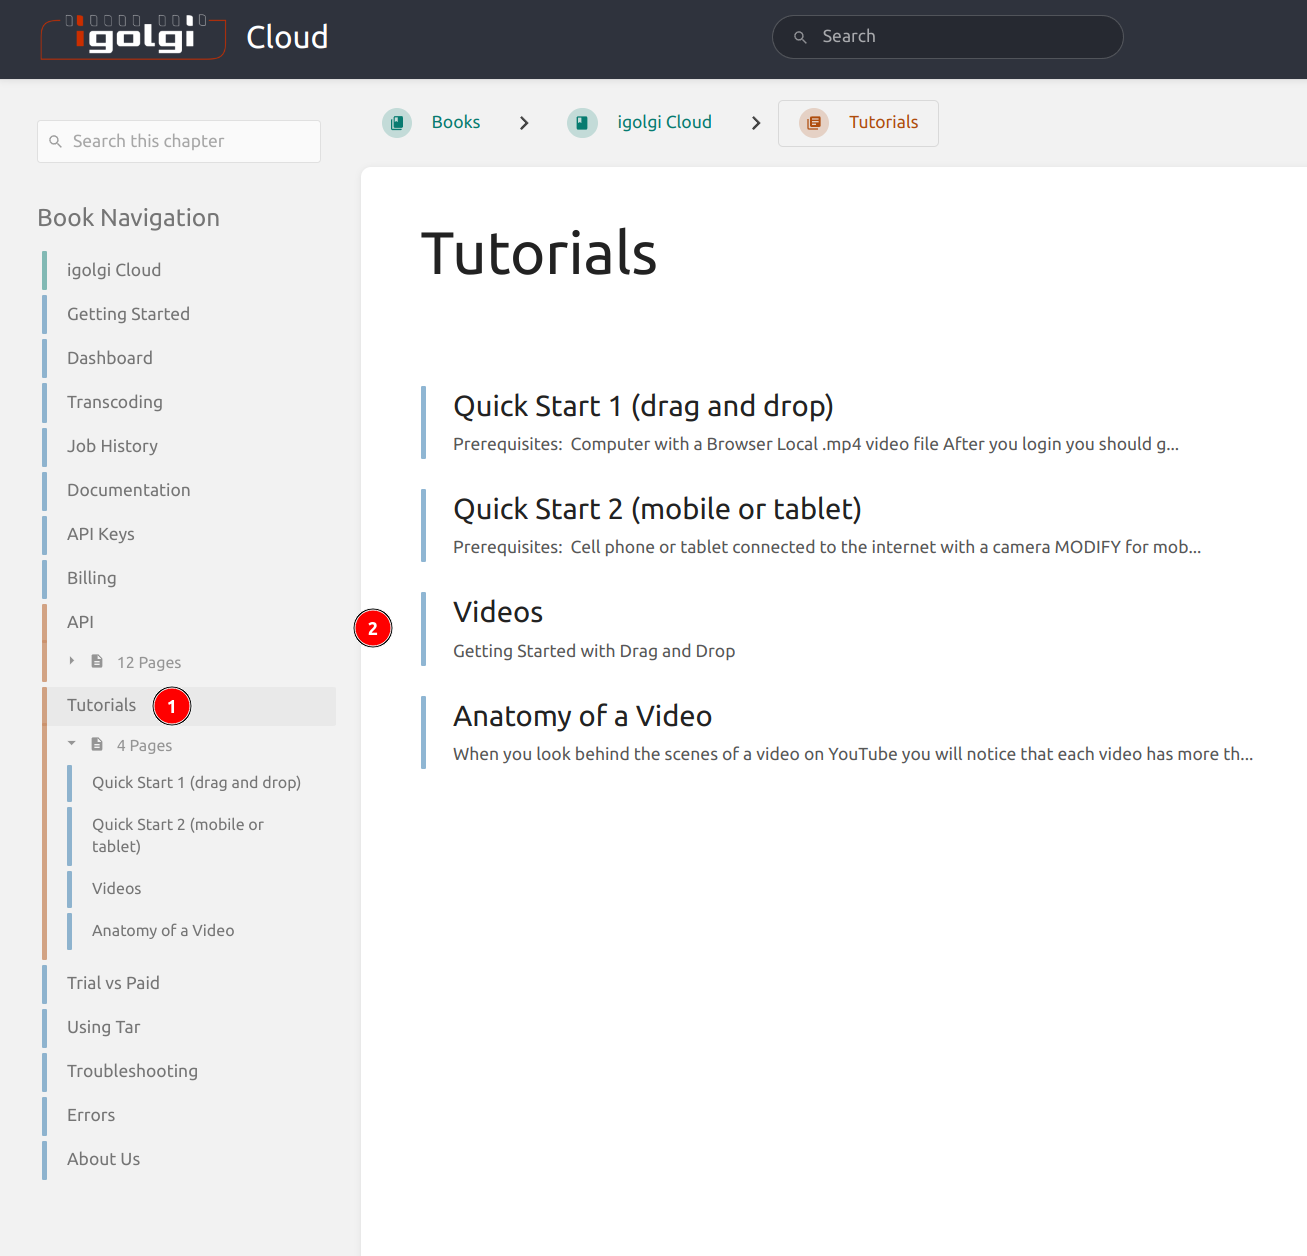
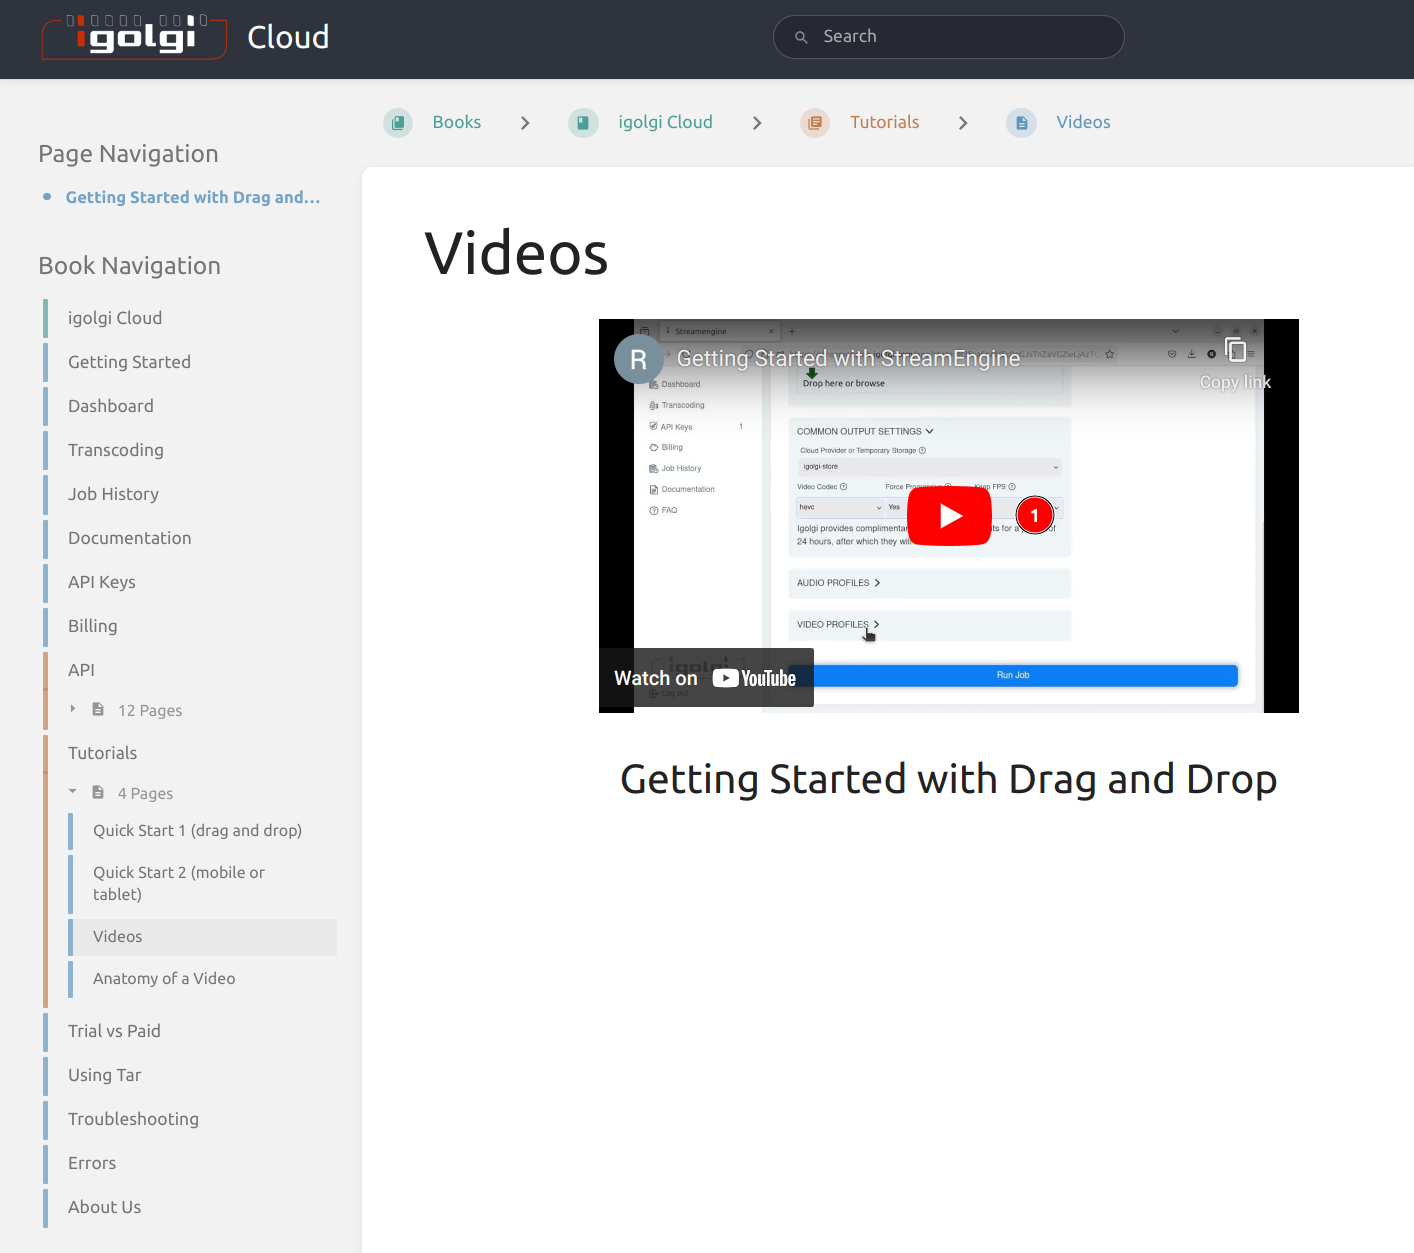
1.) Clicking on tutorial, opens up the tutorials section.
2.) Click on Videos to see our latest videos.
1.) Click to play the video.
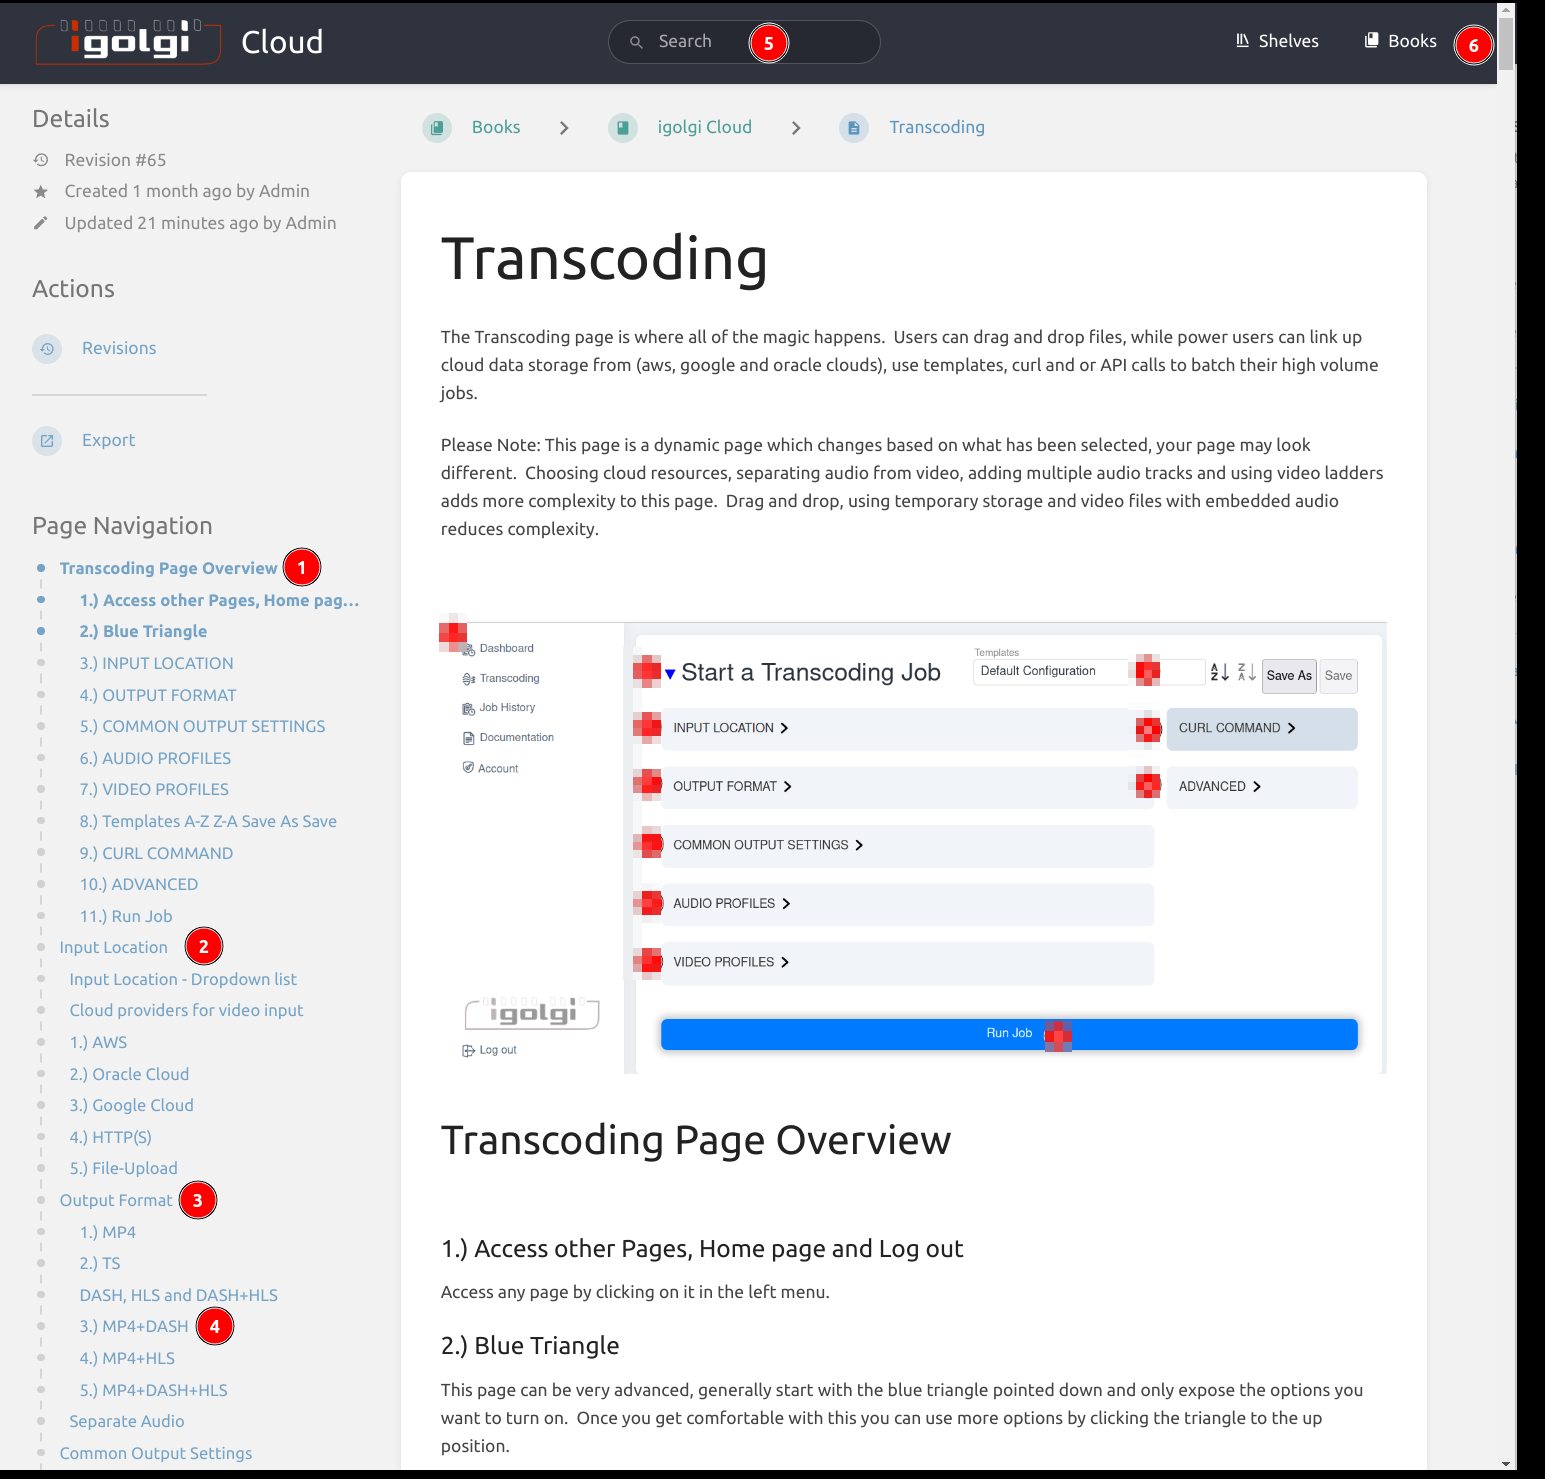
The transcoding page is the largest page and most complicated.
1.) Click on section of page you are interested in, Transcoding Page Overview is at the top.
2., 3., 4.) Click on the section or subsection you are interested in learning more about.
5.) Search for topics.
6.) Use the browser scroll bar to scroll down the page to the section you want to learn more about.
API Keys
If you are a programmer using our API or curl you will need an API key. Every account gets at least one API key by default. If you are paying for StreamEngine you should be extra careful about not letting your API keys in the wrong hands. You can always delete and regenerate API keys when ever you need. Select and copy the API key and save it for use with your code or curl commands.
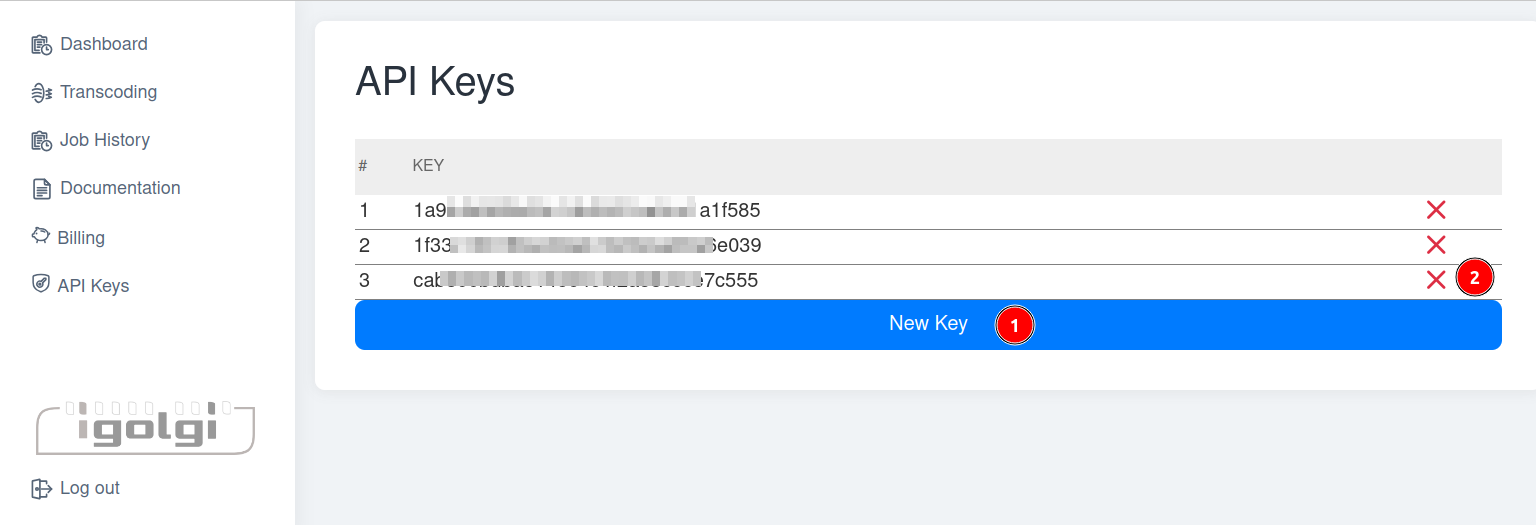
1.) New Key - click here to get a new API key.
2.) Delete Key - click on the red x to delete the selected API key.
If you want to use our API you can visit our API help document.
Please keep in mind after the demo mode you will be responsible for all charges to your account charged to your API key, so keep it safe and regenerate it from time to time.
If you have any issues please contact our support team.
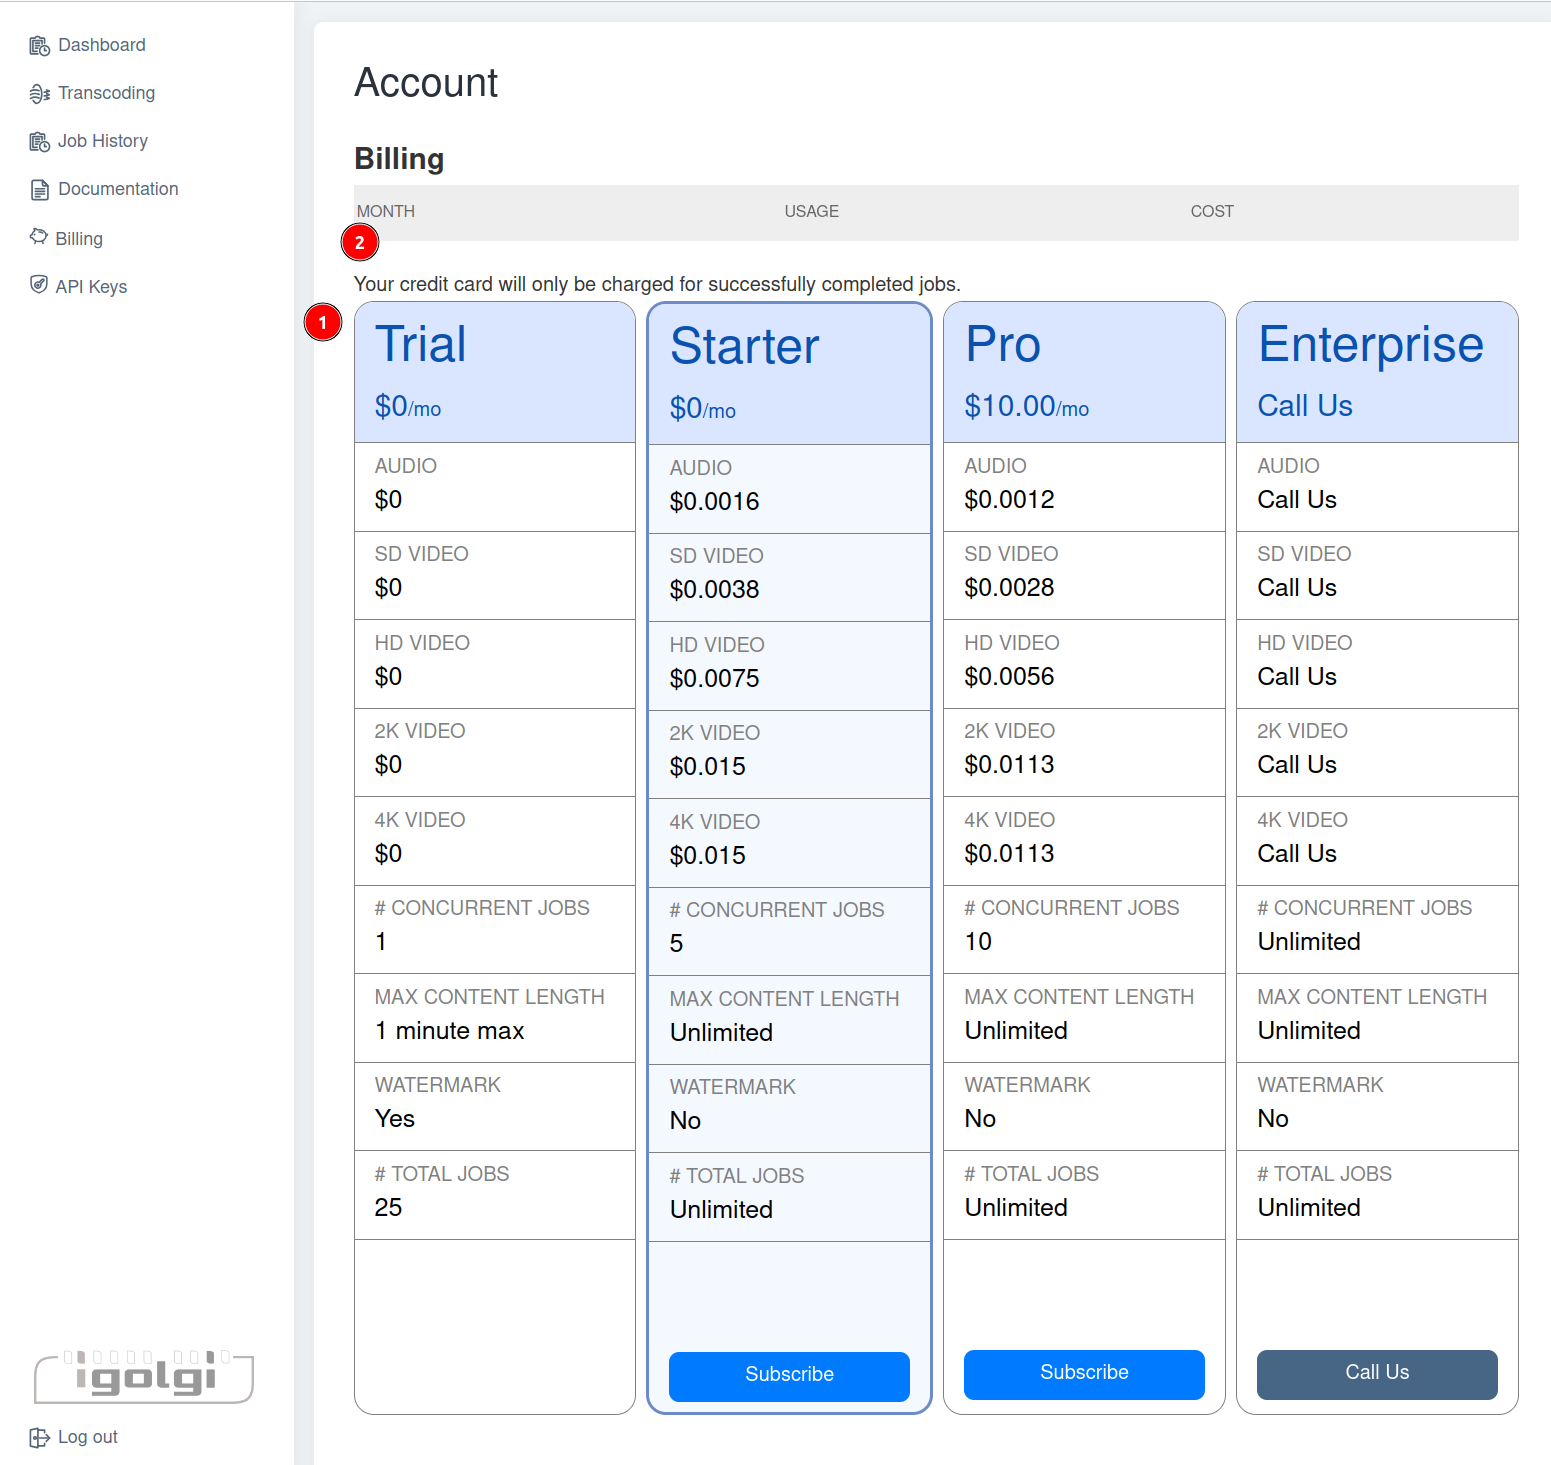
Billing
1.) Select a plan.
After your trial you can choose from any of our plans. When you subscribe enter a credit card and will bill you at the end of the month for time used or in increments of $20 which ever is first. You can cancel at any time and any balance you have used at the time of cancellation will be charged to your credit card. Secure, credit card processing, billing and payments are handled by industry leader stripe.com. If you have any questions or issues billing please contact us and we will respond within one business day.
2.) Billing - After your first month as a subscriber you will see summaries of your usage and cost on a month to month basis. You can also get a running total of expenses by downloading a csv file from the Job History page.
API
API Documentation
Contents
Parameters
Cloud Credentials
Cloud Credentials Input/Output
Audio Profiles
Video Profiles
Supported Containers and Codecs
Creating Jobs
Using the API from within Python
Retrieving a Sent Job
Parameters
input
or not to use this input. This will be an object key if using a cloud provider, or a regular URL otherwise.
| Type | Required | Default |
|---|---|---|
| string | Yes |
videoProfiles
An array containing at least one video profile.
| Type | Required | Default |
|---|---|---|
| array | Yes |
audioProfiles
An array containing zero or more audio profiles.
| Type | Required | Default |
|---|---|---|
| array | Yes |
output_container
Output container to be used. Supported values are ts, mp4, hls, and silverlight .
| Type | Required | Default |
|---|---|---|
| string | No | mp4 |
ts_mode_input_audio_source_stream_count
Audio stream count (in TS mode only).
| Type | Required | Default |
|---|---|---|
| number | No |
audio_output_path
The cloud location where audio should be stored.
| Type | Required | Default |
|---|---|---|
| string | No |
bucket_output_path
The location, within a cloud bucket, where the output should be stored in segmented mode.
| Type | Required | Default |
|---|---|---|
| string | No |
master_variant_mode
Whether or not to use separate audio.
| Type | Required | Default |
|---|---|---|
| boolean | No | false |
segmented_output_hls
Whether to use HLS in segmented output.
| Type | Required | Default |
|---|---|---|
| boolean | No | false |
segmented_output_dash
Whether to use DASH in segmented output.
| Type | Required | Default |
|---|---|---|
| boolean | No | false |
segment_length
The segment length in segmented output.
| Type | Required | Default |
|---|---|---|
| number | No |
video_codec
Output video encoder. Supported values are h.264, mpeg2, and hevc.
| Type | Required | Default |
|---|---|---|
| string | No | h.264 |
ip_distance
Target I/P frame distance.
| Type | Required | Default |
|---|---|---|
| number | No |
gop_length
Target GOP length in seconds.
| Type | Required | Default |
|---|---|---|
| number | No | 1 |
scte35_passthough
Use SCTE35 passthrough?
| Type | Required | Default |
|---|---|---|
| boolean | No | false |
scte35_pid_remap
PID Remap.
| Type | Required | Default |
|---|---|---|
| number | No |
create_tar_file
In segmented output, whether to tar the resulting directory and store it in the same bucket specified by the bucket_output_path parameter. Note that this will take up more space in your bucket.
| Type | Required | Default |
|---|---|---|
| boolean | No |
audio_volume
Target audio volume (0-200).
| Type | Required | Default |
|---|---|---|
| number | No | 100 |
h264_quality
Output quality. Accepted values are 'good', 'better', and 'best'. Supported values are good, better , and best.
| Type | Required | Default |
|---|---|---|
| string | No | good |
video_aspect_ratio
Output video aspect ratio. Supported values are passthrough, force_4:3, force_16:9, invert_aspect_ratio, rotate_counterclockwise , rotate_clockwise, and rotate_counterclockwise + invert_aspect_ratio.
| Type | Required | Default |
|---|---|---|
| string | No | passthrough |
rotation_blackness
... .
| Type | Required | Default |
|---|---|---|
| number | No |
closed_captions
Write CC to output?
| Type | Required | Default |
|---|---|---|
| boolean | No |
force_progressive
Force progressive?
| Type | Required | Default |
|---|---|---|
| boolean | No | false |
keep_fps
Preserve the framerate?
| Type | Required | Default |
|---|---|---|
| boolean | No | true |
logo_url
URL to an image file to use as a watermark.
| Type | Required | Default |
|---|---|---|
| string | No |
cloud_credentials
See Below
| Type | Required | Default |
|---|---|---|
| object | Yes |
Cloud Credentials
input
| Type | Required | Default |
|---|---|---|
| object |
Yes |
output
| Type | Required | Default |
|---|---|---|
| object |
Yes |
Cloud Credentials Input/Output
cloud_provider
The cloud provider to use
| Type | Required | Default |
|---|---|---|
| string | Yes | oracle |
access_key
Account access key.
| Type | Required | Default |
|---|---|---|
| string | No |
secret_key
Account secret key.
| Type | Required | Default |
|---|---|---|
| string | No |
region
The region within which your target bucket is located.
| Type | Required | Default |
|---|---|---|
| string | No |
------
tenancy_ocid
Tenancy OCID (for oracle only)
| Type | Required | Default |
|---|---|---|
| string | No |
user_ocid
User OCID (for oracle only)
| Type | Required | Default |
|---|---|---|
| string | No |
oci_fingerprint
User Fingerprint (for oracle only)
| Type | Required | Default |
|---|---|---|
| string | No |
project_id
Project ID (for google only)
| Type | Required | Default |
|---|---|---|
| string | No |
client_email
Client email (for google only)
| Type | Required | Default |
|---|---|---|
| string | No |
client_id
Client ID (for google only)
| Type | Required | Default |
|---|---|---|
| string | No |
private_key_id
Private Key ID (for google only)
| Type | Required | Default |
|---|---|---|
| string | No |
Audio Profiles
audio_codec
Audio codec to be used during transcode. Supported values are aac, ac3 or mp2.
| Type | Required | Default |
|---|---|---|
| string | No | aac |
audio_channels
Number of audio channels on the output. Use 2 for stereo and 6 for 5.1. Supported values are 2 or 6.
| Type | Required | Default |
|---|---|---|
| string | No | 2 |
audio_bitrate
Output audio bitrate. Supported values are 32, 40, 64, 96, 128, 192, 256, 384, 448 or 768.
| Type | Required | Default |
|---|---|---|
| string | No | 256 |
primary_audio_downmix_to_stereo
Downmix primary audio from 5.1 to stereo.
| Type | Required | Default |
|---|---|---|
| boolean | No |
source_stream
The index of the source stream. Supported values are 1 , 2 , 3 , 4 , 5 , 6 , 7 or 8.
| Type | Required | Default |
|---|---|---|
| string | No |
dolby_digital_dialnorm
The dialnorm. Values range from 0 to 31 inclusive. Use 0 for passthrough.
| Type | Required | Default |
|---|---|---|
| number | No |
Video Profiles
output
The location, including the file name, where the output is to be sent.
| Type | Required | Default |
|---|---|---|
| string | No |
width
The output width in pixels.
| Type | Required | Default |
|---|---|---|
| number | Yes |
height
The output height in pixels
| Type | Required | Default |
|---|---|---|
| number | Yes |
video_bitrate_mode
Output video bitrate mode. Supported values are cbr or vbr.
| Type | Required | Default |
|---|---|---|
| string | No |
video_bitrate
The video bitrate in kbps.
| Type | Required | Default |
|---|---|---|
| number | Yes |
video_framerate
The video framerate. Supported values are 1x, 1/2x or 2x.
| Type | Required | Default |
|---|---|---|
| string | No | 1x |
audio_profiles
| Type | Required | Default |
|---|---|---|
| string | No |
Supported Containers and Codecs
- Input Containers: MXF, MPEG2-TS and MP4
- Output Containers: MPEG2-TS, MP4
- Input Codecs: MPEG2, ProRes, XDCAM, H.264, HEVC for video; AC3, MPEG2, AAC for audio
- Output Codecs: MPEG2, H.264 and HEVC for video; Passthrough, AAC-LC and AAC 5.1 for audio, AC3 stereo and 5.1 for audio
Creating Jobs
Using the API from within Python
Retrieving a Sent Job
Job Status: {'job_id': '4765', 'tcode_progress': '100', 'state': 'ready', 'tcode_time': '57.89', 'tcode_speed': '0.0', 'job_completed': True, 'xfer_speed': '337.88', 'xfer_time': '0.67', 'xfer_progress': '100'}
Job Config: {'input': 'https://streamengine.igolgi.com/uploads/659d9ac25dc7bf7b1a7c487a971a98e8', 'videoProfiles': [{'output': 'oci://yzwhip2gci7s/igolgi-public/80d8cc2a_bdab_442b_bc19_21fe00267a34.mp4', 'width': 0, 'height': 0, 'video_bitrate': 6000, 'video_framerate': '1x'}], 'audioProfiles': [{'audio_codec': 'aac', 'audio_channels': 2, 'audio_bitrate': 128, 'primary_audio_downmix_to_stereo': False, 'source_stream': 1}], 'output_container': 'mp4', 'audio_output_path': 'oci://yzwhip2gci7s/igolgi-public/96dbafd7_bf4f_45a8_bd06_627a4684e45b.mp4', 'separate_audio': True, 'segmented_output_hls': False, 'segmented_output_dash': False, 'video_codec': 'hevc', 'ip_distance': 3, 'gop_length': 2, 'scte35_passthough': False, 'scte35_pid_remap': -1, 'create_tar_file': False, 'audio_volume': 100, 'h264_quality': 'good', 'video_aspect_ratio': 'rotate_counterclockwise + invert_aspect_ratio', 'rotation_blackness': 0, 'closed_captions': False, 'picture_transform': 'none', 'logo_url': None}
Creating cURL Jobs
Creating Jobs
To create a job, use your API key along with a JSON payload matching the schema described in the tables above, and make an HTTP GET request like the following:
curl https://streamengine.igolgi.com/api/v0/job \
-k \
--request POST \
-u 8e6f7a5bf90821a175338ce08be4b7ca:a \
--header 'Content-Type: application/json' \
-d '{
"videoProfiles": [
{
"output": "",
"width": 1024,
"height": 768,
"video_bitrate": 3500,
"video_bitrate_mode": "cbr",
"video_framerate": "1x"
}
],
"audioProfiles": [
{
"audio_bitrate": 256,
"audio_channels": 2,
"audio_codec": "aac"
}
],
"output_container": "mp4",
"video_codec": "h.264",
"input": "oci://yzwhip2gci7s/jey_test_bucket2/test_dir/moana_30_seconds.ts",
"cloud_credentials": {
"input": {
"cloud_provider": "oracle",
"access_key": "...",
"secret_key": "...",
"region": "ca-toronto-1"
}
}
}'
Retrieving a Sent Job
To retrieve a job, use your API key to make a GET request to the /api/v0/job/id endpoint, replacing id with the id of the job you wish to retrieve:
curl https://streamengine.igolgi.com/api/v0/job/1 \ -u 8e6f7a5bf90821a175338ce08be4b7ca:
The response will look something like this:
{
"status": {
"tcode_progress": "0",
"state": "ready",
... # additional fields
},
"config": {
... # your job configuration
},
}
This allows you to retrieve the original configuration for your job, as well as check on its progress using the tcode_progress field.
Go Examples
This is an example in Go, please modify it to fit your environment, be sure to change the video input and output paths as well as the API_KEY and AWS_ACCESS and AWS_SECRET keys.
package main
import (
"bytes"
"encoding/json"
"fmt"
"io/ioutil"
"net/http"
)
func main() {
url := "https://streamengine.igolgi.com/api/v0/job"
// Authentication credentials
username := "INSERT_YOUR_API_KEY"
password := "a"
// Data to be sent in the POST request
data := map[string]interface{}{
"videoProfiles": []map[string]interface{}{
{
"output": "s3://igolgi-se-out/go-testcwaudio3f.mp4",
"width": 1920,
"height": 1080,
"video_bitrate_mode": "cbr",
"video_bitrate": 2301,
"video_format": "progressive",
"video_framerate": "1x",
"audio_profiles": "1",
},
},
"audioProfiles": []map[string]interface{}{
{
"audio_bitrate": 256,
"audio_channels": 2,
"audio_codec": "aac",
"source_stream": 1,
},
},
"master_variant_mode": false,
"output_container": "mp4",
"video_codec": "h.264",
"input": "s3://igolgi-se-in/GOPR8297-2.7K-30-fps.MP4",
"auto_detelecine_flag": false,
"cloud_credentials": map[string]interface{}{
"input": map[string]string{
"cloud_provider": "aws",
"access_key": "INSERT_YOUR_AWS_ACCESS_KEY",
"secret_key": "INSERT_YOUR_AWS_SECRET_KEY",
"region": "us-east-2",
},
"output": map[string]string{
"cloud_provider": "aws",
"access_key": "INSERT_YOUR_AWS_ACCESS_KEY",
"secret_key": "INSERT_YOUR_AWS_SECRET_KEY",
"region": "us-east-2",
},
},
}
jsonData, err := json.Marshal(data)
if err != nil {
fmt.Println("Error marshalling JSON:", err)
return
}
req, err := http.NewRequest("POST", url, bytes.NewBuffer(jsonData))
if err != nil {
fmt.Println("Error creating request:", err)
return
}
req.Header.Set("Content-Type", "application/json")
req.SetBasicAuth(username, password)
client := &http.Client{}
resp, err := client.Do(req)
if err != nil {
fmt.Println("Error sending request:", err)
return
}
defer resp.Body.Close()
body, err := ioutil.ReadAll(resp.Body)
if err != nil {
fmt.Println("Error reading response:", err)
return
}
fmt.Println("Response:", string(body))
}save the script above as se_api_aws.go or similar
run
go run se_api_aws.go
it will give print something like:
Response: {"_auto_generated_id_":13455,"cloud":"aws" ....
Remember your job number above and use it with the following script to check the status.
package main
import (
"encoding/base64"
"encoding/json"
"fmt"
"io/ioutil"
"net/http"
"os"
)
func main() {
if len(os.Args) < 2 {
fmt.Println("Please provide a job ID as an argument.")
os.Exit(1)
}
jobID := os.Args[1]
url := fmt.Sprintf("https://streamengine.igolgi.com/api/v0/job/%s", jobID)
apiKey := "INSERT_YOUR_API_KEY" // Replace with your actual API key
req, err := http.NewRequest("GET", url, nil)
if err != nil {
fmt.Println("Error creating request:", err)
return
}
// Set Authorization header
authHeader := base64.StdEncoding.EncodeToString([]byte(apiKey + ":"))
req.Header.Set("Authorization", "Basic "+authHeader)
client := &http.Client{}
resp, err := client.Do(req)
if err != nil {
fmt.Println("Error sending request:", err)
return
}
defer resp.Body.Close()
body, err := ioutil.ReadAll(resp.Body)
if err != nil {
fmt.Println("Error reading response:", err)
return
}
if resp.StatusCode == 200 {
var data map[string]interface{}
err = json.Unmarshal(body, &data)
if err != nil {
fmt.Println("Error parsing JSON:", err)
return
}
fmt.Println("Job Status:")
fmt.Println("------------------------")
status := data["status"].(map[string]interface{})
fmt.Printf("Job ID: %s\n", status["job_id"])
fmt.Printf("State: %s\n", status["state"])
fmt.Println("Progress:")
fmt.Printf(" Transcode: %v%%\n", status["tcode_progress"])
fmt.Printf(" Transfer: %v%%\n", status["xfer_progress"])
fmt.Println("Time:")
fmt.Printf(" Transcode: %v seconds\n", status["tcode_time"])
fmt.Printf(" Transfer: %v seconds\n", status["xfer_time"])
fmt.Println("Speed:")
fmt.Printf(" Transcode: %v x\n", status["tcode_speed"])
fmt.Printf(" Transfer: %v MB/s\n", status["xfer_speed"])
fmt.Printf("Job Completed: %v\n", status["job_completed"])
fmt.Println("\nJob Config:")
fmt.Println("------------------------")
config, err := json.MarshalIndent(data["config"], "", " ")
if err != nil {
fmt.Println("Error formatting config:", err)
} else {
fmt.Println(string(config))
}
} else {
fmt.Printf("Failed to retrieve job. Status code: %d\n", resp.StatusCode)
fmt.Printf("Response: %s\n", string(body))
}
}Save the script above as se-api-status.go or similar.
Run
go run se-api-status.go 13455
You'll see a result similar to the one below. The job ID of status will be different than the submit job id. You can rerun the status until you see Job Completed: true.
Job Status:
------------------------
Job ID: 4920
State: ready
Progress:
Transcode: 0%
Transfer: 0%
Time:
Transcode: <nil> seconds
Transfer: 78460.45 seconds
Speed:
Transcode: -1 x
Transfer: -1.0 MB/s
Job Completed: false
Job Config:
------------------------
{
"audioProfiles": [
{
"audio_bitrate": 256,
"audio_channels": 2,
"audio_codec": "aac",
"source_stream": 1
}
],
"audio_volume": 100,
"gop_length": 1,
"h264_quality": "good",
"input": "s3://igolgi-se-in/GOPR8297-2.7K-30-fps.MP4",
"output_container": "mp4",
"picture_transform": "none",
"scte35_passthough": false,
"segmented_output_dash": false,
"segmented_output_hls": false,
"separate_audio": false,
"videoProfiles": [
{
"audio_profiles": "1",
"height": 1080,
"output": "s3://igolgi-se-out/go-testcwaudio3f.mp4",
"video_bitrate": 2301,
"video_bitrate_mode": "cbr",
"video_framerate": "1x",
"width": 1920
}
],
"video_aspect_ratio": "passthrough",
"video_codec": "h.264"
}
On linux/Ubuntu if you have never used go.
You can run:
$ sudo apt update
$ sudo apt install golang-go
Javascript Examples
The following code sample was written in java using the fetch method.
It requires an API_KEY and FILE_NUMBER_OF_UPLOADED_VIDEO
Depending on your operating system you will need node.js loaded https://nodejs.org/en
and this code can be run:
node se-localfile.mjs
node --experimental-modules se-localfile.mjs
se-localfile.mjs
import fetch from 'node-fetch';
const url = 'https://streamengine.igolgi.com/api/v0/job';
const username = 'API_KEY';
const password = 'a';
const headers = {
'Authorization': 'Basic ' + Buffer.from(username + ":" + password).toString('base64'),
'Content-Type': 'application/json'
};
const data = {
videoProfiles: [
{
width: 960,
height: 544,
video_bitrate: 2500,
video_framerate: "1x",
audio_profiles: "0"
}
],
separate_audio: false,
segmented_output_dash: false,
output_container: "mp4",
picture_transform: "none",
logo_url: null,
audio_volume: 100,
closed_captions: false,
create_tar_file: false,
gop_length: 2,
h264_quality: "good",
scte35_pid_remap: -1,
video_aspect_ratio: "rotate_counterclockwise + invert_aspect_ratio",
rotation_blackness: 0,
scte35_passthough: false,
segmented_output_hls: false,
ip_distance: 2,
audioProfiles: [
{
audio_codec: "aac",
audio_channels: 2,
audio_bitrate: 256,
primary_audio_downmix_to_stereo: false,
source_stream: 1
}
],
input: "https://streamengine.igolgi.com/uploads/FILE_NUMBER_OF_UPLOADED_VIDEO",
cloud_credentials: {
input: {
cloud_provider: "file-upload",
access_key: null,
secret_key: null,
region: "ca-toronto-1",
tenancy_ocid: null,
user_ocid: null,
oci_fingerprint: null
},
output: {
cloud_provider: "igolgi-store",
access_key: null,
secret_key: null,
region: "ca-toronto-1",
tenancy_ocid: null,
user_ocid: null,
oci_fingerprint: null
}
},
master_variant_mode: false,
video_codec: "h.264"
};
fetch(url, {
method: 'POST',
headers: headers,
body: JSON.stringify(data)
})
.then(response => response.json())
.then(data => console.log(data))
.catch(error => console.error('Error:', error));se-job-status.mjs $node se-job-status.mjs job-id
This sample script will run every 10 seconds to see if a job is still running, when its finished it will display finished, feel free to modify this.
import fetch from 'node-fetch';
const checkJobStatus = async (jobId) => {
const url = `https://streamengine.igolgi.com/api/v0/job/${jobId}`; // Adjust this URL as needed
const username = 'API_KEY';
const password = 'a';
const headers = {
'Authorization': 'Basic ' + Buffer.from(username + ":" + password).toString('base64'),
'Content-Type': 'application/json'
};
try {
const response = await fetch(url, {
method: 'GET',
headers: headers
});
if (!response.ok) {
throw new Error(`HTTP error! status: ${response.status}`);
}
const data = await response.json();
console.log('Job status:', data);
return data;
} catch (error) {
console.error('Error checking job status:', error);
}
};
const checkUntilComplete = async (jobId) => {
let status;
do {
const result = await checkJobStatus(jobId);
status = result.status; // Adjust this based on the actual API response structure
if (status !== 'completed') {
console.log('Job still in progress. Waiting 10 seconds before checking again...');
await new Promise(resolve => setTimeout(resolve, 10000)); // Wait for 10 seconds
}
} while (status !== 'completed');
console.log('Job completed!');
};
// Get job ID from command line argument
const jobId = process.argv[2];
if (!jobId) {
console.error('Please provide a job ID as a command-line argument.');
console.error('Usage: node se-job-status.mjs <job_id>');
process.exit(1);
}
console.log(`Checking status for job ID: ${jobId}`);
checkUntilComplete(jobId);Ruby Examples
Feel free to modify the following script for your environment. To process the video, this script below assumes your job is on aws in an S3 bucket for input and output.
require 'net/http'
require 'uri'
require 'json'
url = URI.parse("https://streamengine.igolgi.com/api/v0/job")
headers = {
'Content-Type' => 'application/json'
}
# Authentication credentials (username and password)
auth = ['INSERT_YOUR_API_KEY', 'a']
# Data to be sent in the POST request
data = {
videoProfiles: [
{
output: 's3://igolgi-se-out/rb-testcwaudio3e.mp4',
width: 1920,
height: 1080,
video_bitrate_mode: 'cbr',
video_bitrate: 2400,
video_format: 'progressive',
video_framerate: '1x',
audio_profiles: '1'
}
],
audioProfiles: [
{
audio_bitrate: 256,
audio_channels: 2,
audio_codec: 'aac',
source_stream: 1
}
],
master_variant_mode: false,
output_container: "mp4",
video_codec: "h.264",
input: "s3://igolgi-se-in/GOPR8297-2.7K-30-fps.MP4",
auto_detelecine_flag: false,
cloud_credentials: {
input: {
cloud_provider: "aws",
access_key: "INSERT_YOUR_AWS_ACCESS_KEY",
secret_key: "INSERT_YOUR_AWS_SECRET_KEY",
region: "us-east-2"
},
output: {
cloud_provider: "aws",
access_key: "INSERT_YOUR_AWS_ACCESS_KEY",
secret_key: "INSERT_YOUR_AWS_SECRET_KEY",
region: "us-east-2"
}
}
}
http = Net::HTTP.new(url.host, url.port)
http.use_ssl = true
http.verify_mode = OpenSSL::SSL::VERIFY_NONE # Not recommended for production
request = Net::HTTP::Post.new(url.path, headers)
request.basic_auth(auth[0], auth[1])
request.body = data.to_json
response = http.request(request)
# Print the response content
puts response.bodySave the file as se-api-aws.rb or similar.
Run:
ruby se-api-aws.rb
You may notice an error like this:
...error ... message: "The video bitrate for this profile and codec should set at a minimum of 2300."...
The error above means the video_bitrate variable in the code should be higher than 2300, it was already changed in the code above, but used as an example of the messages you might see.
When it runs correctly you might see something similar to this:{"_auto_generated_id_":13453,..."updated_at":"2024-07-16T18:49:57.000Z"}
The Id number can also be found on the Job History page.

If you want to see the status of the job from ruby you can use this code:
require 'net/http'
require 'uri'
require 'json'
# Check if an argument was provided
if ARGV.length > 0
external_var = ARGV[0]
else
puts "Please provide a job ID as an argument."
exit
end
# Define the URL and API key
url = URI.parse("https://streamengine.igolgi.com/api/v0/job/#{external_var}")
api_key = "1a944b985b09c14b5001ba5cc1a1f585"
# Set up the HTTP request
http = Net::HTTP.new(url.host, url.port)
http.use_ssl = true
request = Net::HTTP::Get.new(url.request_uri)
request.basic_auth(api_key, '')
# Make the GET request
response = http.request(request)
# Check for a successful response
if response.code == '200'
puts "Job Status:"
puts "------------------------"
puts "Job ID: #{data['status']['job_id']}"
puts "State: #{data['status']['state']}"
puts "Progress:"
puts " Transcode: #{data['status']['tcode_progress']}%"
puts " Transfer: #{data['status']['xfer_progress']}%"
puts "Time:"
puts " Transcode: #{data['status']['tcode_time']} seconds"
puts " Transfer: #{data['status']['xfer_time']} seconds"
puts "Speed:"
puts " Transcode: #{data['status']['tcode_speed']} x"
puts " Transfer: #{data['status']['xfer_speed']} MB/s"
puts "Job Completed: #{data['status']['job_completed']}"
puts "\nJob Config:"
puts "------------------------"
puts JSON.pretty_generate(data['config'])
else
puts "Failed to retrieve job. Status code: #{response.code}"
puts "Response: #{response.body}"
endSave the file above as se_api_status.rb or similar
Run
ruby se_api_status.rb 13453 where 13453 is the job number
Job Status:
------------------------
Job ID: 4918
State: ready
Progress:
Transcode: 100%
Transfer: 0%
Time:
Transcode: 19.06 seconds
Transfer: 28.29 seconds
Speed:
Transcode: 0.0 x
Transfer: 0.0 MB/s
Job Completed: true
Job Config:
------------------------
{
"input": "s3://igolgi-se-in/GOPR8297-2.7K-30-fps.MP4",
"videoProfiles": [
{
"output": "s3://igolgi-se-out/py2-testcwaudio3e.mp4",
"width": 1920,
"height": 1080,
"video_bitrate_mode": "cbr",
"video_bitrate": 2400,
"video_framerate": "1x",
"audio_profiles": "1"
}
],
"audioProfiles": [
{
"audio_codec": "aac",
"audio_channels": 2,
"audio_bitrate": 256,
"source_stream": 1
}
],
"output_container": "mp4",
"separate_audio": false,
"segmented_output_hls": false,
"segmented_output_dash": false,
"video_codec": "h.264",
"gop_length": 1,
"scte35_passthough": false,
"audio_volume": 100,
"h264_quality": "good",
"video_aspect_ratio": "passthrough",
"picture_transform": "none"
}
Python Examples
The following example uses video files on AWS in an S3 bucket and writes files out to a different AWS S3 Bucket.
import requests
url = "https://streamengine.igolgi.com/api/v0/job"
headers = {
'Content-Type': 'application/json',
}
# Authentication credentials (username and password)
auth = ('INSERT_YOUR_API_KEY', 'a')
# Data to be sent in the POST request
data = {
'videoProfiles': [
{
'output': 's3://igolgi-se-out/py2-testcwaudio3d.mp4',
'width': 1920,
'height': 1080,
'video_bitrate_mode': 'cbr',
'video_bitrate': 2250, # there are minimum bitrates see tables
'video_format': 'progressive',
'video_framerate': '1x',
'audio_profiles': '1' # required if you want audio 0 - 7
}],
'audioProfiles': [
{
'audio_bitrate': 256,
'audio_channels': 2,
'audio_codec': 'aac',
'source_stream': 1 # required if you want audio 1 - 8
}],
"master_variant_mode": False,
"output_container": "mp4",
"video_codec": "h.264",
"input": "s3://igolgi-se-in/GOPR8297-2.7K-30-fps.MP4",
"auto_detelecine_flag": False,
"cloud_credentials": {
"input": {
"cloud_provider": "aws",
"access_key": "INSERT_YOUR_AWS_ACCESS_KEY",
"secret_key": "INSERT_YOUR_AWS_SECRET_KEY",
"region": "us-east-2"
},
"output": {
"cloud_provider": "aws",
"access_key": "INSERT_YOUR_AWS_ACCESS_KEY",
"secret_key": "INSERT_YOUR_AWS_SECRET_KEY",
"region": "us-east-2"
}
}
}
# Disable SSL verification (not recommended for production)
response = requests.post(url, json=data, headers=headers, auth=auth)
# Print the response content
print(response.content.decode('utf-8'))
import requests
import sys
import json
from requests.auth import HTTPBasicAuth
if len(sys.argv) > 1:
external_var = sys.argv[1]
else:
print("Please provide a job ID as an argument.")
sys.exit(1)
# Define the URL and API key
url = f"https://streamengine.igolgi.com/api/v0/job/{external_var}"
api_key = "INSERT_YOUR_API_KEY"
# Make the GET request
response = requests.get(url, auth=HTTPBasicAuth(api_key, ''))
# Check for a successful response
if response.status_code == 200:
data = response.json()
status = data.get("status", {})
config = data.get("config", {})
print("Job Status:")
print("------------------------")
print(f"Job ID: {status.get('job_id')}")
print(f"State: {status.get('state')}")
print("Progress:")
print(f" Transcode: {status.get('tcode_progress')}%")
print(f" Transfer: {status.get('xfer_progress')}%")
print("Time:")
print(f" Transcode: {status.get('tcode_time')} seconds")
print(f" Transfer: {status.get('xfer_time')} seconds")
print("Speed:")
print(f" Transcode: {status.get('tcode_speed')} x")
print(f" Transfer: {status.get('xfer_speed')} MB/s")
print(f"Job Completed: {status.get('job_completed')}")
print("\nJob Config:")
print("------------------------")
print(json.dumps(config, indent=2))
else:
print(f"Failed to retrieve job. Status code: {response.status_code}")
print("Response:", response.text)
Job Status:
------------------------
Job ID: 4920
State: ready
Progress:
Transcode: 100%
Transfer: 0%
Time:
Transcode: 19.94 seconds
Transfer: 27.87 seconds
Speed:
Transcode: 0.0 x
Transfer: 0.0 MB/s
Job Completed: True
Job Config:
------------------------
{
"input": "s3://igolgi-se-in/GOPR8297-2.7K-30-fps.MP4",
"videoProfiles": [
{
"output": "s3://igolgi-se-out/go-testcwaudio3f.mp4",
"width": 1920,
"height": 1080,
"video_bitrate_mode": "cbr",
"video_bitrate": 2301,
"video_framerate": "1x",
"audio_profiles": "1"
}
],
"audioProfiles": [
{
"audio_codec": "aac",
"audio_channels": 2,
"audio_bitrate": 256,
"source_stream": 1
}
],
"output_container": "mp4",
"separate_audio": false,
"segmented_output_hls": false,
"segmented_output_dash": false,
"video_codec": "h.264",
"gop_length": 1,
"scte35_passthough": false,
"audio_volume": 100,
"h264_quality": "good",
"video_aspect_ratio": "passthrough",
"picture_transform": "none"
}
Stream videos with HTML-DASH and HLS
Why would I want to use hls or dash?
Dash and Hls are great for streaming large files and give the user the ability to jump around in the video, fast forward, rewind or jump to an index. In the past you needed expensive streaming servers and serve videos using rtsp: or mms:
In StreamEngine convert a file you want to stream from a website to mp4-hls, mp4-dash or mp4-hls+dash. This will create a tar or tar.gz file
DASH - Dynamic Adaptive Streaming over HTTP
then copy the file to your webserver and name it playlist.m3u8 or modify the <source src = "playlist.m3u8" ... line below.
<!DOCTYPE html>
<html lang="en">
<head>
<meta charset="UTF-8">
<meta name="viewport" content="width=device-width, initial-scale=1.0">
<title>HLS-DASH Player</title>
<link href="https://vjs.zencdn.net/7.20.3/video-js.min.css" rel="stylesheet">
<script src="https://vjs.zencdn.net/7.20.3/video.min.js"></script>
</head>
<body>
<video-js id="my-video" class="video-js vjs-default-skin vjs-big-play-centered" controls preload="auto" width="640" height="360">
<source src="playlist.m3u8" type="application/x-mpegURL">
</video-js>
<script>
var player = videojs('my-video');
player.play();
</script>
</body>
</html>This HTML file does the following:
- It includes the video.js CSS and JavaScript files from a CDN.
- It creates a video player using the
video-jstag. - It sets the source of the video to your
playlist.m3u8file. - It initializes the video.js player and attempts to start playback.
To use this:
- Save this HTML code to a file (e.g.,
player.html) on your web server. - Make sure your
playlist.m3u8file is in the same directory as the HTML file, or update thesrcattribute with the correct path to your playlist file. - Access the HTML file through your web server (e.g.,
https://yourserver.com/player.html).
Note:
- Ensure that your web server is correctly configured to serve the
.m3u8file with the correct MIME type (application/x-mpegURL). - The player's size is set to 640x360 pixels. You can adjust these values as needed.
- This example uses video.js version 7.20.3. You may want to check for the latest version and update the URLs accordingly.
Curl - Check Job Status
When you submit a curl job you should get a response back from the StreamEngine server with the job id on it.
Curl - Linux and Windows
curl -u API_KEY:a -H "Content-Type: application/json" https://streamengine.igolgi.com/api/v0/job/<JOB_ID>
replace API_KEY with your StreamEngine API Key
replace <JOB_ID>
If you only want to see job status and have jq installed on linux you can run
curl -u API_KEY:a -H "Content-Type: application/json" https://streamengine.igolgi.com/api/v0/job/<JOB_ID> | jq ".status"
$ curl -u API_KEY:a -H "Content-Type: application/json" https://streamengine.igolgi.com/api/v0/job/<JOB_ID> | jq ".status"
% Total % Received % Xferd Average Speed Time Time Time Current
Dload Upload Total Spent Left Speed
100 1079 100 1079 0 0 9989 0 --:--:-- --:--:-- --:--:-- 10084
{
"job_id": "5087",
"tcode_progress": "100",
"state": "ready",
"tcode_time": "36.84",
"tcode_speed": "0.0",
"job_completed": true,
"xfer_speed": "0.0",
"xfer_time": "86398.93",
"xfer_progress": "100"
}
Note the job_id above (backend) will be different than is the <JOB_ID> submitted which is the id of the frontend,
or
$ curl -u API_KEY:a -H "Content-Type: application/json" https://streamengine.igolgi.com/api/v0/job/<JOB_ID> | jq ".status.job_completed"
% Total % Received % Xferd Average Speed Time Time Time Current
Dload Upload Total Spent Left Speed
100 1079 100 1079 0 0 9099 0 --:--:-- --:--:-- --:--:-- 9144
true
jq is available for Windows, use at your own risk, it's a separate install, AMD64 executable should work with intel.
Windows cmd, note API_KEY blurred out.
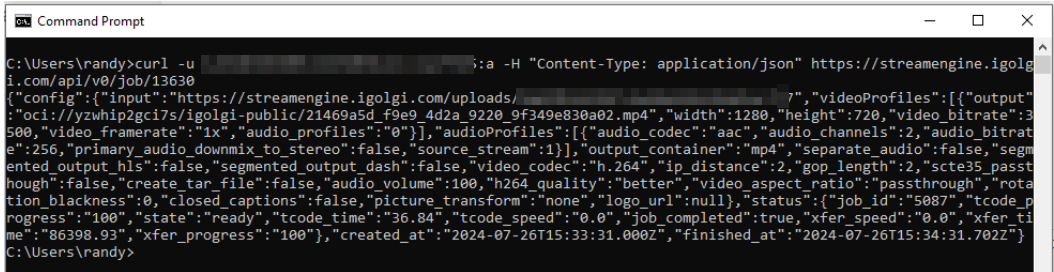
On Windows with PowerShell. PowerShell is a little different curl works but -u option does not so we will need to write a program.
param(
[Parameter(Mandatory=$true)]
[string]$JobId
)
$url = "https://streamengine.igolgi.com/api/v0/job/$JobId"
$username = "API_KEY"
$password = "a"
$base64AuthInfo = [Convert]::ToBase64String([Text.Encoding]::ASCII.GetBytes(("{0}:{1}" -f $username,$password)))
$headers = @{
Authorization = "Basic $base64AuthInfo"
"Content-Type" = "application/json"
}
try {
$response = Invoke-RestMethod -Uri $url -Headers $headers -Method Get
Write-Host "Status for Job ID: $JobId"
Write-Host "Full status:"
$response.status | ConvertTo-Json
Write-Host "`nKey status fields:"
Write-Host "State: $($response.status.state)"
Write-Host "Job Completed: $($response.status.job_completed)"
Write-Host "Tcode Progress: $($response.status.tcode_progress)%"
Write-Host "Xfer Progress: $($response.status.xfer_progress)%"
}
catch {
Write-Host "Error checking job status: $_"
}
save it to a file for example CheckJobStatus.ps1
Then you can run the script above.
.\CheckJobStatus.ps1 -JobID <JOB_ID>
Linux shell script if you want to store your API key an reuse it with a script.
#!/bin/bash
JOB_ID=$1
if [ -z "$JOB_ID" ]; then
echo "Please provide a job ID as an argument."
echo "Usage: ./check_job_status.sh <job_id>"
exit 1
fi
echo "Checking status for job ID: $JOB_ID"
while true; do
response=$(curl -s -u API_KEY:a -H "Content-Type: application/json" https://streamengine.igolgi.com/api/v0/job/$JOB_ID)
status=$(echo $response | jq -r '.status')
echo "Job status: $status"
if [ "$status" = "completed" ]; then
echo "Job completed!"
break
else
echo "Job still in progress. Waiting 10 seconds before checking again..."
sleep 10
fi
doneCurl - Windows PowerShell
Here is another example on Windows in PowerShell
.\CheckJobStatus.ps1 -JobId <Your-Job-ID>
param(
[Parameter(Mandatory=$true)]
[string]$JobId
)
$url = "https://streamengine.igolgi.com/api/v0/job/$JobId"
$username = "API_KEY"
$password = "a"
$base64AuthInfo = [Convert]::ToBase64String([Text.Encoding]::ASCII.GetBytes(("{0}:{1}" -f $username,$password)))
$headers = @{
Authorization = "Basic $base64AuthInfo"
"Content-Type" = "application/json"
}
function Check-JobStatus {
try {
$response = Invoke-RestMethod -Uri $url -Headers $headers -Method Get
return $response
}
catch {
Write-Host "Error checking job status: $_"
return $null
}
}
Write-Host "Checking status for job ID: $JobId"
do {
$result = Check-JobStatus
if ($result -ne $null) {
$status = $result.status # Adjust this if the API response structure is different
Write-Host "Job status: $status"
if ($status -ne "completed") {
Write-Host "Job still in progress. Waiting 10 seconds before checking again..."
Start-Sleep -Seconds 10
}
}
else {
Write-Host "Failed to get job status. Retrying in 10 seconds..."
Start-Sleep -Seconds 10
}
} while ($status -ne "completed")
Write-Host "Job completed!"Tutorials
Quick Start 1 (drag and drop)
Prerequisites:
- Computer with a Browser
- Local .mp4 video file
After you login you should go to the Dashboard page
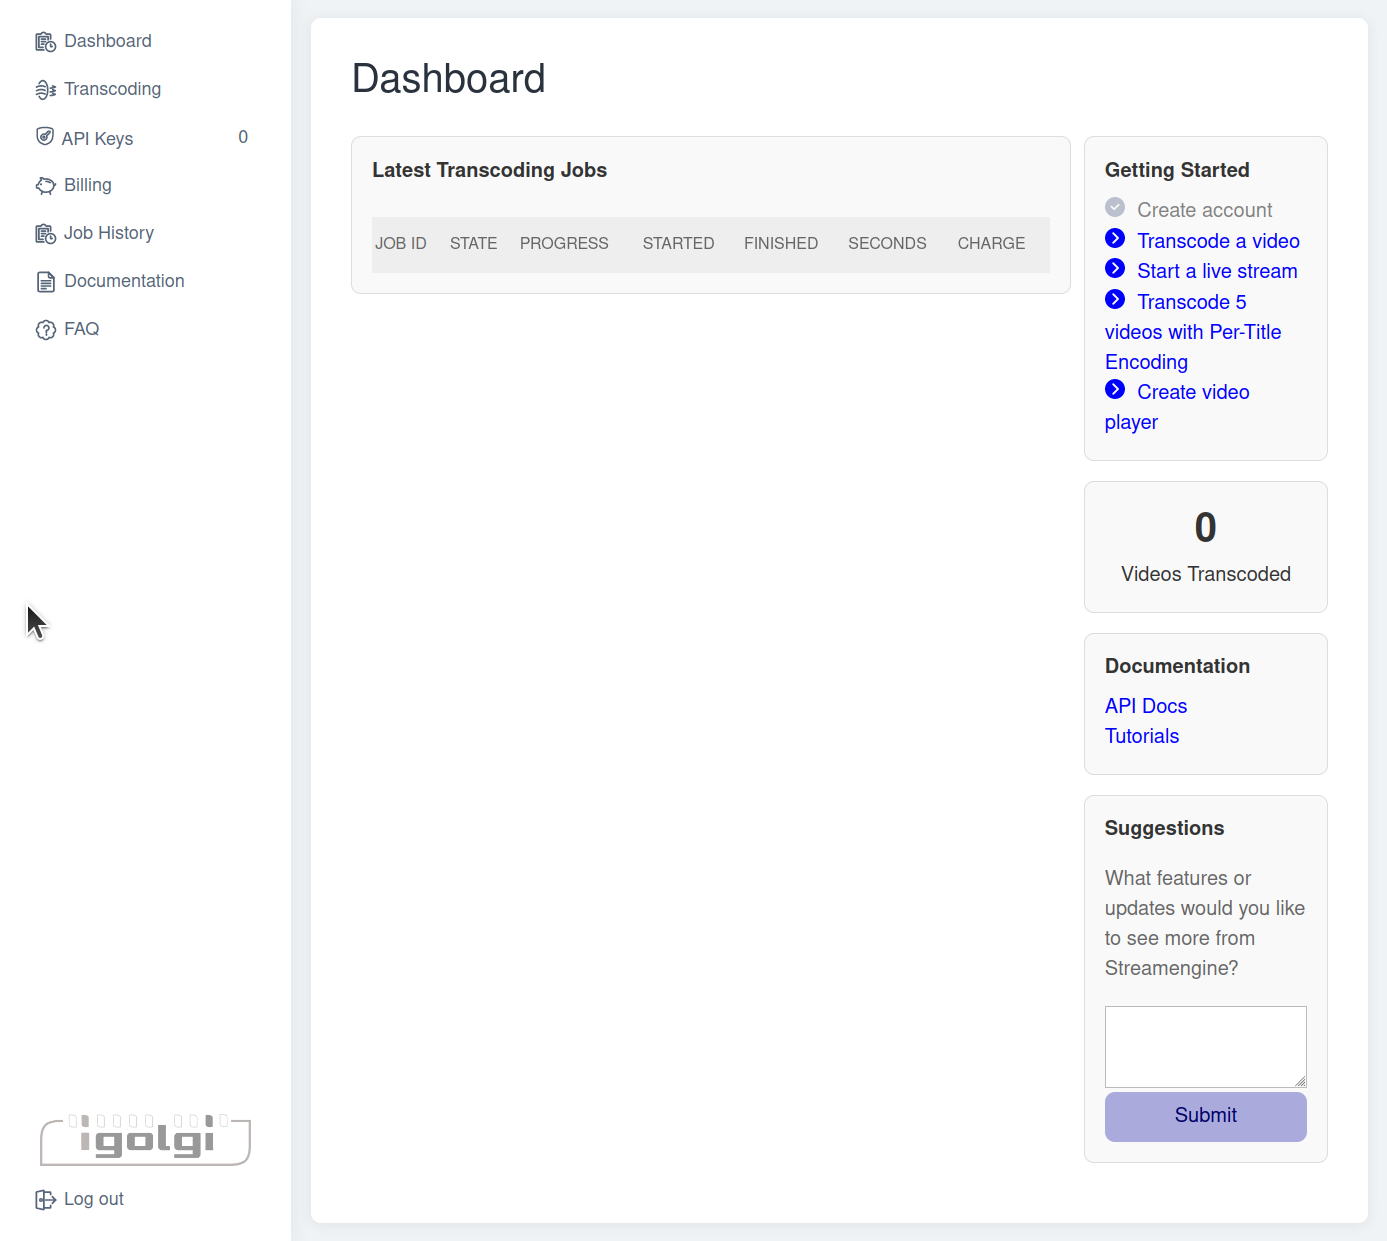
Click "Transcode a Video" on right side under getting started or the "Transcoding" link on the left side of the screen. This should open the Start a Transcoding Job page

Click on Input Location
Under Cloud Provider. click the drop down and select file-upload
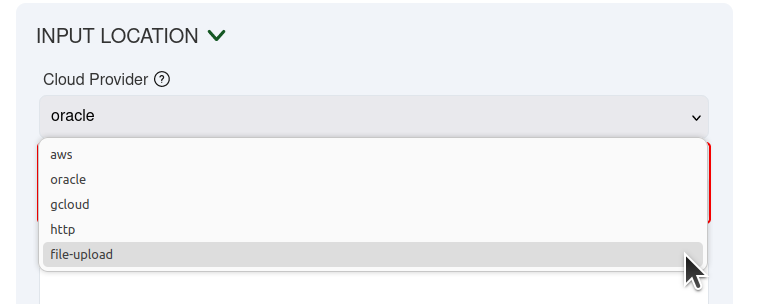
Find an mp4 file and drag and drop it into the Drop here or click on the Green Arrow to browse for the file.

Wait a few seconds or minutes depending on the size of the file and speed of your network.
Note: Demo Users are limited to ???25MB??? file sizes.
You will see a message when the file has successfully been uploaded,
Once your job has been loaded, click the blue Run Job bar at the bottom of the screen
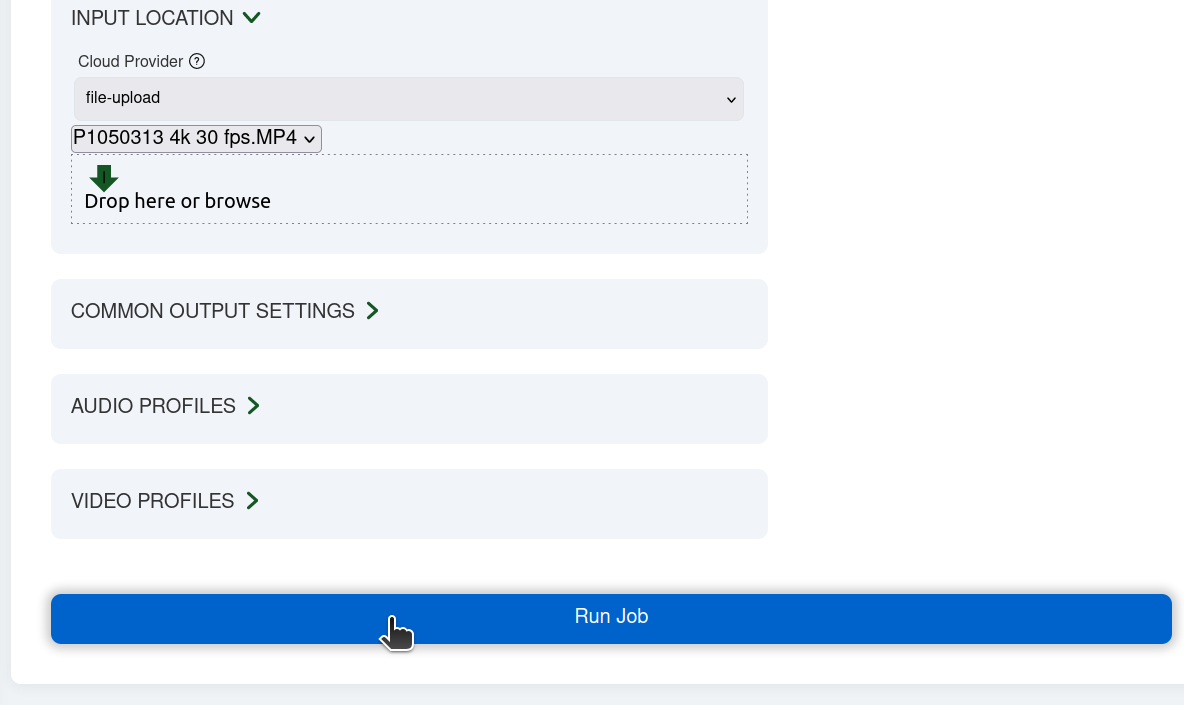
You should see your job get transferred into the job queue and transcoded by watching a slider at the bottom of the screen. After a minute or so depending on the size of the file you should see a message in the lower right hand corner that says your job has successfully been completed. If you miss the message the run job bar will changed from dark blue to blue.
Now let's save our job as a template so we can come back and modify it later.
Click on Save As in the upper right hand corner.
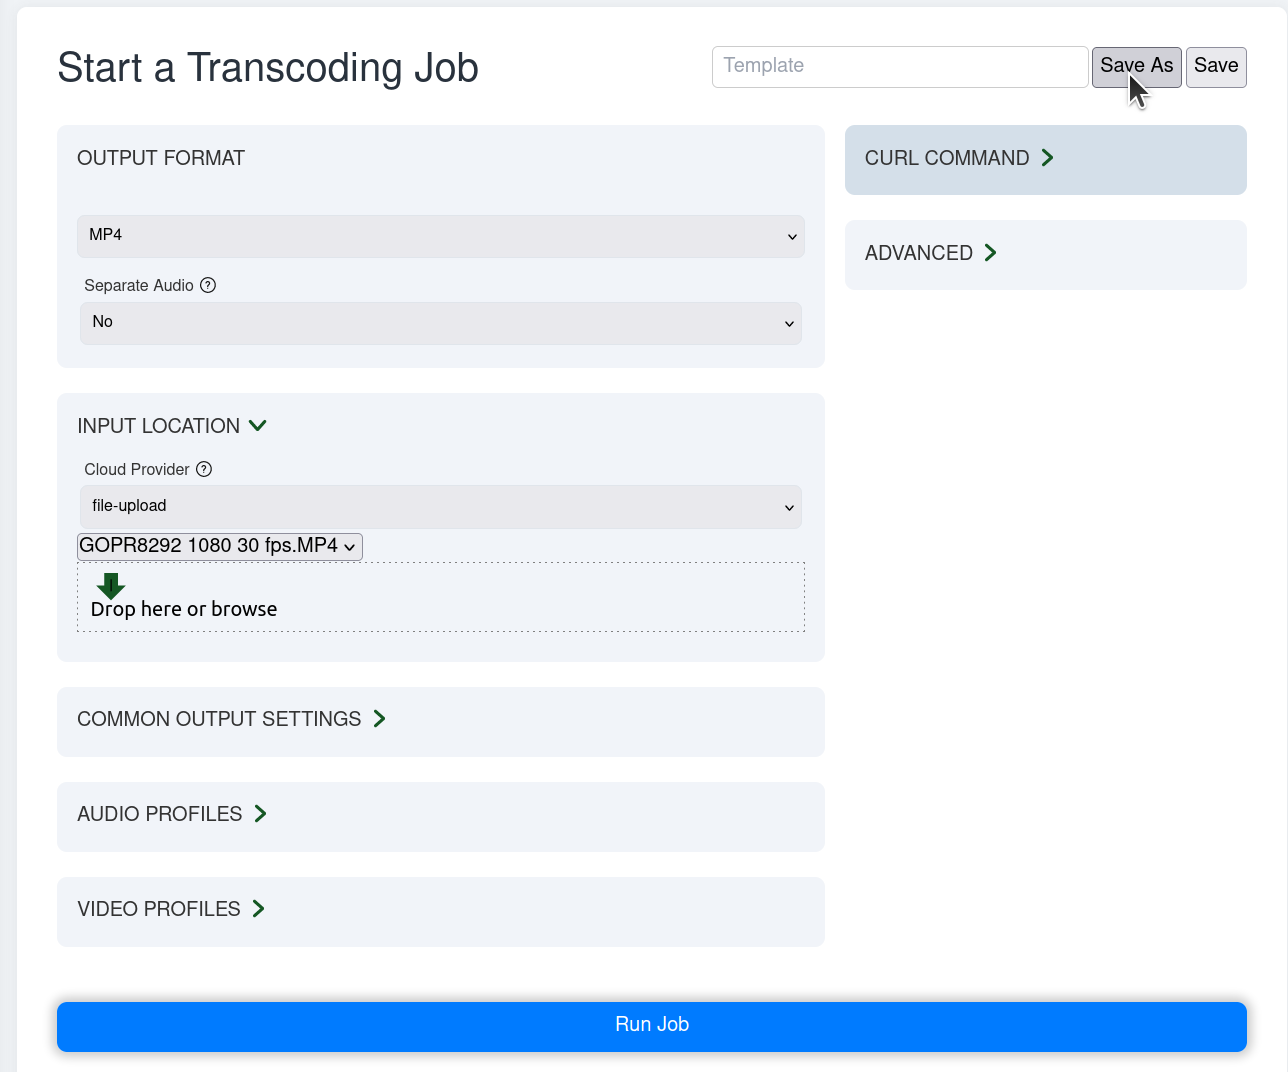
You can name it anything you want then click OK.
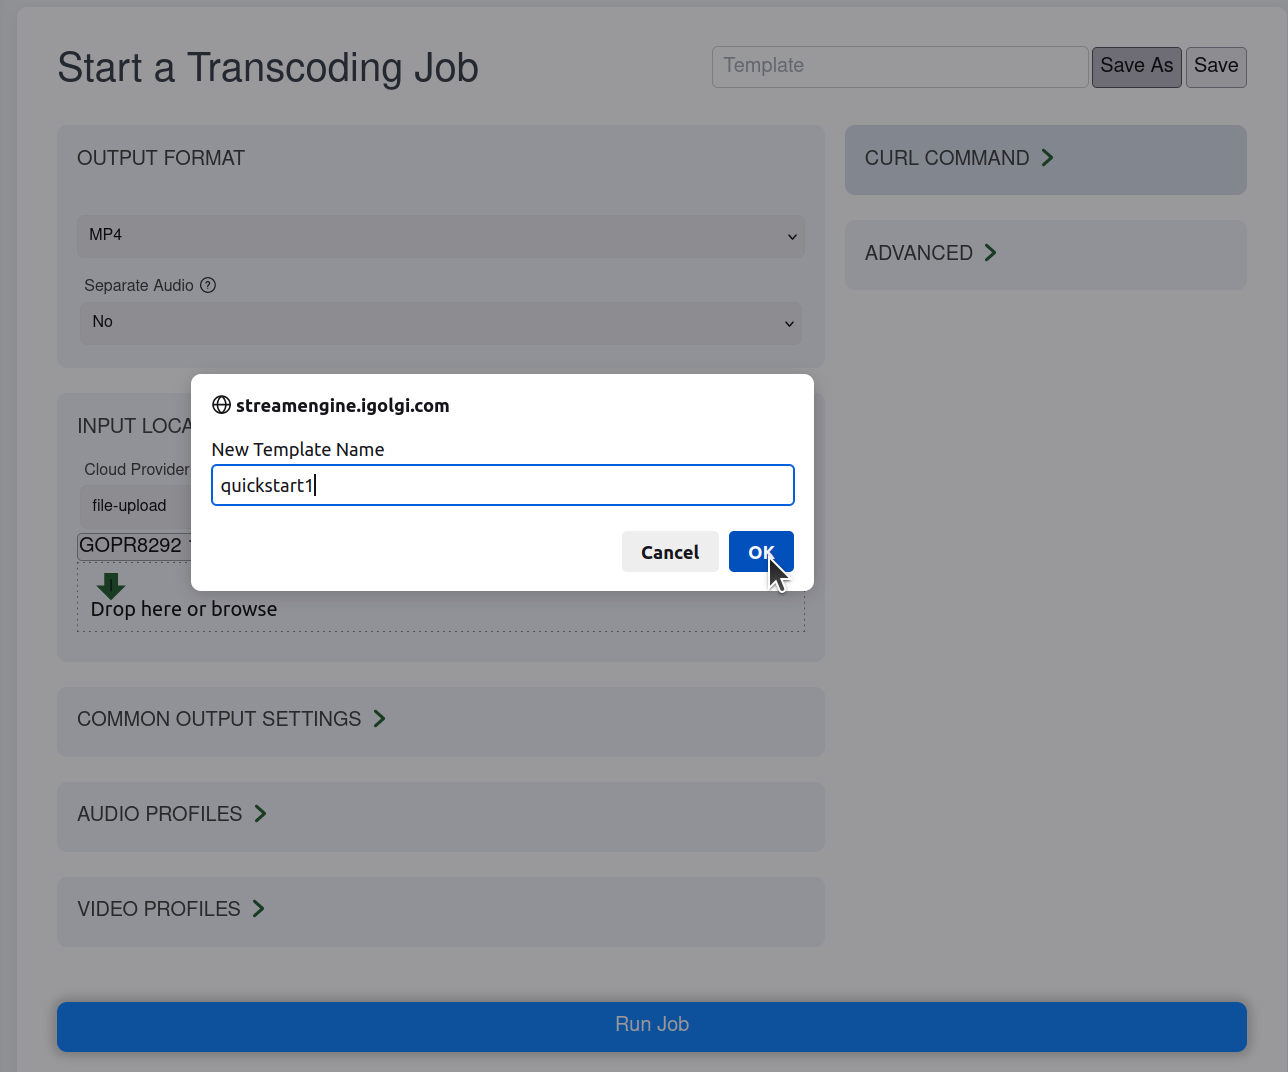
Now let's take a look at your job.
Click on the Job History link in the upper left hand corner.
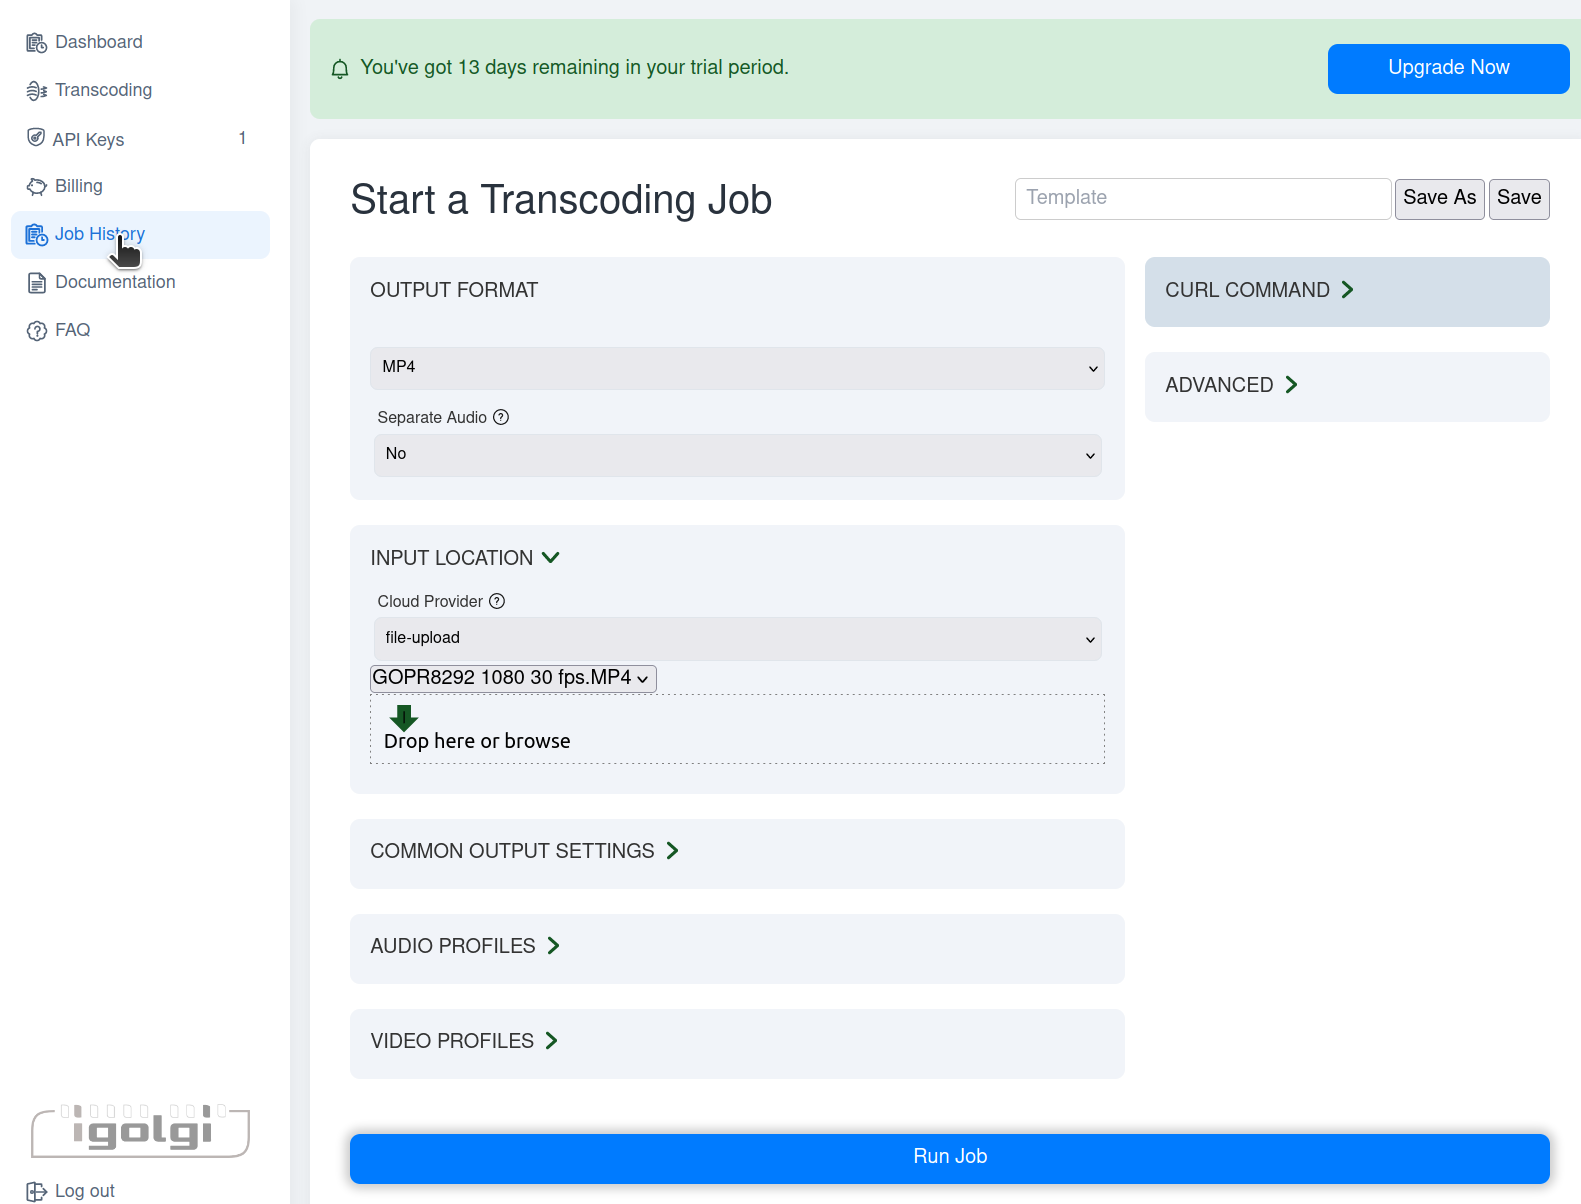
Find the last job you created and click on Watch. Please Note: it is possible to create a video that will not run on your local computer or mobile device if you don't have the proper codecs to play the video.
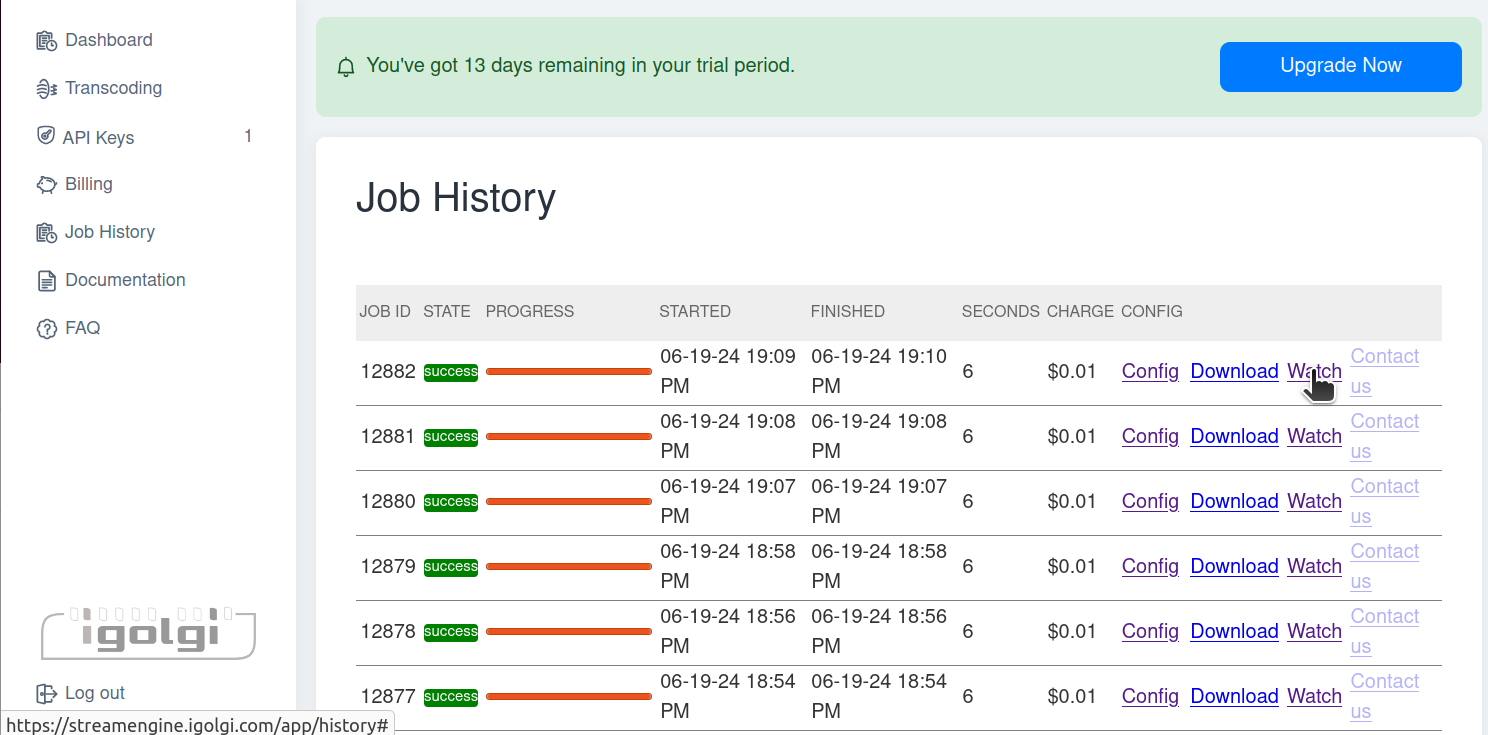
A video player should popup and play your video. You can also download the video to your local computer. Please Note: download name is a random name, you may want to rename it to whatever name you want.
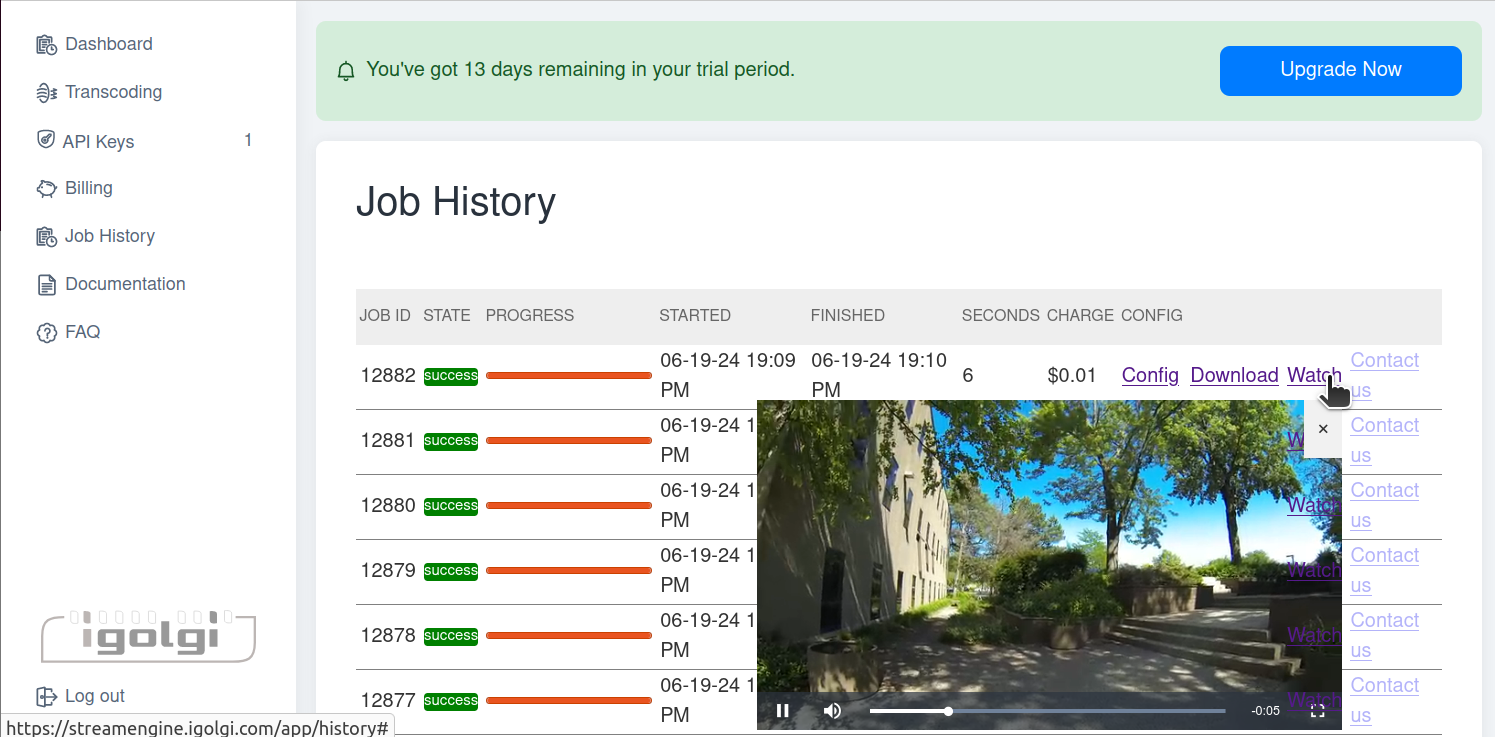
Now you might what to go back to the transcode page and play around with other settings. To learn more about other options, see our transcoding page documentation.
Quick Start 2 (mobile or tablet)
Prerequisites:
- Cell phone or tablet connected to the internet with a camera
MODIFY for mobile
After you login you should go to the Dashboard page
Click "Transcode a Video" on right side under getting started or the "Transcoding" link on the left side of the screen. This should open the Start a Transcoding Job page
Click on Input Location
Under Cloud Provider. click the drop down and select file-upload
Find an mp4 file and drag and drop it into the Drop here or click on the Green Arrow to browse for the file.
Wait a few seconds or minutes depending on the size of the file and speed of your network.
Note: Demo Users are limited to ???25MB??? file sizes.
You will see a message when the file has successfully been uploaded,
Once your job has been loaded, click the blue Run Job bar at the bottom of the screen
You should see your job get transferred into the job queue and transcoded by watching a slider at the bottom of the screen. After a minute or so depending on the size of the file you should see a message in the lower right hand corner that says your job has successfully been completed. If you miss the message the run job bar will changed from dark blue to blue.
Now let's save our job as a template so we can come back and modify it later.
Click on Save As in the upper right hand corner.
You can name it anything you want then click OK.
Now let's take a look at your job.
Click on the Job History link in the upper left hand corner.
Find the last job you created and click on Watch. Please Note: it is possible to create a video that will not run on your local computer or mobile device if you don't have the proper codecs to play the video.
A video player should popup and play your video. You can also download the video to your local computer. Please Note: download name is a random name, you may want to rename it to whatever name you want.
Now you might what to go back to the transcode page and play around with other settings. To learn more about other options, see our transcoding page documentation.
Videos
Getting Started with Drag and Drop
Anatomy of a Video
When you look behind the scenes of a video on YouTube you will notice that each video has more than one video (in the example below, YouTube has 24 videos). Streaming video companies like YouTube, Netflix, Apple, Pluto and others need to support different devices with different bandwidths and screen resolutions. If the internet gets too bogged down, video providers will step down to the next video at a lower bandwidth until a higher bandwidth is available.
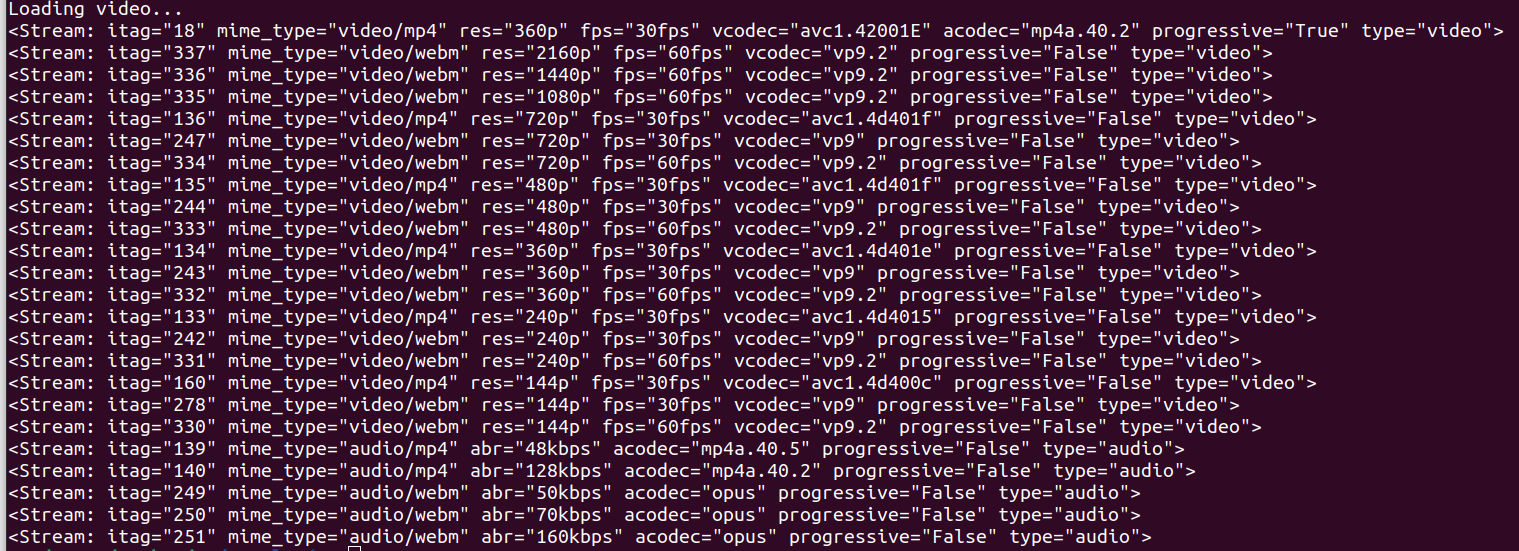
Most video files are actually containers. mp4, avi, mov, mkv and flv are containers. Containers can hold a lot of information, audio tracks in different languages, video, closed caption text files etc.
Codecs are different from containers as they compress and decompress different file. The word codec was even taken from compress and decompress. Most popular codecs are h.264, h.265 or hevc, aac, mp3 and others vp9 is a youtube codec.
Tools like ffprobe and mediainfo allow you to see inside of a video container. Most containers contain a compressed video and at least 1 audio track.
StreamEngine allows you to convert up to 8 audio tracks inside of a container.
Below is a video from the united nations with many different language tracks.
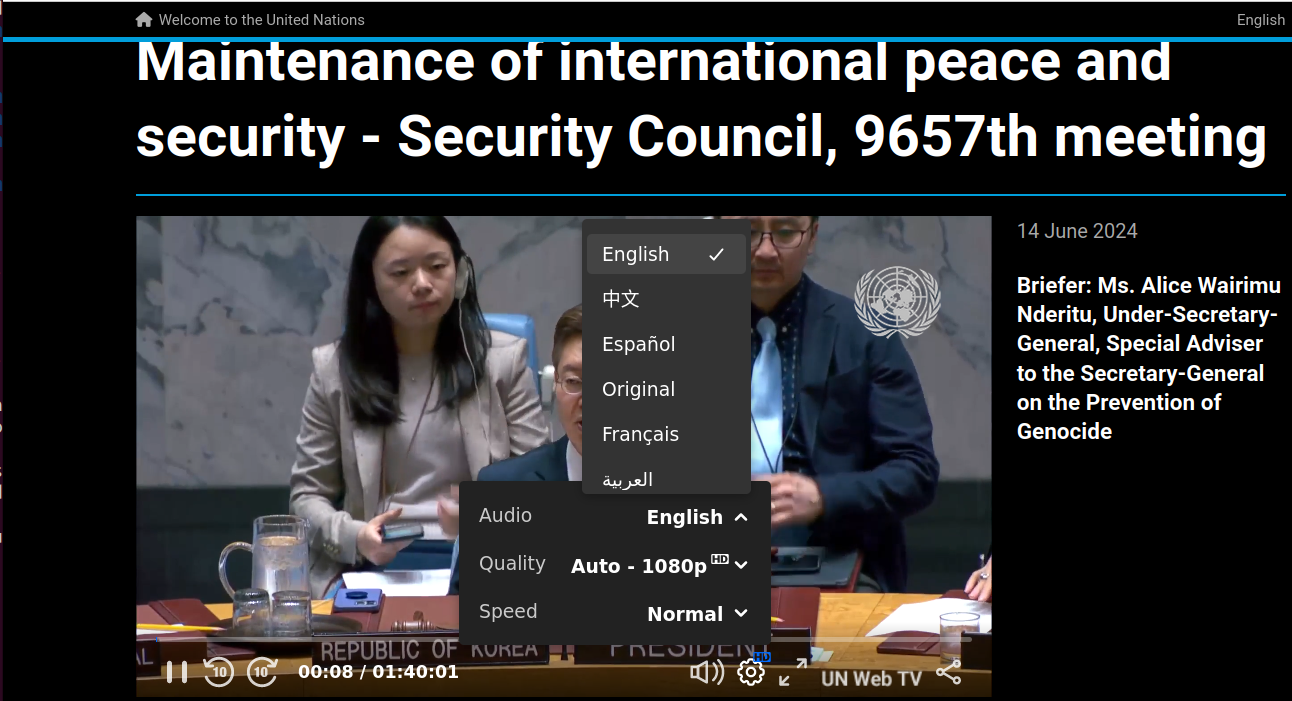
Here is what a .mov video container looks like with mediainfo, the following example has 4 - two channel audio tracks as well as 1 video track and 1 other track.
$ mediainfo 1080i60_SMPTE_8CH_audible.mov
General
Complete name : 1080i60_SMPTE_8CH_audible.mov
Format : MPEG-4
Format profile : QuickTime
Codec ID : qt 2005.03 (qt )
File size : 63.8 MiB
Duration : 14 s 181 ms
Overall bit rate mode : Variable
Overall bit rate : 37.7 Mb/s
Encoded date : UTC 2021-03-04 16:00:20
Tagged date : UTC 2021-03-04 16:00:22
Writing library : Apple QuickTime
TIM : 00;00;00;00
TSC : 60000
TSZ : 1001
Video
ID : 1
Format : ProRes
Format version : Version 0
Format profile : 422 LT
Codec ID : apcs
Duration : 14 s 181 ms
Bit rate mode : Variable
Bit rate : 31.0 Mb/s
Width : 1 920 pixels
Height : 1 080 pixels
Display aspect ratio : 16:9
Frame rate mode : Constant
Frame rate : 59.940 (60000/1001) FPS
Color space : YUV
Chroma subsampling : 4:2:2
Scan type : Interlaced
Scan type, store method : Interleaved fields
Scan order : Top Field First
Bits/(Pixel*Frame) : 0.249
Stream size : 52.4 MiB (82%)
Writing library : adb0
Language : English
Encoded date : UTC 2021-03-04 16:00:20
Tagged date : UTC 2021-03-04 16:00:20
Color primaries : BT.709
Transfer characteristics : BT.709
Matrix coefficients : BT.709
Audio #1
ID : 2
Format : PCM
Format settings : Little / Signed
Codec ID : sowt
Duration : 14 s 181 ms
Bit rate mode : Constant
Bit rate : 1 536 kb/s
Channel(s) : 2 channels
Channel layout : M M
Sampling rate : 48.0 kHz
Bit depth : 16 bits
Stream size : 2.60 MiB (4%)
Language : English
Encoded date : UTC 2021-03-04 16:00:20
Tagged date : UTC 2021-03-04 16:00:20
Audio #2
ID : 3
Format : PCM
Format settings : Little / Signed
Codec ID : sowt
Duration : 14 s 181 ms
Bit rate mode : Constant
Bit rate : 1 536 kb/s
Channel(s) : 2 channels
Channel layout : M M
Sampling rate : 48.0 kHz
Bit depth : 16 bits
Stream size : 2.60 MiB (4%)
Language : English
Encoded date : UTC 2021-03-04 16:00:20
Tagged date : UTC 2021-03-04 16:00:20
Audio #3
ID : 4
Format : PCM
Format settings : Little / Signed
Codec ID : sowt
Duration : 14 s 181 ms
Bit rate mode : Constant
Bit rate : 1 536 kb/s
Channel(s) : 2 channels
Channel layout : M M
Sampling rate : 48.0 kHz
Bit depth : 16 bits
Stream size : 2.60 MiB (4%)
Language : English
Encoded date : UTC 2021-03-04 16:00:20
Tagged date : UTC 2021-03-04 16:00:20
Audio #4
ID : 5
Format : PCM
Format settings : Little / Signed
Codec ID : sowt
Duration : 14 s 181 ms
Bit rate mode : Constant
Bit rate : 1 536 kb/s
Channel(s) : 2 channels
Channel layout : M M
Sampling rate : 48.0 kHz
Bit depth : 16 bits
Stream size : 2.60 MiB (4%)
Language : English
Encoded date : UTC 2021-03-04 16:00:20
Tagged date : UTC 2021-03-04 16:00:20
Other
ID : 6
Type : Time code
Format : QuickTime TC
Duration : 14 s 181 ms
Frame rate : 59.940 (60000/1001) FPS
Time code of first frame : 00:00:00;00
Time code, striped : Yes
Language : English
Encoded date : UTC 2021-03-04 16:00:20
Tagged date : UTC 2021-03-04 16:00:20
G
Trial vs Paid
Demo/Trial accounts are limited to 14 days, one concurrent job, up to 25 videos, only 1 minute of video will be processed with a watermark.
If you decide to add a credit card, we will charge you monthly or when your total cost exceeds $20 whichever comes first. At the end of your billing term we will round any fees up to the nearest cent $0.01. All prices are in United States Dollar or USD.
We have three options, billed monthly based on what you use. Billed annually at $10 per month get a 25% discount.
Industry standard Stripe.com handles all of our billing and payments. Industry standard auth0.com handles all user account information.
Minimum cost is $0.01 per video.
Videos that fail to get processed will not be charged.
Delta is an additional cost that will be added to the video size and format above. If your video bandwidth is higher than 25,000Kbps there will be an additional fee, although 20,000Kbps is good for 4K with 5.1 surround. Please note setting video bandwidth to 25,000 and audio to 256kbps would exceed 25,000. A better setting would be to top out video at 24,000Kbps and use any audio setting.
Beyond the Enterprise Plan you might want to consider igolgi hardware solutions for your organization. Streamengine is based on iLux File and Blazar products.
While we can compress videos to Dolby format audio you will need a separate license from Dolby to broadcast or stream Dolby content. Click to learn more about Dolby Audio Licensing
Using Tar
Some of the professional options of StreamEngine allow you to create several to thousands of video files, for these options we recommend using tar (tape archive) or adding all files to one big file which can be compressed. tar.gz is the compressed version of tar tar.gz which is similar to windows .zip files. Most versions of Windows support tar and newer versions support tar.gz, however, windows tar is only accessible in from the command line. There is a free open source tool called 7 zip which can be downloaded as well.
Selecting Tar as an options
Save as tar, tar is a compressed file similar to zip but for Linux, macOS and Windows 11 update 23H2 or higher. You can open a tar file in Windows 10 using command line or you can use a third party app like free opensource 7-zip found at https://www.7-zip.com .
Tar on Windows
On Windows 10 & 11
1.) Search for cmd
2.) Select Run as Administrator
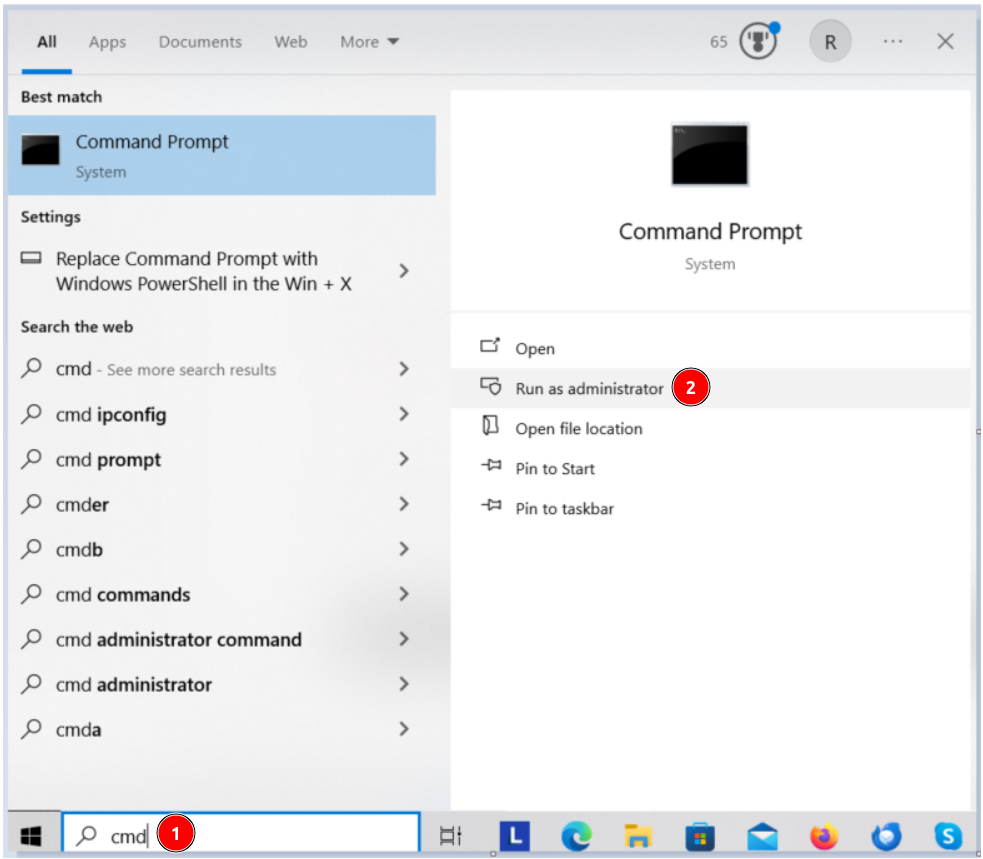
You may get a popup windows asking "Do you want to allow this app to make changes to your device?", if so click Yes.
A command window will popup, navigate to the directory where the tar file is.
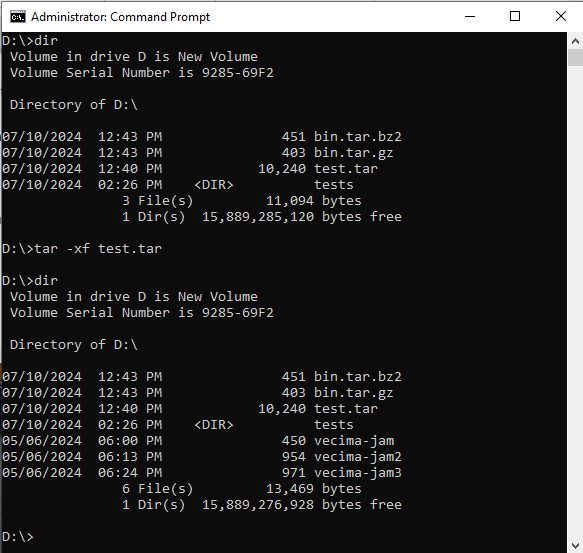
Then run tar -xf tarfilename.tar and it will extract the file into the current directory.
In the example in the image above we ran tar -xf test.tar and it extracted 3 files from the tar file and put them in the current directory.
7-Zip on Windows
1.) Search for 7-zip
2.) Click to download it
3.) Optional - Read more about 7-zip
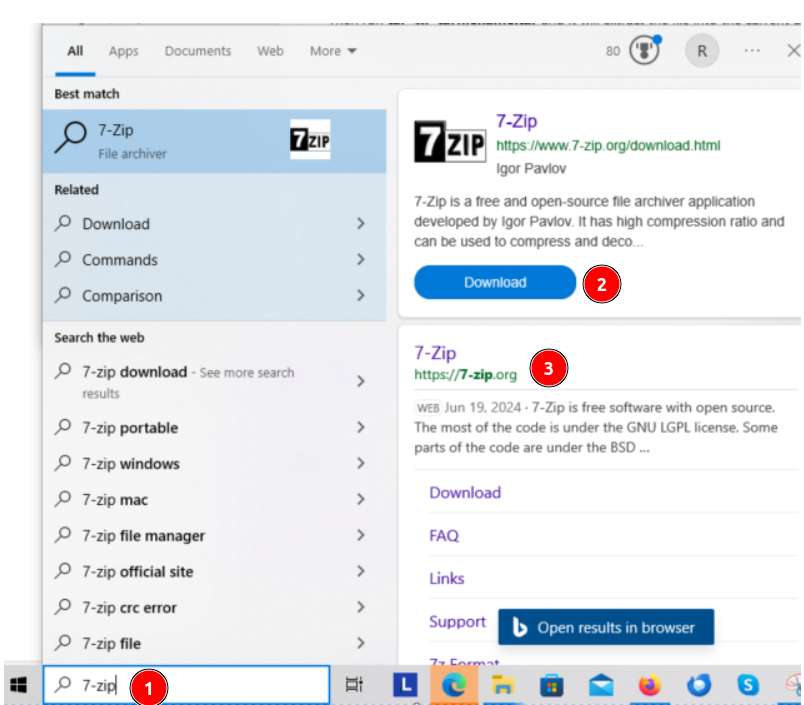
Troubleshooting
If you get an error
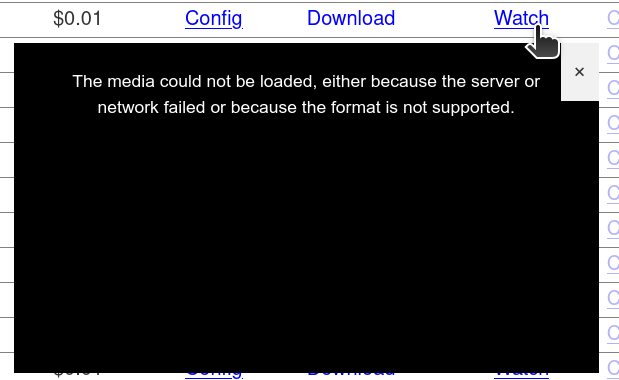
On the job history page you may see this error .... It is possible to use a video codec with streamengine that you do not have loaded on your computer, its also possible that your browser does not know how to play the video. It's usually HEVC/H.265 that may be causing this issue. HEVC/H.265 may require licensing some operating systems license it and some 3rd party player or video editors may license it as well. Use a Google or your favorite AI tool to search on how to get HEVC installed on your computer or browser. When searching for errors it is best to be as specific as possible I can't play an H.265 video in Firefox v128 on Ubuntu 22.04.
Also clicking on "Config" might give you clues as to what might be causing the playback problem. The project was a success but the video won't play in the browser. So the video file is good and you can click to download it and play it in a video player that supports the codec. Although the video does not play in the browser so let's look for trouble shooting clues. The video is on oci which is the oracle cloud and igolgi's temporary storage. The audio codec is 'aac' which is pretty standard, the output container is mp4, but the video codec is HEVC which needs to be licensed. Some computers and some browsers may be licensed and most mobile devices.
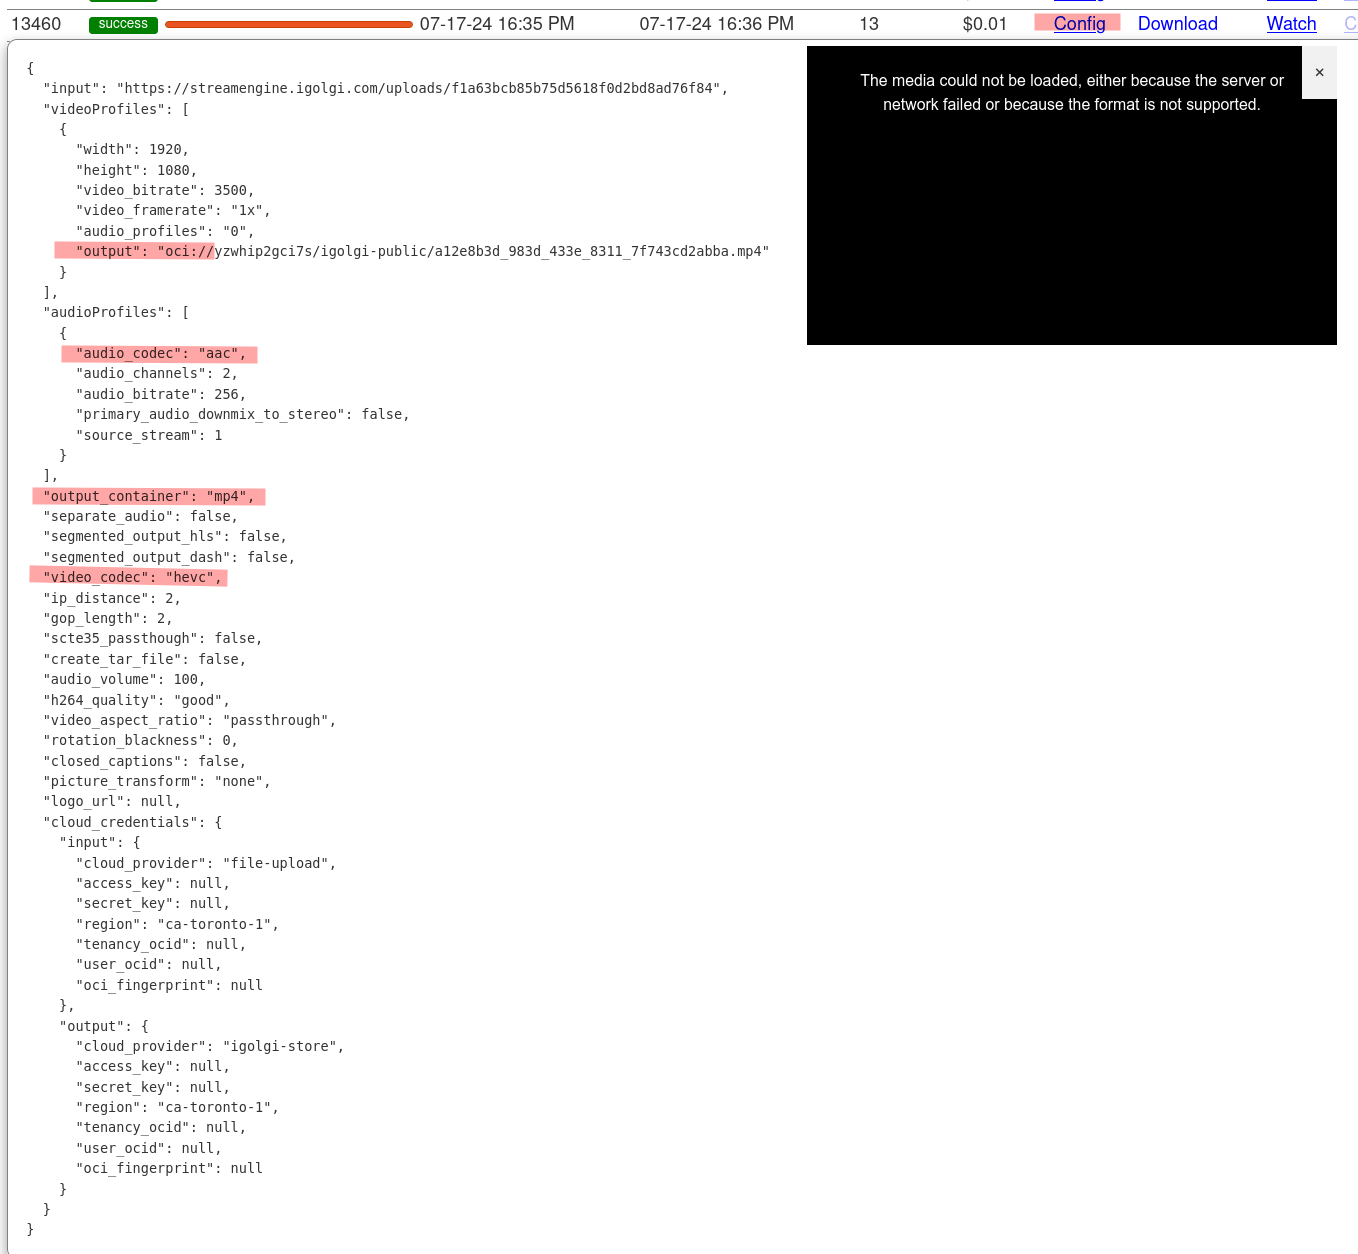
About Us

igolgi History - About Us
Founded in 2008 by Jeff Cooper and Dr. Kumar Ramaswamy
igolgi is an engineering and development company. Our engineering staff has years of experience in every type of compression encoding and transcoding technology, and we are experts in software control and interface. Our principal engineers hold over 200 patents in compression related projects. For over a decade we have provided innovative, flexible, and high-quality solutions for the broadcast, cable, LPTV and government markets.
igolgi serves customers world-wide with all design, manufacturing, and support facilities located in the USA.
Any other wiz bangey facts, products, customers etc?
Offices in Princeton, NJ, Barrington, IL, Barcelona, SP
StreamEngine is based on igolgi custom iLux File hardware
As your StreamEngine use grows at some point you might want to consider adding iLux File to your local network.
iLux | File - Convert File Based Content to Linear or Adaptive Bitrate Formats
Effortlessly convert studio masters with igolgi’s iLux File processing platform, designed for superior video quality and minimal bandwidth usage. Integrated with asset management and storage solutions, iLux File ensures seamless, scalable, and reliable file-based video processing and publishing. Experience unmatched efficiency with robust failsafe mechanisms, flexible scheduling, and comprehensive management tools for uninterrupted operations.
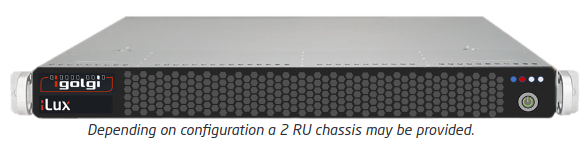
iLux | Broadcast - Advanced ATSC 1.0 Encoding Platform
Experience unparalleled broadcast quality with igolgi’s iLux | Broadcast, the ultimate ATSC 1.0 encoding solution. Featuring top-tier MPEG2 Encoding and flexible interface support, iLux effortlessly scales to meet your HD and SD channel needs. With comprehensive features like EAS integration, CALM audio control, and dynamic PSIP, iLux ensures superior video quality and reliability at the best price.
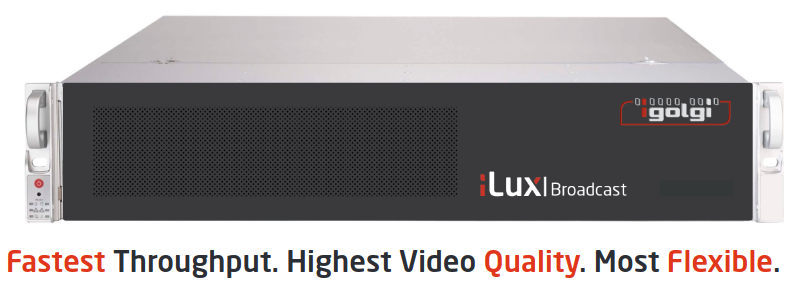
iLux | ATSC 3.0 - NextGen Pro Encoding Platform
Simplify ATSC 3.0 deployment with igolgi’s iLux Broadcast NexGen Studio Platform, integrating encoding, signaling, delivery services, and broadcast gateway. Support up to 8 HD streams, deliver DASH-packaged streams, and integrate essential services like Electronic Service Guide and emergency announcements. With exceptional video processing, advanced algorithms, and a unified user interface, iLux offers the highest quality, most flexible solutions at the best price, all designed and supported in the USA.

iLux | XScale - Mixed H264 & MPEG2 Increase Density up to 24 Channels
Unlock double the channel capacity with igolgi’s iLux ATSC 1.0 XScale, a versatile encoder supporting H.264 and MPEG2. Seamlessly mix and match MPEG2/H.264 channels for unparalleled video quality and expanded channel support. XScale ensures effortless configuration and superior performance, offering complete ATSC 1.0 broadcast solutions at the best price point.
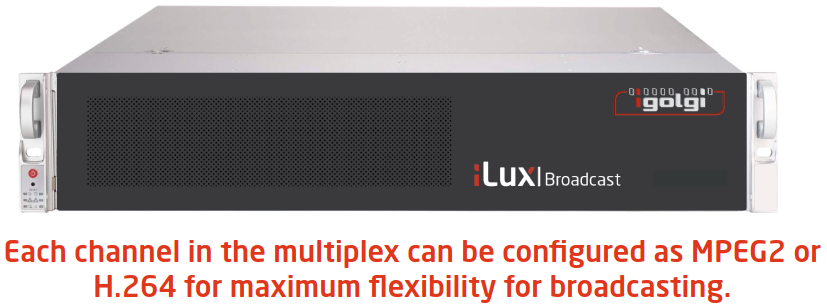
iLux | Mini - Low Power TV Broadcasting
Experience exceptional low-power TV broadcasting with igolgi’s iLux | Broadcast Mini, a compact, high-quality, and cost-effective ATSC 1.0 encoding solution. Designed for the ATSC Repack, it supports up to four HD/SD programs with superb MPEG2 encoding and flexible interface options. Featuring complete broadcast station solutions, including Program Guide, EAS integration, and dynamic audio control, iLux Mini ensures optimal video quality and seamless scalability at the best price.
iLux | Live - Live Transcoding
Simplify live video encoding and transcoding with igolgi’s iLux-LIVE, offering top-notch video quality and ultra-dense, low-power hardware. Supporting up to 160 HD channels per 1 RU and the latest codecs (H.264, HEVC, AV1), iLux-LIVE ensures outstanding video at minimal bit rates. Trusted for over 15 years, this versatile, software-defined platform features easy setup, advanced encoding technology, and seamless integration with third-party packagers for a future-proof, cost-effective solution.

Blazar - Just-in-Time High Speed Transcoding up to 100x Faster
Streamline your transcoding workflows with igolgi Blazar, designed for high-speed bulk transcoding, just-in-time transcoding, and live dynamic ad insertion. Blazar offers exceptional speed, converting a two-hour movie in just one minute, and supports on-the-fly ABR profile generation. Its scalable architecture and proprietary software ensure unmatched video processing and flexibility, making it perfect for SVOD and cloud DVR applications.